Showing posts with label foiling. Show all posts

Saturday, 27 February 2016

Vintage Rose 'with Love' card - Moroccan Spice & Gold Foiling


Hello, welcome to another Blog post and time to share another of my Trimcraft DT makes with you.  I do love those vibrant warm colours in the First Edition Moroccan Spice papers and thought the orange would look great for a vintage style with some gold foiling using the First Edition Foiling products.  


I rolled a simple rose from the papers to accent the sentiment.  The edges of the papers have been distressed and inked with an orange ink to complement the papers and gold colours.

Step By Step:
  1. From the Moroccan Spice 8x8” paper pad cut green paper to measure 6 ¾” x 4 ¾” and orange textured paper to measure 6 3/8” x 4 3/8”.  Distress edges with scissors and then ink around with orange ink.  Mat orange paper onto green paper centrally using double sided tape to adhere.
    From the Moroccan Spice 6x6” paper pad cut green paper to measure 5” x 3” and green pattern paper to measure 4 ½” x 2 ½”.  Distress edges and ink as before, mat smaller piece onto larger piece with double sided tape.
  2. Using a 5 x7” Kraft card blank with the fold across the top, adhere larger mat centrally onto card front.  Add smaller mat at an angle.
  3. To create rose, cut a circle of orange double sided paper (Moroccan Spice) and cut into it to create a spiral, then roll up starting from outside edge.  Secure rose with glue at the bottom and press into place to dry.
  4. Using the FE Foliage die set, die cut 2 large leaves from the green paper, pass through your die cutter again with a rubber mat to emboss the veins.
    Add gold foiling to leaves and rose by applying the FE Foil Transfer Glue and leave to become tacky, then place the foil on top and press and rub firmly before lifting the foil. 
  5. To create the foiled sentiment, die cut ‘With Love’ (Modern Sentiments set) using the FE Foil Applicator Foam.  (I find it easier to peel the backing and adhere the foam to white card before die cutting).  Remove paper from die cut and place gold foil on top, pressing down as before to transfer the foil onto the sentiment.
  6. Cut an oval of orange card (I used the oval waste from the frame in the Belle & Boo die set) distress and ink edges of oval before adhering to panel on card front.  Glue foiled sentiment on top.
    Glue rose and 2 leaves to top left of panel, bending and shaping the leaves first before gluing in position.
  7. To finish I die cut a flourish from the FE Doily die set and cut it in half, inking in orange ink and then tucking 1 piece to top left of panel and 1 piece to bottom right, gluing in place before adding 2mall orange adhesive gems to flourishes and 1 larger adhesive pearl to centre of rose.(Dovecraft).


    Products Used:
    First Edition 8x8 FSC Paper Pad Moroccan Spice
    First Edition 6x6 FSC Paper Pad Moroccan Spice
    First Edition Dies - Foliage
    First Edition Dies - Sentiments Modern
    First Edition Dies - Doily
    First Edition Foil – Gold
    First Edition Foil – Foam
    First Edition Foil Glue
    Dovecraft Kraft 5"x7" Cards & Envelopes

    All products used are from +Trimcraft Ltd and this project also appears in my Trimcraft Design Team Gallery link here: http://www.trimcraft.co.uk/projects/121434/vintage-rose-card-with-first-edition-moroccan-spice-papers-and-gold-foiling


Friday, 22 January 2016

Accordion Heart Card


I've made a few bright modern cards recently so this time I thought I would re-visit a more muted, distress, vintage style and the First Edition 'Falling Leaves' are perfect for this style of crafting.  For this project I have distressed, inked, foiled, stamped and heat embossed.

I also quite like paper folding and find accordion folds very relaxing to make with their concertina style, this time I thought I would try making a large heart and found a few templates online, one of  which I have shared with you (hopefully you can understand my notes on it).

I also love the FE Foiling and, as I don't have the machine just yet, I have been experimenting using the other methods like the Foil Transfer Glue which I have used in this project.

Step By Step:
  1. Cut a rectangle of pale patterned paper from FE Falling Leaves pad to measure approx. 6 ¾” wide by 4 ¾” high.
    Using the ‘Always in my Heart’ clear stamp (Willow) and a clear embossing pad, stamp the sentiment over the paper randomly.  Sprinkle stamping with clear embossing powder and emboss with a heat gun.
    Distress the edges of the paper using the edge of your scissors or a distressing tool if you have one. 
    Ink around the edges using a pale brown ink allowing some of the ink to blend onto the paper to highlight the stamping in places.
  2. Next apply FE foil transfer glue in random squiggly lines around the edge of the paper and leave to dry for a few minutes.  When glue goes clear it is ready to add the foil, so take the FE gold foil and press against the raised glue lines, rubbing and smoothing to apply
  3. Using a red brown ink, stamp the sentiment onto the pale dotted paper (Falling Leaves), sprinkle with clear embossing powder and heat emboss with the heat gun.  Cut out sentiment into a rectangle shape and distress, ink and add gold foiling to match the base paper.
  4. Adhere brown organza ribbon (Willow) across the lower part of paper panel and add lace ribbon on top, securing the ends on the reverse of the paper.
    Take paper doilies (Sweet Paris) and position so that they overlap the paper panel at top left and side right, adhering on the back.
    Attach paper panel to a 5 x 7” Kraft card in landscape position (with the fold along the top)
  5. Create an Accordion / Rosette heart shape (see template above) using the knit / textile patterned paper from the Falling Leaves pad.  Scoring and folding both strips in a concertina pattern and gluing the ends to form a loop, add glue to a circle of card and press down squeezing the shape together to form a heart shape. 
    Ink around the edges of the heart with the brown ink.  Add FE foil transfer glue randomly to the raised folds of the heart, allow to go clear, then apply FE gold foil as before.
  6. Attach rosette heart at an angle to card front using 3D foam pads.  Thread a wooden heart button (Sweet Paris) with jute twine and tie in a bow, trim ends and fray the twine, then add button to centre of rosette heart.
    To finish, take 3 square plastic buttons (TTT) and thread with jute twine, trim ends and fray before attaching buttons in a row to bottom of card at RH side.

Tuesday, 12 January 2016

Hello!!

Hello!!  and welcome to another Blog post!!  Today I'd like to share this simple modern style card with you.

I do love using my First Edition die sets and there has been some really great additions to the range lately (and more on their way). I really like the Modern Sentiments set, the hello speech bubble is so ‘on trend’ right now and whilst checking out the new Grace Taylor papers I spotted the perfect paper to match the die, so here’s another card that ‘just had to be done’.

The chalkboard style paper works well for a monochrome colour scheme, but I felt it really came alive with the ‘pop’ of red from the glitter card and foiling.  It’s a simple make but a modern and fun way to say hello, add a few hearts and it could be a Valentines card too.


Step by Step Tutorial:
  1. Cut 5 ¾ “square of Chalkboard Speech patterned paper from the Grace Taylor Sherbet Sky pack.  Adhere to 6” x 6” square card front using double sided tape. (I like the fold along the top).
  2. Apply strips of double sided tape full length across the card front, 1 across the top and 2 across the bottom.  Trim flush with card edges. Remove red backing from the tape one at a time, and then apply FE Red Foil and press onto the sticky tape and rub with fingers smoothing the foil across the whole strip, remove foil sheet to reveal a red foiled stripe.  Do the other tape strips the same, one at a time so it keeps the sticky fresh and ready for foiling. 
  3. Take the ‘Hello’ speech bubble die from the FE Modern Sentiments set and cut from white card.  Glue die cut shape to Dovecraft red glitter card and press down to ensure its stuck.  When dry trim around the die cut leaving a small border showing.  Attach to card front using 3D foam pads.
  4. To finish add a few red and black sequins (Sweet Paris) to the card front using glue to adhere.  I used a combination of small and large sequins to add extra interest.
Materials List: 
  • 6 x6" White Card Blank - Dovecraft
  • Grace Taylor 'Sherbet Sky' 12x12 paper pad
  • First Edition 'Sentiments Modern' die set
  • A4 Glitter Card Ruby (Red) - Dovecraft
  • First Edition Foil in Red
  • 6mm Permafix Tape - Dovecraft
  • 6mm Double Sided Tape - Dovecraft
  • small 3D Foam Squares - Dovecraft
all materials from +Trimcraft Ltd  and the project can also be seen in the Trimcraft DT Gallery link here: http://www.trimcraft.co.uk/projects/121025/hello-card-with-grace-taylor-sherbet-sky-first-edition-foiling
 

Friday, 8 January 2016

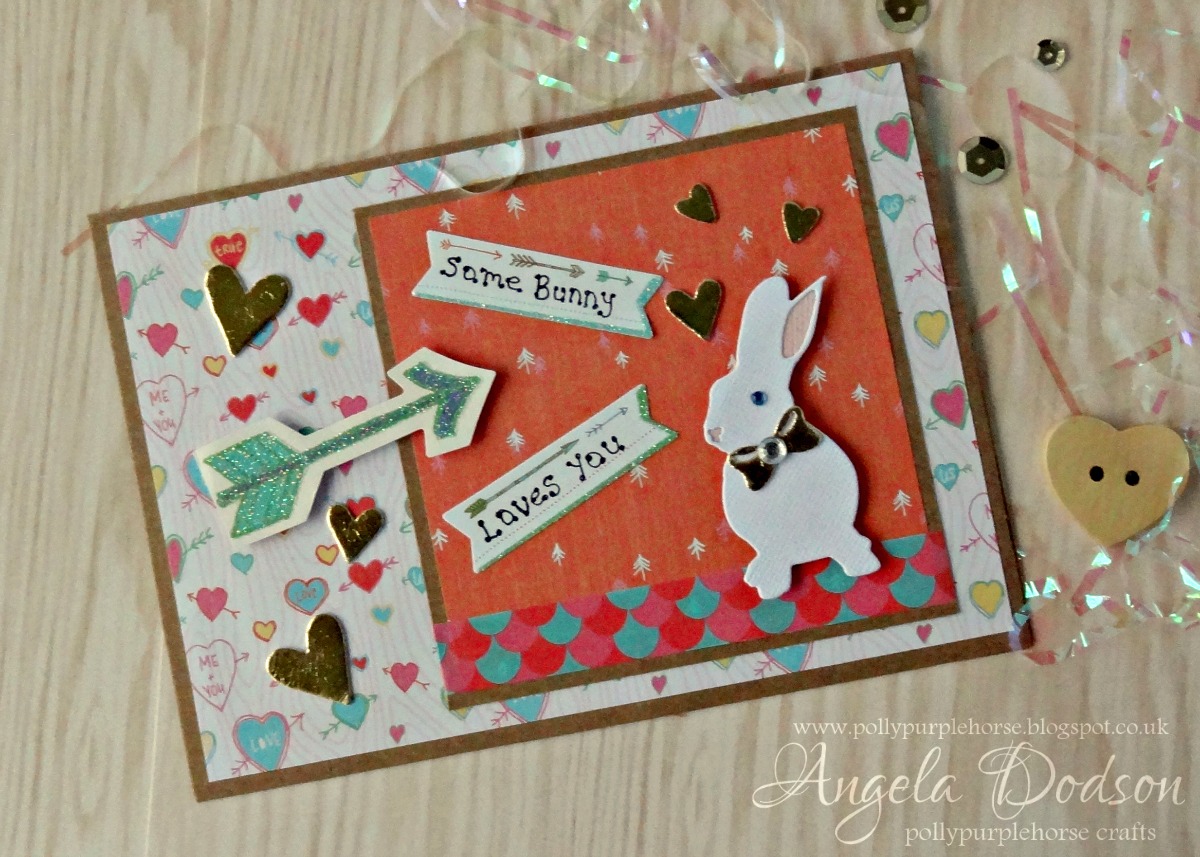
Some Bunny Loves You!!


How cute is the new Grace Taylor Forest Friends collection from +Trimcraft Ltd , I couldn't resist teaming them with the cute bunny from the new First Edition Animal Die set to create a Valentines card.   I also had fun playing with the Gold Foiling and adhesive foam sheets.  (If you've not tried foiling then give it a go, you can still get great results if you haven't got the applicator machine, all my foiling is done with the adhesive foam on this project)

The Forest Friends collection is perfect for card making as well as scrap booking as it has lots of lovely embellishments such as the fun sticker book , shaped paper cuts and washi tape.
 
 
Thank you for popping by and I hope you will join me again as I have another card to share with you later :)