Showing posts with label design space. Show all posts

Wednesday, 23 August 2017

A Papercut Style Heart Wedding Card - Papermilldirect DT


Hello, today I'm going to share a recent Wedding card design idea with you.  I love to use Papermilldirect White Linen card not only for it’s lovely texture and the luxury look it gives, but also because it cuts beautifully on my Cricut Explore.  I needed to make a Wedding card with a lemon and white combo so I choose the PMD Pastel Canary card to partner the linen card centrepiece.

Step By Step.  
The design of the card is based around a papercut style heart, I used a heart shape from Design Space and adapted it by welding in some shapes to close some of the open spaces and make it easier to mount onto it’s backing. (The Design Space images I've used are shown at the end of this post)


Mount the White Linen papercut heart onto it’s Pastel Canary backing shape using 3D foam pads and decorate with adhesive pearls and clear gems.  Prepare an 8x8 white card base by adding a mat and layer of embossed white card onto Pastel Canary using d/s tape.  Affix decorative heart to card front using d/s tape and clear drying glue.


Attach a panel of Pastel Canary card inside the card and add a panel for the greeting.  I have cut another heart from smooth white card and used my Cricut to write ‘On Your Wedding Day’ upon it.  I have also added a die cut Wedding Cake and 2 Champagne Flutes using die sets.


Cut the centrepiece heart panel from White Linen card and add to it’s Pastel Canary backing shape using 3D foam pads.  (I have personalised the centre heart by slicing the words into the shape using a Cricut Font, you could use the write function if you prefer?) Decorate heart with small adhesive gems and then add to card front.


Add other decoration to card front if desired, I have added a bride and groom die cut from White Linen card using a FE Wedding Die set and mounted using 3D foam pads.


Add personalised layered hearts to bottom left and bottom right. I have used my Cricut to write ‘Mr&Mrs’ on one and the Wedding date on the other. To finish, add a trio of paper flowers using sticky dots, twirl the wire stems if they have and arrange as desired.  I used a ready-made white box to hold the card and decorated it with a personalised layered heart and a paper flower to match,
Angela x

Products Used:
White Linen Card – Papermilldirect
Pastel Canary 160gsm – Papermilldirect
Smooth White Card – Papermilldirect
Wedding Die Set – FEDIE042 - First Edition
Congratulations Die Set – DCDIE038 – Dovecraft
6mm Adhesive Pearls – SCDOT045 – Simply Creative
3mm Adhesive Clear Gems – SCDOT017 – Simply Creative
Adhesives: D/S Tape, Clear Drying Glue, 3D Foam Pads
Design Space Images used:


Wednesday, 26 July 2017

Romantic Gypsy Caravan Gift Box - Trimcraft DT


Hello, back with another catch up post, the First Edition papers are the perfect quality and weight for 3D paper crafting projects. I found the ‘Sweet Nothings’ papers perfect for this gypsy caravan gift box, with it’s romantic florals, soft spring colours and those fabulous wood pattern papers!  I have a video to show the caravan inside and out, link here: https://youtu.be/nxw_SIvG2yU


Step By Step:
This project has been cut on the Cricut Explore using Design Space images.  (Although I have cut this project on my Explore, a similar design could be made manually by adapting a box, shape the top sides and add a roof. Glue box onto larger card base and add wheels)
I chose the plain wood effect papers to construct the base of the box, as this was also double sided with a lovely rose print for the inside of the box.


The main top body of the caravan using the matching wood effect paper that has the rose pattern on it, which gives the appearance of stencilled flowers on the caravan.

For the wheels I cut an extra set to double them up and give extra strength, this also gave the wheels a pink paper backing to match the front.
Wheels have been attached using little brads (or split pins) the heads are hidden behind the little hearts which have been glued onto the head of the brad after assemble.


I’ve kept the decorations simple but you could really have fun dressing this one up, perhaps adding trailing flowers, etc. I have used the solid roof for the caravan but you could you the slotted roof option that would allow little notes to be posted into the box, idea for weddings etc.
To see the project in better detail, I have a video link here: https://youtu.be/nxw_SIvG2yU
This project also appears in my Trimcraft DT Gallery link here: www.thecraftblog.com/inspiration/romantic-gypsy-caravan-gift-box

Products Used:
First Edition Sweet Nothings Papers 12 x 12 – FEPAD143
4 small brads or split pins
Cricut Explore
Cricut Design Space file free with access
Adhesives: Clear Drying glue, Perma fix tape,

Friday, 21 October 2016

Trick or Treat?


Hello, I'm back to share an easy Halloween make I created for the Papermilldirect Design Team.  I’m teaming the fun colorflute card with black cardstocks for a traditional orange & black Halloween colour scheme.

I created a file in Cricut Design Space (link here: https://us.cricut.com/design/#/canvas/45482082 ) to cut from Papermilldirect Black Smooth card, this is a lovely 250gsm weight and cuts like a dream on my Explore.  I cut the cobweb frame, Trick or Treat words and bats from the 250gsm card.
Adhere black cobweb frame onto a sheet of PMD Mandarin Orange Colorflute card.  I used a strong permafix tape for all 4 sides and some dabs of clear drying glue for the webs parts, pressing down to ensure adhesion.  Trim orange colorflute card to give a small border around the black frame.


Glue wording to sign using clear drying glue.  An easy way to line them up is to use the waste from your cut out as a template to adhere your letters through, when letters are glued carefully lift template away.
Glue bats as desired around ‘Trick or Treat’ sentiment.  You can also resize the bats or cut more if required to create your own layout.  Add eyes with a white gel pen.
Papermilldirect’s Extra Thick Charcoal Black card at 550gsm is the perfect weight for a backing to this sign, sturdy but easy to punch 2 holes into using a hole punch.  Use a combination of d/s tape and glue to adhere sign to backing.  Tie black and orange ribbons through the holes to finish and you have a Halloween Sign all ready to display.


I love the texture of the Colorflute card, it is easy to cut on my paper guillotine and the colours are bright and eyecatching, I've used the Mandarin Orange for this design but there is also a Lime colour perfect for Halloween makes too.
If you don't have a Cricut to use the file to cut, you can still make your own Halloween designs using the colorflute card and Extra thick cardstock, just die cut lettering or adhesive stickers for the greetings, bats are easy to cut out or try dies or punches, don't forget to share what you make over on the +Papermilldirect  facebook page.

Products Used:
Extra Thick Charcoal Black Card 550gsm – Papermilldirect
Black Smooth card 250gsm – Papermilldirect
Mandarin Orange Colorflute Card – Papermilldirect
Design Space File for Cricut Explore Link: https://us.cricut.com/design/#/canvas/45482082
Adhesives: Perma Fix Tape or D/S Tape, Clear Drying Glue,
Black & Orange ribbons, White gel pen
 

Friday, 23 September 2016

Mirabelle ‘Waiting’ Bow Card – Santoro Mirabelle collection -Trimcraft


Hello, Sharing a +Trimcraft Ltd  Design Team project with you today.  The characters in the new Santoro Mirabelle collection are simply stunning, I particularly love the stamps and for my first stamped design I chose the ‘Waiting’ character.
For the bow on the front, I created these templates on my Cricut Explore in Design Space (followers of my Blog and Facebook page can message me for the file link) or you can create your own bow shape using loops of double sided Mirabelle paper or use a template if you prefer.


 Step By Step:
  1. Score & fold white card to create a card base measuring approx. 8” x 5 ¾” in landscape position.  From the 12x12 Mirabelle paper pad, cut rose patterned paper to cover the front panel, inking around the edges with a brown ink before attaching with d/s tape.
  2. Cut a smaller rectangle approx. 6 ½” x 4 ¼” of grey patterned paper, ink with brown ink and then adhere to card front using d/s tape (positioning this panel more towards the top of the card).  Tape a length of Mirabelle ribbon to just go over the edges of the card front, fish tail ends, and then glue in place along the bottom of the smaller paper panel.

  3. Cut the Bow parts from double sided Mirabelle papers, pink rose for the top box and brown stripe for the bottom bow.  Again ink all cut edges with brown ink and then bend and glue the loops into place onto the card front.  Add 2 bow tails.
  4. Stamp the ‘waiting’ girl character onto white card using brown ink and colour with First Edition markers.  Add extra highlights with a white gel pen and edge around the image with a light grey marker pen.

    When complete, glue a frame around her (from Decoupage pad) and trim card flush with edges.  Apply a little brown ink coming into the white around the girl from the edges of the frame.  Adhere stamped image to centre of bow on card front using layered 3D foam and a dab of glue.
  5. Cut satin ribbon (from Mirabelle Satin Tags) into 2 different size lengths, fish tail 1 end of each piece and add to card front at each side of card front, coming down from the top.  Add a Glitter glue dot to the end of each.  Add the satin tag ‘Just for you’ across the stamped image and onto the bow at RH side.
  6. Take 2 green leaves (Simply Creative) and a Mirabelle yellow rose, ink the rose with brown ink and assemble with the leaves at bottom RH corner of card.
    To finish add a Pearl Charm to top left of card and 3 glitter dots to bottom left.
 Products Used:


First Edition Twin Markers - Browns

Sunday, 1 May 2016

'Lovely' Floral Card - A Step by Step Tutorial


Hello I'm back again with another Step By Step Tutorial for you.  This week the Papermilldirect Design Team are working on the theme of ‘Floral’ and I have a little card design to share featuring a layered Daisy.
Most crafters have flower dies and sentiments in their stash, along with background dies or embossing folders, so although I used my Cricut Explore (link at end of post) to cut the Daisy flower, it is easy to layer up any of your flower dies or use a flower template or even ready-made paper flowers for a floral make.
Die cut a trellis style design from Papermilldirect White Pearlised cardstock using a Spellbinders die.  (You could use an embossing folder if you prefer).  I didn’t need all the piece and so trimmed it down to less than 4” using the pattern as a guide to leave a fancy edge.
The card base is cut from PMD Marine Blue and measures approx. 5 ½” x 4 ¼” and I have rounded the bottom corners.  I also cut a panel of PMD New Lilac card to measure approx. 4 ½” x 4” and rounded all 4 corners.
Glitter glue was used to edge the front of the card base and also the New Lilac panel to add a little sparkle.
The Trellis die cut panel was then adhered to the lilac panel using a clear drying acylic glue and then the whole panel was mounted onto the card front using double sided tape.
Cut the flower layers, I used 3 layers to create a daisy style flower using Papermilldirect White Pearlised paper, layering the flower with 3D foam in the centre of each layer. Shape the petals and then glue the flower to the card front, adding some glitter glue in the centre and a yellow enamel adhesive dot. Cut leaves from PMD Spring Green card and shape to give dimension. Add a little 3D foam pad to the back of each leaf and glue the stem by tucking under the flower, the 3D foam pads will hold the leaves in place.

Die cut your sentiment in PMD Black card and PMD Marine Blue Card.  I have used the word ‘Lovely’ from a First Edition die set.  Layer the sentiments up using a clear drying glue, offsetting the Marine Blue one so that the black gives a shadow effect.
Glue the sentiment in place on the card front and smooth down using a bone folder or crease tool to ensure it is adhered onto the trellis work.  To finish add a little butterfly embellishment.

Using the Papermilldirect Pearlised card and paper adds a lovely sheen to your makes and I especially like the paper for diecutting flowers as it gives a delicate look that can be easily shaped yet retains a lot of strength. It also is a dream to cut on Cricut Explore where it cuts very cleanly.

Materials Used:
Marine Blue, New Lilac, Spring Green, Black coloured cardstocks – Papermilldirect
Ultra White Pearlised Paper, Ultra White Pearlised Card – Papermilldirect
My Design Space Link (for card base, Daisy & Leaves) - https://uk.cricut.com/design/#/canvas/39473641
‘Fancy lattice’ Shapeabilities #S5-152  - Spellbinders
‘Modern Sentiments’ #FEDIE038 – First Edition
Adhesives:  D/S Tape, 3D Foam Pads, Cosmic Shimmer Glue
Glitter Glue, Adhesive Enamel Dot


Tuesday, 1 March 2016

Happy Mothers Day Floral Wreath Card


Hello I'm back here to share a Mother’s Day card with you.  This week I’m using a variety of coloured cardstocks from Papermilldirect’s lovely colours range, and teaming it with ‘Coniston Blue’ which is this week’s  +Papermilldirect Special Offer card.  If you're quick you can grab a small box for just £4-40!!  This is for 75-80 A4 sheets of premium quality 300gsm, a bargain!!

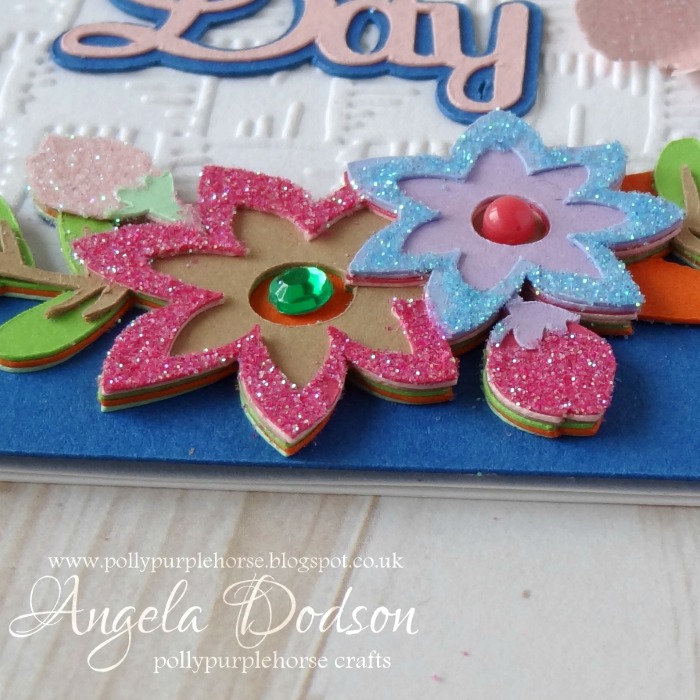
I cut this layered floral design on my Cricut Explore using images free from within the Design Space subscription. (I know they've changed the name to Access now :D ) If you would like to cut it exactly as I have, the link to my DS file is here: https://uk.cricut.com/design/#/canvas/37189424   I have sized it to fit a 6x6 card but you can of course adjust the size to suit your requirements.


If you don’t have a Cricut then why not use the coloured cardstocks as inspiration to die cut or punch a variety of flower shapes and leaves to form a wreath shape onto a card front.  I am using the ‘Coniston Blue’ as the backdrop and shadow for my ‘Happy Mother’s Day’ sentiment, as it is the perfect shade of blue to set off those lovely bright colours.
The flowers and leaves in my design are very dimensional and this is simply by layering up the shapes and gluing them on top of each other, using a wet clear drying glue such as Cosmic Shimmer allows some ‘wriggle time’ to line them up and not leave any glue marks.


For the Plain White Card panel I have embossed it with a Basket Weave effect embossing folder through my Big Shot to add some extra detail and texture, but it could also be left plain.  The card blank is also PMD Plain White card.
To add some extra sparkle I applied some of the Nuvo glitters by first using the Nuvo glue pen on the area to glitter and then sprinkling the glitter onto it from the bottle, when dry you can gently tap the excess off and pop it back into the bottle.   (I used a small clean paintbrush to gently brush away any stray glitter afterwards)


You can add different adhesive gems, pearls or enamel dots to the centres of the flowers to make them ‘pop’ and / or add some die cut butterflies as I have done here to accent the sentiment.
Although I designed this one as a greeting card, it would work well mounted in a little box frame too, perhaps as a Mother’s Day Gift?  You could even use different sentiments in the centre or perhaps a photograph to make it an extra special gift.


Materials Used:
Papermilldirect - Coniston Blue ‘offer card’
Papermilldirect - Plain White card
Papermilldirect Coloured card - Pale Turquoise, Marine Blue, Apple Green, Spring Green, Baby Pink, Raspberry Pink, New Lilac, Buff, Orange
Crafters Companion – Basket Weave Embossing Folder
Nuvo Glue Pen – Tonic Studios
Nuvo Pure Sheen Glitter – Candy Pink, Aqua, & Diamond – Tonic Studios
Adhesive gems, pearls, enamel dots
Double Sided Tape, Cosmic Shimmer Acrylic Glue


Wednesday, 24 February 2016

You make my Heart so very Happy


Hello I'm back to share another make with you, this one is a DT project for Trimcraft.  I’m in love with these gorgeous First Edition Love Story papers from +Trimcraft Ltd .  

The canvas and wood effect papers and a theme of love gave me the idea to create a little Birdhouse shaped card.  This could be a Valentines or Anniversary make or to send to someone ‘just because’.  

I created the card shape using my Cricut Explore but you could easily cut a simple house shape by drawing in pencil onto a card blank and cutting with scissors or craft knife and decorating as you wish.

Step By Step:
  1. I designed and cut the birdhouse and 2 birds on my Cricut Explore using Design Space subscription, I can share my DS link with you here: https://uk.cricut.com/design/#/canvas/36107737  Which will give you access to my design file so you can cut everything as I have done, all is sized ready for you to load the mats and just press ‘go’.
  2. Using Dovecraft A4 Kraft Card I cut 2 identical pieces to form the front and back of my card base. (Scoring a short way down the back piece and folding before adding glue above the score line creates the join, you may prefer to do this after the front papers are on ).
  3. I cut an extra front card piece from FE Love Story checked pattern canvas effect paper and adhered to Kraft card front.  Inking edges with red ink and then black ink to add definition.  I then cut the smaller front panel from Love Story Wood effect paper inking the edges as before and adhering to card front
  4. I cut 2 roof section parts from brown arrow patterned paper in the Love Story pad, inked with red and black inks as before and then added to card front using 3D foam pads to layer up both sections to create height.
  5. The heart sentiment ‘You Make my heart so very happy’ was cut out of the Love Story papers, inked around as before and then edges in Dovecraft ‘crystal’ glitter glue.  When dry it was glued to card front towards the top of the birdhouse.
  6. I cut 2 birds from heart patterned paper.  Each bird consists of 2 layers and I inked around all the parts using red ink and black ink as before, adding extra black to colour the beaks and legs. This time also outlining with Dovecraft glitter glue in ‘Crystal’ to add extra sparkle.  When dry I shaped the pieces in my fingers and layered up using 3D foam pads.  I added 1 bird (flying) to top of birdhouse allowing wings & beak to overlap, and the other bird (with legs) to bottom RH side of birdhouse allowing the tail to overlap.
  7. Using the FE Foliage Die set I cut 2 leafy fern pieces from floral pattern Love Story paper and die cut 3 small flowers using the FE Flowers die set.  Inked all pieces with red and black inks as before and shaping in my fingers to give some texture / movement before adhering to card front at bottom LH side.
  8. To finish I coloured 2 small clear gems with FE black marker for the birds eyes and added clear adhesive gems to centres of flowers, heart sentiment, and to decorate roof section of the birdhouse.
Products Used:
All materials are from +Trimcraft Ltd and this project also appears in my Trimcraft Design Team Gallery Link here:http://www.trimcraft.co.uk/projects/121410/you-make-my-heart-so-very-happy-first-edition-love-story-papers

Wednesday, 17 February 2016

A New Home Card with Forest Friends

I do love the cute Forest Friends collection from Grace Taylor and thought it would be fun to create a Mushroom or toadstool shaped New Home Card.  


I finally got around to using the cute Raccoon character from the embellishment sticker pack, but he's such a sweetie I may need to add more to my stash. :D  I have included my Cricut Design Space link below if you wish to cut exactly as I have or you could draw a template and cut by hand as it's a simple shape :)

Step By Step:
  1. I cut this design on my Cricut Explore and can share my Design Space Project link here: https://uk.cricut.com/design/#/canvas/36100306
    if you would like to make one the same, it is already sized for you. (You could also cut a simple toadstool / mushroom shape by drawing in pencil onto a kraft card blank and cutting paper pieces for the spots)
  2. I cut the largest shape, the card base from Dovecraft A4 Kraft card and cut it twice to create a front and back for my card.  (The back panel can be added later by simply scoring across it about 2” down and adding tape above this section before attached to card front)
  3. Using the pink card from the Dovecraft coloured A4 card pack, I cut the large base panel.  I added faux stitching all around using a white pen.  Edges were inked with a red ink and then Dovecraft glitter glue in ‘crystal’ was applied to add some sparkle.
  4. I used various pattern papers from the Forest Friends 12x12 pad to cut the layered parts.  Yellow for the under cap and the blue for the stalk.  Faux stitching with a white pen was added to each paper piece and all cut edges inked with red ink
  5. The spots were cut from white card and then embossed using the Santoro Willow embossing folder as the pattern reflects the shape on one of the papers I’ve used.  I then ink around with red ink allowing extra ink to come over onto the edges of the embossing to highlight it.
  6. All the pattern pieces were then glued in place upon the pink card shape, it has some lines to help you line it up.
  7. I chose letters from the Grace Taylor Forest Friends sticker book to spell out ‘A New HOME’ and added them to the card front.  A couple of the arrows were also added to point to the word HOME, and a little hedgehog sticker was applied to the bottom of the smaller toadstool mushroom shape.
  8. To finish a cute Raccoon from the Embellishment Stickers (Forest Friends) was added to the bottom of the card at RH side, positioned to be standing in front of the mushroom / Toadstool.
Products Used:
Grace Taylor Forest Friends 100 Sheet Paper Pad GS2743

Grace Taylor Forest Friends Sticker Flip Book GS2745

Grace Taylor Forest Friends Grand Adhesions GS2750

Dovecraft A4 Kraft Card DCBS103

Dovecraft A4 Premium Coloured Card DCBS75

SANTORO®'s Willow Embossing Folder SNEF002

Cricut Explore Machine PC2002435


All materials are from +Trimcraft Ltd  and this project also appears in my Trimcraft Design Team Gallery, link here: http://www.trimcraft.co.uk/projects/121368/a-new-home-card-with-grace-taylor-forest-friends-collection

Tuesday, 26 January 2016

Be Mine - Fun Valentine Gift Box Idea


Hello, the Papermilldirect DT have been busy creating all different kinds of gift boxes this week and I'm sharing a fun gift box idea for Valentine’s Day.  Although I have used my Cricut Explore to cut the box for this project, you could easily use the elements to decorate a plain box blank or score and fold a box similar and use heart shapes to decorate.
Cut box shape elements using my Design Space link here: https://uk.cricut.com/design/#/canvas/35853997
I have sized the box to fit A4 card all ready for you but you can easily change the dimensions if you wish.  (For those using earlier Cricut machines the box is from ‘Box It Up’ cartridge and also available free within the subscription images)  Cut the 2 side sections and lid from Papermilldirect White Hammered cardstock and the 5 red panels from Papermilldirect Post Box Red card.  Remember to pop the scorer into the holder if you want your machine to add the score lines for you.
Crease and fold lid along score lines, add glue or tape to inside of lid and adhere the red panel to show through the heart aperture.  Glue tabs to assemble box lid.
Crease and fold along score lines for the 2 box side sections, glue tabs to join panels together.
Slip the 4 red card sections into the side ‘pockets’ to show through the small heart apertures on each side of the box.  You can glue these in place if you prefer.

Fold over tabs at the bottom of box to close it.  If you wish to line the box you can add a square of red card or pattern paper inside.
Apply washi tape around the lid of the box, I have chosen a gold tape with white dots.

Using the First Edition Vintage Gentleman die set cut 1 curly moustache shape from papermilldirect black card and glue onto heart.  Add 2 googly eyes to create a fun face on the lid.
Using a sentiment stamp set and black ink, stamp ‘Be Mine’ onto white hammered card, cut out and glue to box lid.   Cover a small piece of red card with the gold washi tape and die cut into a heart.  Glue heart to box lid as shown.
As the box is a simple 2 part box shape you could easily score and fold your own using Papermilldirect cardstock.  I chose to use hammered card to give texture to the box but you could use Papermilldirect plain white card or even another colour from across the range.  You could also use templates or dies to cut your heart shapes.  Googly eyes add a fun element and come in different sizes, styles and colours so you can add lots of character to your designs, why not make a set of different ones?
Are you making gift boxes for Valentine’s Day?  Why not share your designs over on the Papermilldirect facebook page, we’d love to see them.

Materials Used:
White Hammered Card - Papermilldirect
Post Box Red Card - Papermilldirect
Black Card - Papermilldirect
Vintage Gentleman Die Set - First Edition
Sweet Little Sentiments stamp set - Clearly Besotted
Gold Washi Tape, Googly Eyes
Cosmic Shimmer Clear Drying Glue
Black Archival Ink
Cricut Explore with subscription or older cricut with 'Box it Up' images
Design Space Link:https://uk.cricut.com/design/#/canvas/35853997
 
Papermill Design Team:
if you have a moment, please do pop over and check out the other papermill teamies blogs and see what they got up to this week: