Showing posts with label printables. Show all posts

Thursday, 16 June 2016

Cute Happy Birthday Card - Step By Step Tutorial


Hello, gosh I just realised how far I am behind with my blogging!!  My first catch-up is to share a simple step-by-step Tutorial for my +Papermilldirect  DT, we were working on the theme of Free Printables or Downloads and I have a cute little birthday chick card to share with you.  The image used is from a set of 4 free download digi images available from Simply Cards & Papercraft magazine (Link at end of post).

Step By Step:

Download and print off your chosen image form the set of 4  (I have chosen the chick with birthday cake) I like to print onto Papermilldirect White Linen cardstock as I love the effect. Use your chosen medium to colour the image, I have used my favourite First Edition craft marker pens and as this is a simple design you can simply block colour for ease or get more detailed with shading if you wish.

Cut out image using a circular nesting die and cut a slightly larger shape from PMD Marine Blue coloured card. Mat image onto blue shape using glue. I have added extra interest by cutting the coloured layer using a scalloped circle die, but you can use a plain circle if your prefer and of course if you don't have a die cutting machine then just cut image into a square panel.

Use a Birthday themed embossing folder to emboss a piece of PMD White Linen Card and trim down to measure approx. 3 3/4" x 5".

Mat embossed panel onto a slightly larger panel of PMD Daffodil Yellow card using double sided tape, and mat again onto a panel of PMD Marine Blue cardstock approx. 4 1/4" x 5 1/2".
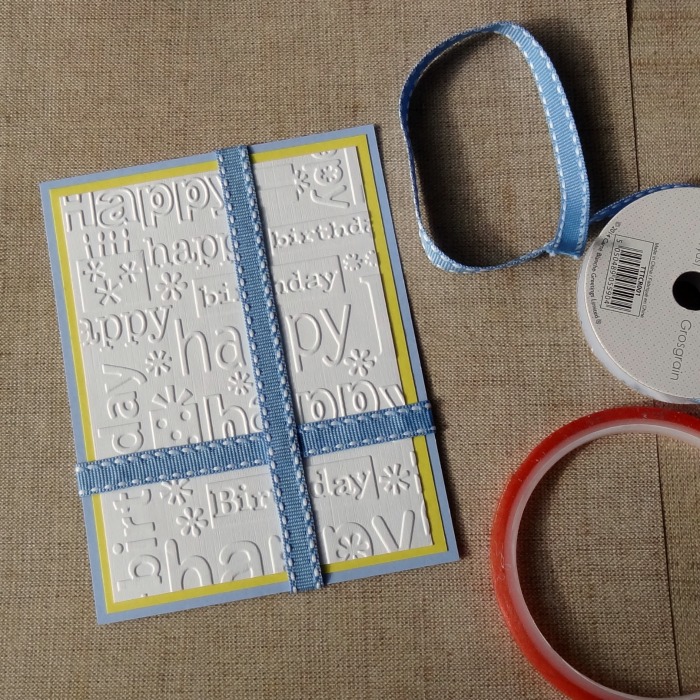
 Add blue grosgrain ribbon across matted panel as shown adhereing with permafix tape and securing ends at back of panel.  Cut 2 small pieces of ribbon, fishtail ends and add where ribbons cross.
Score & fold Papermilldirect Plain White card and trim down to create a 4 1/2" x 5 3/4" card base.  Add embossed panel to card front using 3D foam pads.  Add layered image towards bottom of card on top of where the ribbons meet, again using 3D foam pads.


To finish, add glitter glue to icing on the cake and decorate card front using pale blue adhesive gems.

Materials Used:
White Linen Card - Papermilldirect
Marine Blue Card - Papermilldirect
Daffodil Yellow Card - Papermilldirect
Plain White Card - Papermilldirect
Free digi download image - http://www.papercraftmagazines.com/downloads/item/652-simply-cards-papercraft-150-downloads
Dies - Nesting Circle Dies - Sizzix
Embossing Folder - Happy Birthday - Cuttlebug / Provocraft
First Edition Craft Markers - First Edition
Blue Grosgrain Ribbon, Blue Adhesive Gems, Glitter glue
Adhesives: Double Sided Tape, Perma-Fix Tape, 3D Foam Pads.


Tuesday, 9 February 2016

Love is in the Air...

Hello, I have another make for you this week using Papermilldirect cardstocks.  This week the Design Team are looking at Free Printables and creating Valentines projects with them.  I found a set of printable mini notecards designed by The Tom Kat Studio and available for free from their website. The set I am using is the Printable Mini Notecards - Set #1
These printables are great for quick makes as they print out with 3 mini notecards per A4 sheet, simply download, print, colour, cut out and fold and they are ready to go, or if you have a little more time why not make them into a bigger design as I have done here.

I printed the design sheet off onto an A4 sheet of Papermilldirect Plain White card, there are 3 different designs on the sheet, I chose the Balloon design to work with.  I coloured the balloon using First Edition marker pens in shades of purple and pink, and the lettering in pink and yellow.

I used a light grey marker pen to outline the image and sentiment, then trimmed the image down to just under 3” square. A light grey marker pen was used to outline the cut edge before mounting the square onto a slightly larger square of Papermilldirect  Purple Grape Card.
Using a Sizzix embossing folder with a bubbles design I embossed Papermilldirect Plain White card and trimmed down to approx. 4” square.  I decided I quite liked the debossed side to work with the balloon image and matted it onto a slightly larger square of PMD Raspberry Pink card.

The card base was created by scoring and folding and A4 sheet of PMD Plain White card and then trimming down to create a 5.5” square card.  I added the embossed panel centrally to the card front using double sided tape and used 3D foam pads to adhere the balloon panel to create height.
To finish a touch of white gel pen adds a little highlight to the balloon.Choosing a simple image to work with makes colouring quicker and easier and teaming with a simple embossed panel adds extra interest. I decided to leave the card as more of a 'clean & simple' style but you could of course add extra embellishments or ribbons if you prefer.

Materials Used:
Plain White Card - Papermilldirect
Purple Grape Card - Papermilldirect
Raspberry Pink Card - Papermilldirect
Free Valentines Printables - http://www.thetomkatstudio.com/2013/01/freeprintablevalentinesforparenting
Craft Twin Markers - First Edition
Sizzix Embossing Folder
Double Sided Tape, 3D Foam Pads


Thursday, 18 June 2015

Saying Hello!! Giraffe Style with Papermill Direct


I'm saying Hello!! with this Giraffe card I created with this week's Special Offer from +papermilldirect:


As the theme this week is ‘Printables’ I thought I would combine a free download with this week’s special offer to create a bright ‘hello’ card. I chose the ‘Safari Animals’ free download from Crafts Beautiful magazine. (links at end of post) Downloads are easy to use and are also perfect for anyone that likes the look of stamped images but perhaps isn’t as confident using ink and stamps, plus they can be printed onto different cardstocks and papers, at different sizes, and you can add colour to them too.


The ‘Safari Animals’ download set consists of a Lion, Tiger and the Giraffe which I have chosen to use. My old printer is a bit temperamental and not always happy to print on thick card but I find that it quite likes the PMD White Linen and when I saw how striking the black & white image was upon the linen texture I decided I would leave it un-coloured. The great thing about printables is that you get to choose what size you want to work with and if you are not sure, then it is easy to test print onto plain copy paper until you are happy with sizing. I trimmed the image panel down to approx. 8cm x 12.5cm and matted onto PMD black card to frame it.


The gorgeous Bright Green Laid card has been used to create a background. I like to put the card stocks through their paces in various ways this week I’m embossing & die-cutting. The back panel has been embossed using a ‘mosaic’ patterned embossing folder and you can see how well it takes the embossing creating a lovely textured background which adds shades and interest as well as being very tactile. The panels have been mounted to the card front using 3D foam pads to give height.


The Bright Green Laid Card is also perfect for die-cutting; you can see it happily copes with both the leafy branch and the ‘hello’ word sentiment perfectly. (The branch actually had a bird on it which I have trimmed off easily with scissors for this project). The die-cut shapes were given a shadow of black card by simply cutting the image again and slightly offsetting, adhering with cosmic shimmer glue, this is a subtle way to help them stand out without being too prominent. I have tried to keep the clean look of the card by keeping to the three basic colours of black, white, & green, Adding some natural coloured Jute trim strip and black sequins topped with pale green adhesive pearls to finish. Completed card size is just over 5” x 7”.

Materials Used:
Bright Green Laid Offer Card – Papermill Direct

Black Card – Papermill Direct 
Giraffe Image from Safari Animals – Free Download – Crafts beautiful magazine

Mosaic Embossing Folder – Cuttlebug 
Branch Die Creatables LR0138 – Marianne Design

Hello Word Die – Clearly Besotted
Adhesives: Double Sided Tape, 3D foam pads, cosmic shimmer glue

Jute Trim, Black Sequins, Pale Green adhesive pearls
Papermill Design Team:
if you have a moment, please do pop over and check out the other papermill teamies blogs and see what they got up to this week: