Showing posts with label ribbon. Show all posts

Thursday, 16 June 2016

Cute Happy Birthday Card - Step By Step Tutorial


Hello, gosh I just realised how far I am behind with my blogging!!  My first catch-up is to share a simple step-by-step Tutorial for my +Papermilldirect  DT, we were working on the theme of Free Printables or Downloads and I have a cute little birthday chick card to share with you.  The image used is from a set of 4 free download digi images available from Simply Cards & Papercraft magazine (Link at end of post).

Step By Step:

Download and print off your chosen image form the set of 4  (I have chosen the chick with birthday cake) I like to print onto Papermilldirect White Linen cardstock as I love the effect. Use your chosen medium to colour the image, I have used my favourite First Edition craft marker pens and as this is a simple design you can simply block colour for ease or get more detailed with shading if you wish.

Cut out image using a circular nesting die and cut a slightly larger shape from PMD Marine Blue coloured card. Mat image onto blue shape using glue. I have added extra interest by cutting the coloured layer using a scalloped circle die, but you can use a plain circle if your prefer and of course if you don't have a die cutting machine then just cut image into a square panel.

Use a Birthday themed embossing folder to emboss a piece of PMD White Linen Card and trim down to measure approx. 3 3/4" x 5".

Mat embossed panel onto a slightly larger panel of PMD Daffodil Yellow card using double sided tape, and mat again onto a panel of PMD Marine Blue cardstock approx. 4 1/4" x 5 1/2".
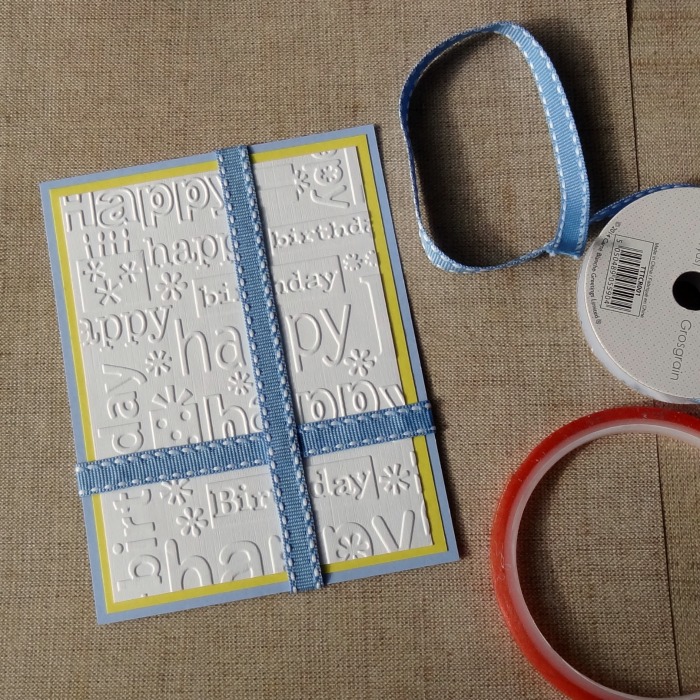
 Add blue grosgrain ribbon across matted panel as shown adhereing with permafix tape and securing ends at back of panel.  Cut 2 small pieces of ribbon, fishtail ends and add where ribbons cross.
Score & fold Papermilldirect Plain White card and trim down to create a 4 1/2" x 5 3/4" card base.  Add embossed panel to card front using 3D foam pads.  Add layered image towards bottom of card on top of where the ribbons meet, again using 3D foam pads.


To finish, add glitter glue to icing on the cake and decorate card front using pale blue adhesive gems.

Materials Used:
White Linen Card - Papermilldirect
Marine Blue Card - Papermilldirect
Daffodil Yellow Card - Papermilldirect
Plain White Card - Papermilldirect
Free digi download image - http://www.papercraftmagazines.com/downloads/item/652-simply-cards-papercraft-150-downloads
Dies - Nesting Circle Dies - Sizzix
Embossing Folder - Happy Birthday - Cuttlebug / Provocraft
First Edition Craft Markers - First Edition
Blue Grosgrain Ribbon, Blue Adhesive Gems, Glitter glue
Adhesives: Double Sided Tape, Perma-Fix Tape, 3D Foam Pads.


Friday, 25 March 2016

Easter Treats card


Hello!! Today I’m sharing an Easter card created with the pretty Flower Girl papers within the Simply Creative range from +Trimcraft Ltd .  No Easter is complete without a chocolate bunny amongst all those pretty eggs and so I have used the cute Bunny from the First Edition Animal die set for my chocolate bunny character.

 Step By Step:
  1. Using a Dovecraft 6x6 white square card blank with fold across the top, cover front with the checked paper from the Flower Girl 6x6 pad. Outline the paper with Dovecraft glitter glue in ‘Crystal’.
  2. From white card, cut a large egg or oval shape to fit the front of the card height wise and cover with the flower strip paper from the pad.  (Draw a simple shape or use a template, there is a downloadable Trimcraft pattern on the home page which you can resize for the egg shapes). 
  3. Outline egg with glitter glue and allow to dry.  Attach a small doily from the La De Dah range to the centre of the egg using a dab of glue or tape in the centre. 
  4. Take the sentiment set (2 pieces) from the Me To You Easter decoupage pad and adhere the bottom layer centrally onto doily. Take Dovecraft pink gingham ribbon and adhere across the panel, securing ends on the back with tape.  Using 3D foam pads attach the top part of the sentiment ‘Easter Treats’ on top of the ribbon and outline with glitter glue.  Add a length of gingham ribbon across top of egg securing ends on reverse. Take another piece of ribbon and tie a bow, trim ends and then glue in place at top right of top ribbon.
  5. Using the FE Animal themed set, cut bunny from FE Textured card in brown.  Add a tiny piece of pink to back the nose and pop some glitter glue on top.  Add chocolate bunny to card front using a double height of 3D foam pads.
  6. Cut a medium sized egg shape from Flower Girl lilac striped paper, outline with glitter glue and add Dovecraft white ric rac across centre using glue to adhere.  Use 3D foam pads to adhere egg to bottom left opposite bunny.
  7. Cut 5 small egg shapes from different pattern papers within the Flower Girl 6x6 pad, again outline with glitter glue in ‘crystal’ and attach to card front at angles using 3D foam pads.
    To finish add a little clear adhesive gem to bunny’s eye and a pink bow from Floral Muse to decorate.

Products Used:
Simply Creative FSC Paper Pad 6x6 Flower Girl
Dovecraft White 6"x6" cards & envelopes
La De Dah Die cut Doily Shapes
Glitter Glue Box - Pastels
First Edition Dies - Animal
Dovecraft Ribbon Box With Love
Dovecraft Floral Muse Mini Ribbon Bows
First Edition Premium Textured Cardstock – 12x12 Papers


Wednesday, 2 March 2016

Mini Butterfly Wreath with Floral Muse Collection

Hello, today I'm sharing one of my +Trimcraft Ltd DT makes with you.  The Dovecraft Floral Muse collection is sooooo pretty I didn’t know where to start first!!  It’s been a little while since I made a hanging wreath and I had originally intended to make this to go onto a card front but I really liked it as a strand alone (or rather hanging) wreath and with the acetate strip it allowed the sentiment to ‘float’.

Step By Step:
    Make a little cardboard wreath shape (or use a ready-made one if you prefer).  A simple wreath shape can be cut from circles, the outer size for mine is approx. 5” dia. The inner circle approx. 3.5” dia. 
    Add glue to wreath shape and place down onto grey trellis pattern paper from the Floral Muse 6x6 pack.  When dry cut out, you may find a craft knife easier for the inner circle.  Sand the cut edges (I use a nail file) and then ink all around edges inside and out with a light brown ink.
    Using the distressed postage style text stamp form the Floral Muse clear stamp set, stamp randomly all over the wreath using a brown ink.
    Pierce holes into the wreath, 2 at the top for hanging ribbon and 6 evenly spaced around the wreath. Cut lengths of pink organza ribbon (Floral Muse) 6 smaller lengths and 1 larger length for hanging.  Using the same stamp and brown ink stamp onto the ribbon randomly.  When dry, tie each ribbon through holes and trim, then add the longer hanging ribbon securing knots on back with dab of glue.
    Using the First Edition Foliage die set and green card from the FE Textured card pad, die cut 4 leafy ferns.  Stamp randomly using the same text stamp and brown ink as before. Ink edges with light brown ink.
    Take 2 papers from the Floral Muse 6x6 and 1 piece of pink card from the FE textured card pad and cut 3 circles.  Using the same text stamp and brown ink as before, stamp randomly all over the front and back of each circle.  The cut into the circles to create spirals.  Ink cut edges with light brown ink and then rolls spirals to create roses, securing with glue at the bottom.
    Arrange die cut leaves and roses on wreath and when happy with position, glue into place.
    For Sentiment, use brown ink to stamp ‘Made with Love’ onto a pattern paper from the Floral Muse 6x6 pack and cut out.  Glue to a strip of Dovecraft Acetate and then glue acetate to back of wreath at ends so that sentiment is positioned in centre, trim acetate.
    Next stamp 4 butterflies from the Floral Muse clear stamps with brown ink, stamp 2 onto floral muse paper and 2 onto blue textured card from the FE pad.  Cut out and ink edges, bend wings and then arrange onto wreath and glue in place along their bodies only.
    Using the FE Butterflies die set, die cut 2 smaller butterflies from Floral Muse paper, over-stamp with text stamp and ink around with light brown ink.  Bend wings as before and add 1 butterfly to top of sentiment, the smaller one to the rose’s arrangement.
    To finish add Dovecraft 3D pearls effects in Pastel Pink colour to the centres of the roses

Products Used:
Dovecraft Floral Muse 6x6 Paper Pack (FSC)
Dovecraft Floral Muse Clear Stamps - Sentiments
Dovecraft Floral Muse Clear Stamps - Butterfly
First Edition Dies - Butterflies
First Edition Dies - Foliage
Dovecraft A4 Acetate Sheets
Dovecraft Pearl Effects Box – Pastels
First Edition Premium Textured Cardstock – 12x12 Papers

All Products are from +Trimcraft Ltd  and this project also appears in my Trimcraft DT Gallery link here: http://www.trimcraft.co.uk/projects/121439/mini-butterfly-wreath-with-dovecraft-floral-muse-collection


Monday, 8 February 2016

Love Grows Here ...


Hello, today I'm sharing another make with the new and very pretty First Edition Love Story papers from +Trimcraft Ltd .  My cards often evolve by way of a phrase and this time in my mind I had the ‘Love Grows Here’ theme to play with.  It also gave me chance to try out the tree shape from the new First Edition Foliage die set and I added little hearts to 'grow' on the tree.

Here's my Step By Step:
  1. Cut a rectangle of peach card from the Dovecraft Premium Colour Card pack approx. 5 3/8” wide by 4 3/8” high. Cut a rectangle of floral patterned paper from the Love Story 6x6” pad approx. 6” wide by 4” high.  Ink around the edges of both with pink ink.
    Pierce holes around the edges of the floral rectangle paper and add faux stitching with a white pen. Mat floral paper onto peach card using double sided tape.
  2. Using the First Edition Border die cut 2 loopy borders from beige Love Story paper and attach across lower section of matted paper panel using glue along the centre section.  Adhere Dovecraft  ‘Love’ printed ribbon across the border slipping the ends under the border end sections and securing with tape at back of panel.
    Attach panel to card blank using double sided tape.  I have used a green scalloped edged 5” x 7” card from the Glad Tidings pack.

  3. Next cut 3 panels, 1 from green card (to match card blank) approx. 3 3/8” wide by 4 ¼” high, 1 from the peach card approx. 3 1/8” wide by 4” high, and 1 from the Love Story pale hexagon pattern paper approx. just under 3” wide by 3 7/8” high.  Pierce holes in pale panel and add faux stitching with white pen.  Ink around all 3 panels with pink ink.  Mat smallest panel centrally onto peach card panel, then adhere onto green panel at an angel (see photos).
  4. Using the Tree die from the FE Foliage die set, cut tree in green card and glue centrally onto panel.  Die cut hearts from pink Love Story paper using Santoro die set and glue 5 small ones direct to the tree, add 2 larger ones raised with 3D foam pads.  Die cut 2 heart borders from the Borders, Frames & Buckles set using 2 of the pink Love Story papers, trim them a little and glue across bottom of tree.

  5. Add the sentiment of ‘Love Grows Here’ to a rectangle of pale Love Story paper, ink edges with pink ink, and adhere to tree panel to look like a tab.  I used my Cricut Explore to write and cut the tab ( If you want to use my file already sized my Design Space Link is here: https://uk.cricut.com/design/#/canvas/35665234  )  but you could type and print out from your computer or handwrite wording if you prefer.  Cut a small piece of Dovecraft heart patterned ribbon, loop it and attach to tab.
    Position completed Tree panel to card front at an angle (see photos)
  6. Take 2 stick pins, a pink heart (Sweet Paris) and green leaf (Willow) and slide & secure into place just behind tree panel where it joins the ribbon border.  A dab of glue or tape just under the head of each pin and under the ribbon will help keep them in place.  Top pins with a little green ribbon bow (Sweet Paris).
    To finish add a small adhesive pearl to ribbon bow and 3 small pearls to top right of tree panel.


Products Used:

Santoro Pearls SNGE003


All materials from +Trimcraft Ltd  and the project can also be seen in the Trimcraft DT Gallery link herehttp://www.trimcraft.co.uk/projects/121223/love-grows-here-card-with-first-edition-love-story-and-dies


Tuesday, 2 February 2016

LOVE a simple Valentines card make

Hello, I'm back again to share a simple Valentines card make with you, and this one could not be more different from the card I posted yesterday.  This week the Design Team are working on Valentines Day cards that are easy to create and do not involve any die cutting or other expensive tools.
For my make I have simply used ready cut scrap booking elements, along with some ribbons and gems from my stash and teamed them with coloured card from Papermilldirect's fab range of colours.
I created a card blank by scoring and folding an A4 sheet of Papermilldirect Baby Pink card and then trimmed it down to 5" x 7" (a standard card size that for quickness will fit into a ready bought or made envelope)
Taking the Hedgehog glittered die cut from the pack I used 3D foam pads to adhere to a slightly larger piece of Papermilldirect Ruby Red Card and then layered again onto a slightly larger piece of PMD Baby pink card this time using double sided tape to create my image panel quickly.
For the sentiment panel I cut PMD Ruby Red card to measure approx 2 3/8" x 2 1/4" and matted this onto slightly larger PMD Baby Pink card the same as previous.  Taking the glittered alphabet stickers from the Sticker book I chose letters to spell out 'LoVe' and as these are self adhesive it is a quick way to create a sentiment.  There are a few different styles of letters in the sticker book to play with and I also added 2 of the arrows to frame the sentiment.
To create the back panel I simply cut a piece of pattern paper to approx 6" x 4" and matted to a piece of PMD Ruby Red card measuring 6.5" x 4.5".  I took a sentiment ribbon from my stash and added it across the paper panel, securing the ends on the back with double sided tape.  The back panel was then adhered to the card front using 3D foam pads to give a little height.
Adhere the hedgehog panel to card front using 3D foam pads so that it sits over the ribbon.  Adhere 'love' panel at an angle using double sided tape, just slipping the corner under the ribbin  at RH side.  To finish I looped pink & white bakers twine round the ribbon and tied in a double bow trimming the ends to suit, and added  3 Self adhesive heart gems to lower RH side of paper panel.
This is an easy make requiring only a paper trimmer (or craft knife and ruler if you prefer) to trim card to size.  Using coloured cardstocks adds more interest to simple makes and using ready die-cut shapes and sticker elements helps to create a quick and co-ordinated look. 

Materials Used:
Baby Pink Card - Papermilldirect
Ruby Red Card - Papermilldirect
Forest Friends 12x12 papr pad - Grace Taylor
Forest Friends Sticker Book - Grace Taylor
Forest Friends Paper Die Cuts pack - Grace Taylor
Sentiment Ribbon, Pink & White Twine, Adhesive Heart Gems
Double Sided Tape, 3D Foam Pads

Papermill Design Team:
if you have a moment, please do pop over and check out the other papermill teamies blogs and see what they got up to this week: 


Thursday, 3 December 2015

Christmas Snowflake Gift bag with Papermilldirect


Hello, firstly apologies for my lack of posts over the last couple of weeks, I've not been feeling 100% but I'm back in blogland and trying to catch up, so first up here's a little gift bag, one of my Design Team makes for Papermill, it’s a simple make and easily adapted to use any ribbons, dies or colour-schemes you have in mind.  I’ve chosen the Papermilldirect Ultra White Pearlised paper for this gift bag as the weight is ideal, strong enough to hold its scores (and treats of of course) and yet easy to pinch in for the sides. The pretty shimmery finish is perfect for festive makes adding a touch of luxury to your gift giving.  These bags are easy and quick to make so they are perfect for batch making.  I have used folds and ribbon to seal the bags, simply undo the ribbon at the back to release the folded section of the bag.  You could also seal the back with a little festive sticker or label if you prefer.
To create the Gift Bag: Take a sheet of A4 Ultra White Pearlised paper and trim to measure 21cm x 28cm.
Using a scoreboard position paper with long side across the top and score down at 6m intervals to give 4 score lines and an extra 2.5cm section at the end (this will be a joining tab later)
Now turn paper so short side is across the top and score a line at 6cm down.  This will give a row of squares.
Use scissors or craft knife to cut each score line on the squares just up to the 6cm score line to give 4 equal squares and 1 smaller rectangle.  Cut away the smaller rectangle completely.
Crease each score line of the whole sheet and form the bottom squares into tabs as you would if making a box.  I used double sided tape to adhere each flap on top of another.  When gift box bottom is completed add tape or glue to the smaller side panel and adhere this panel in place behind the next panel to enclose the sides.  Then pinch in the sides to create the gift bag shape.
Pop your gifts or treats into the bag and squeeze the top together, turn over the top once or twice to the back and you can add a sticky label at the back to seal it if desired or seal with the ribbon trim as I have done here.

For the ribbon trim, take a length of Christmas ribbon (my sentiment ribbon reads ‘Do Not Open Until Dec 25th).  Add strong doubles sided tape to the back and apply ribbon around the top of the bag with joint at the back.  Add another length of ribbon to go up the front of the back (parcel style) again using strong double sided tape to attach.  Take another length of ribbon and trim ends, form a loop and attach to top right of ribbon band.
Die-cut 3 small snowflakes and glue flat to the gift bag at the bottom to add extra interest and texture. 
To finish, Die cut and layer snowflakes as desired from PMD Ultra White Pearlised Paper and PMD Post Box Red Card.  Use 3D foam pads to create dimension when layering.  Add a clear sparkly adhesive gem in the centre to top off the snowflake.
Materials Used:
Ultra White Pearlised Paper – Papermilldirect
Post Box Red Card - Papermilldirect
Spellbinders Shapeabilities Create a Flake three #S4-340
Cuttlebug Snowflake #2 – Provocraft
Adhesives: Double Sided Tape, 3D foam pads, glue
Xmas Ribbon, Sparkly adhesive gem

Papermill Design Team:
if you have a moment, please do pop over and check out the other papermill teamies blogs and see what they got up to this week: 

Thursday, 22 May 2014

Tying The Knot!! with this Papermill Offer!!

Hello, wow doesn't a week go fast!!  It's Thursday already and that means the launch of another fab new offer from Papermill Direct, this week it is a White card 265gsm and  available in small boxes £5.00, midi boxes £13.50 and mega boxes £32.50, This is the link to the Special Offers.(materials used and challenges entered links at bottom of post).


So what did I decide to make with it?  Well I scored & folded the card to make a card base.  I cut another panel and used an embossing folder through my Big Shot to create a swirls pattern, the white card embosses really well.   For my theme the phrase 'Tying the Knot' was something I wanted to play with. I found the sentiment and cut it out with my Cricut Mini from the white card, and a shadow from 'Purple Grape' another of my favourite papermill cards, which I also used to 'mat' the white embossed panel.  Before attaching the embossed panel to the card base, I added a lovely purple satin ribbon and a smaller piece to tie through into a knot.


The sentiment of 'Tying the Knot' was assembled and raised on 3D foam pads before attaching to the front of the card, this gives height and lets the phrase stand out.  Four faux sparkly gems were added to each corner of the panel and a larger one was placed into the 'O' of 'Knot' as i thought it would echo the theme of a sparkly diamond in an Engagement Ring.

Hopefully by keeping the colour palette to 2 shades this makes a simple but elegant Wedding Card, or perhaps even an Engagement card?  

As expected the White Card is great to work with and behaved perfectly with both manual embossing and electronic cutting. I did make another card which I will show another day :)

Materials List:
Plain White 265gsm 'offer' card - papermill direct
Purple Grape card - papermill direct
Purple ribbon
Sparkly faux gems
Sentiment cut using a cricut Mini


Challenges Entered: 
Week 259 Purple Passion - allsorts Challenge Blog
http://allsortschallenge.blogspot.co.uk/2014/05/week-259-purple-passion.html
Anything Goes - Sisters of Craft Challenge Blog
http://thesistersofcraft.blogspot.co.uk/2014/05/sisters-of-craft-launch-of-our-new.html


Why not pop over and see what the other Design Team members got up to this week: