Showing posts with label washi tape. Show all posts

Saturday, 13 February 2016

Woof You!!

 Project image
I do love sausage doggies, dachshund doesn’t really seem a cute enough word for them.  Anyway I have this fun Dovecraft washi tape and the First Edition Animal themed die set and thought the lovely colours in the new Me to You ‘Sweet Shop’ papers would work well with them, so here’s my doggy themed Valentine card or maybe just a card to send to that special someone whatever the occasion?

Project image

Step by Step:
  1. Take a 6” x 6” square Kraft card blank and place with the fold across the top.  Add a length of the Dachshund printed wash tape across the bottom, smoothing down firmly and then trimming the sides flush with card.
  2. From the Sweet Shop 6x6 paper pack, cut a piece of green striped paper approx. 3 7/8”square.  Mat this onto  a die cut stamp shape cut from lemon paper (Sweet Shop) using the First Edition nesting postage stamp.  Adhere to card front using double sided tape.
  3. Using the First Edition Script alphabet die set, cut letters to spell ‘woof you’ from Dovecraft Chocolate glitter card.  Glue letters in place at top right of paper panel.
  4. Using the dachshund die from the FE Animal themed set, cut 1 from kraft card and add dark brown card to the back to show through the cut outs.  Add to card front using 3D foam pads to bottom of paper panel.
  5. Die cut balloons using the Belle & Boo die set from different pattern papers within the ‘Sweet Shop’ 6x6 pack.  I also cut one balloon from the chocolate glitter card. Glue a length of pink & white twine to back of each balloon then arrange balloons on card front using 3D foam pads to adhere.  Take the lengths of twine and take under the dogs head so they look to be held in its mouth, adding a dab of glue behind head to hold in place then trim twine ends to desired length 
     Project image


    All materials are from +Trimcraft Ltd  and this project also appears in my Trimcraft Design Team Gallery, link here: http://www.trimcraft.co.uk/projects/121361/woof-you-valentines-card-with-sweet-shop-papers-and-first-edition-dies
     
    .

Tuesday, 26 January 2016

Be Mine - Fun Valentine Gift Box Idea


Hello, the Papermilldirect DT have been busy creating all different kinds of gift boxes this week and I'm sharing a fun gift box idea for Valentine’s Day.  Although I have used my Cricut Explore to cut the box for this project, you could easily use the elements to decorate a plain box blank or score and fold a box similar and use heart shapes to decorate.
Cut box shape elements using my Design Space link here: https://uk.cricut.com/design/#/canvas/35853997
I have sized the box to fit A4 card all ready for you but you can easily change the dimensions if you wish.  (For those using earlier Cricut machines the box is from ‘Box It Up’ cartridge and also available free within the subscription images)  Cut the 2 side sections and lid from Papermilldirect White Hammered cardstock and the 5 red panels from Papermilldirect Post Box Red card.  Remember to pop the scorer into the holder if you want your machine to add the score lines for you.
Crease and fold lid along score lines, add glue or tape to inside of lid and adhere the red panel to show through the heart aperture.  Glue tabs to assemble box lid.
Crease and fold along score lines for the 2 box side sections, glue tabs to join panels together.
Slip the 4 red card sections into the side ‘pockets’ to show through the small heart apertures on each side of the box.  You can glue these in place if you prefer.

Fold over tabs at the bottom of box to close it.  If you wish to line the box you can add a square of red card or pattern paper inside.
Apply washi tape around the lid of the box, I have chosen a gold tape with white dots.

Using the First Edition Vintage Gentleman die set cut 1 curly moustache shape from papermilldirect black card and glue onto heart.  Add 2 googly eyes to create a fun face on the lid.
Using a sentiment stamp set and black ink, stamp ‘Be Mine’ onto white hammered card, cut out and glue to box lid.   Cover a small piece of red card with the gold washi tape and die cut into a heart.  Glue heart to box lid as shown.
As the box is a simple 2 part box shape you could easily score and fold your own using Papermilldirect cardstock.  I chose to use hammered card to give texture to the box but you could use Papermilldirect plain white card or even another colour from across the range.  You could also use templates or dies to cut your heart shapes.  Googly eyes add a fun element and come in different sizes, styles and colours so you can add lots of character to your designs, why not make a set of different ones?
Are you making gift boxes for Valentine’s Day?  Why not share your designs over on the Papermilldirect facebook page, we’d love to see them.

Materials Used:
White Hammered Card - Papermilldirect
Post Box Red Card - Papermilldirect
Black Card - Papermilldirect
Vintage Gentleman Die Set - First Edition
Sweet Little Sentiments stamp set - Clearly Besotted
Gold Washi Tape, Googly Eyes
Cosmic Shimmer Clear Drying Glue
Black Archival Ink
Cricut Explore with subscription or older cricut with 'Box it Up' images
Design Space Link:https://uk.cricut.com/design/#/canvas/35853997
 
Papermill Design Team:
if you have a moment, please do pop over and check out the other papermill teamies blogs and see what they got up to this week: 


Sunday, 17 January 2016

Jar of Hearts


Hello Today I have a bright card to share with you.  When I first saw the First Edition Pots & Vases die set I thought it would be fun to make a ‘jar of hearts’  but then I got distracted with other crafty ideas.  Recently, whilst looking through the new Grace Taylor paper pads, the idea popped back in my head, thanks to the heart patterned papers.

 Step by Step Tutorial:
  1. Cut a 5 ¼” square of heart patterned paper from the Grace Taylor Sherbet Sky pad, then mat onto a slightly larger square of Dovecraft Kraft card using double sided tape to adhere. 
    Cut  3 ¼“ square of grid patterned paper from the Sherbet Sky pad and again mat onto a slightly larger square of Kraft card using d/s tape.  Adhere smaller mat centrally onto larger mat using d/s tape. 
  2. Take bright patterned Dovecraft washi tape, sticking across the bottom of the smaller mat and taking it round to the back of the larger mat so the ends are neatly stuck at the back, I used 2 lengths of washi tape to create a wider strip.  Take a length of Dovecraft ‘With Love’ sentiment ribbon and use permafix tape to attach across the washi tape stripe, take ends to the back of panel and secure.  Cut a piece of washi tape and angle the ends before sticking across the top LH corner of the smaller mat.
  3. Take a 6 x 6” bright green card blank from the Bright Spark pack and position with fold along the top, attach layered paper mat panel centrally to card front using D/S tape.
  4. Cut jar shape using the FE Pots & Vases die set.  I cut one from a pale blue section of paper in the Sherbet Sky pad.  I then added a little extra blue paper behind the cut outs and then cut the jar again from white card and glued the paper jar to the white jar to create a sturdier piece.
  5. Cut different sized small hearts using the heart dies from the Santoro die set and the pink geometric paper from the Sherbet Sky pad.  Glue some of the hearts so they look to be inside the jar.  The attach jar to card front using 3D foam pads, position jar so it looks to be sitting on the washi tape / ribbon border.
  6. Next using the Modern Sentiments die set, cut the words ‘Love’ ‘You’ using spare card to match the card blank, attach the words using glue and position at angles to look like they are coming out of the jar.  Arrange the rest of the die cut hearts around the jar using glue, except one larger heart attached with a small 3D foam pad to bottom left of jar and a larger heart attached with 3D foam pad to ribbon trim at RH side.
  7. To finish add 3 small clear adhesive gems to the heart on the ribbon and a clear gem to the ‘o’s in Love You.
 Materials List: 
  • 6 x6" Bright Spark Card Blank - Dovecraft
  • Grace Taylor 'Sherbet Sky' 12x12 paper pad
  • First Edition 'Sentiments Modern' die set
  • First Edition 'Pots & Jars' die set
  • Santoro Willow Die Set - Trimcraft
  • Washi Tape - Dovecraft
  • Sentiment Ribbon - Dovecraft
  • 6mm Double Sided Tape - Dovecraft
  • small 3D Foam Squares - Dovecraft
all materials from +Trimcraft Ltd  and the project can also be seen in the Trimcraft DT Gallery link here: http://www.trimcraft.co.uk/projects/121098/jar-of-hearts-card-with-grace-taylor-sherbet-sky-first-edition-dies

Friday, 8 January 2016

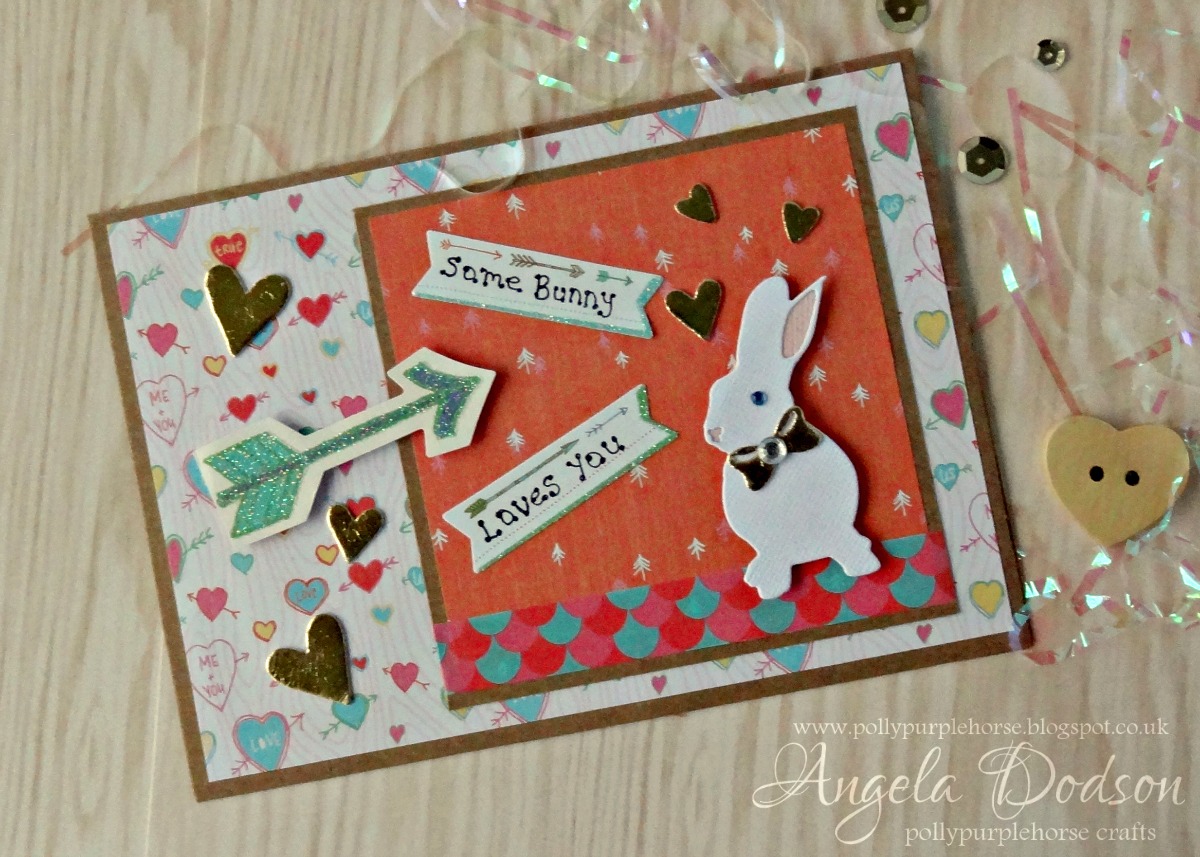
Some Bunny Loves You!!


How cute is the new Grace Taylor Forest Friends collection from +Trimcraft Ltd , I couldn't resist teaming them with the cute bunny from the new First Edition Animal Die set to create a Valentines card.   I also had fun playing with the Gold Foiling and adhesive foam sheets.  (If you've not tried foiling then give it a go, you can still get great results if you haven't got the applicator machine, all my foiling is done with the adhesive foam on this project)

The Forest Friends collection is perfect for card making as well as scrap booking as it has lots of lovely embellishments such as the fun sticker book , shaped paper cuts and washi tape.
 
 
Thank you for popping by and I hope you will join me again as I have another card to share with you later :)

Thursday, 25 June 2015

Party Time!! with Papermilldirect


Hello welcome to this week's +papermilldirect  blog post.  The theme is Party Invitations and the Design Team have been busy creating some fun kids themed invites, (links as always are at the end of the post).


Today I'm sharing with you my Party Time!! Windmill Invitation card.  I combined bright colours of Red & White with spots to create a bright fun windmill style Party Invite. A simple design which could be personalised to suit different colour schemes and party themes. Using the white Pearlised paper gave a sheen to the windmill and allowed the right flexibility and strength to form the shape.

papermilldirect Plain White card was scored and folded to create a card base measuring just under 6” x 6” square.For the main panel, papermilldirect Postbox Red card was cut to approx. 5 ½ “x 5 ½ “, a strip of decorative red & white washi tape was applied across both the top and bottom and the panel adhered to the card front using double sided tape.

Using papermilldirect White Pearlised paper I cut a windmill / pinwheel shape out using my Cricut Explore but these are also easy enough to cut by hand from a basic square shape. The windmill was assembled and secured using a small metal brad which I pierced through a small circle of red card and then each arm section of the windmill, closing the brad on the back.

Small self adhesive Dazzles circles were used to decorate the windmill. The Dazzles I chose were a holographic red with a gold outline as I felt they were a good match for the washi tape.  I glued a strip of white Ric Rack ribbon to the card front using clear drying Cosmic Shimmer glue and added the completed windmill to the top using 3D foam pads.

The sentiment of ‘Party Time!!’ was printed onto PMD Plain White cardstock using my Cricut Explore and the black ‘midnight’ pen. You could also handwrite, stamp or use peel offs if preferred.  To finish a medium sized Dazzle adhesive was added to each side of the sentiment and 3 larger ones were added along the washi tape border at bottom right hand side.

Materials Used:
White Pearlised Paper – Papermill Direct 
Post Box Red Card - Papermill Direct
White Ric Rac Ribbon,
Small metal Brad
Self Adhesive (peel offs) Jewel Dazzles
Washi Tape
(optional) Cricut Explore to cut shape and write sentiment
Adhesives used: Double Sided Tape, Cosmic Shimmer Glue, 3D Foam Pads

Papermill Design Team:
if you have a moment, please do pop over and check out the other papermill teamies blogs and see what they got up to this week: 

https://www.papermilldirect.co.uk/
Click Logo to go direct to papermill