Showing posts with label mothers day. Show all posts

Saturday, 25 March 2017

Flower Pot Card with hidden greeting - Trimcraft DT


Hello, over at +Trimcraft Ltd we have a brand new card shape of the month to play with and it’s perfect for Mother’s Day.  I have used the lovely Painted Blooms papers and the First Edition nesting blooms dies to create the flowers.  The flowers lift out to reveal the message.

Step By Step:
  1. Follow the Trimcraft Card Shape of the Month instructions (by Maxine) here: https://www.trimcraft.co.uk/blog/march-2017/card-shape-of-the-month-flower-pot-card-tutorial which includes the template to create the flower pot card base.
  2. Use Painted Blooms paper to cover the front of the plant pot and ink around with a brown ink to define the shape.
  3. Stamp the Dovecraft clear stamp ‘To the World you are a Mother…’onto the stalk tab section using black ink and allow to dry.
  4. Create flowers from Painted Blooms papers in the 6x6 pad by diecutting with the FE Nesting Blooms shapes.  Snip into each flower shape and glue 1 petal on top of 1 other to create a shaped flower with 5 petals instead of 6.  Layer up some flowers using 3D foam pads.
  5. Add extra detail to flower centres by cutting them from white glitter card and adding fringe paper to them. 
  6. Cut leaves from green FE Textured card using the FE Nesting Blooms dies and cutting into individual petals.  Score a line down each, ink edges and shape using a pokey tool or pencil.  Snip some leaves in half to create smaller ones.
  7. Arrange flowers and leaves as desired and glue into place on the circle top of the sentiment tab, leave to dry.
  8. Add ‘with love’ ribbon to front of plant pot.  Die cut 2 tag shapes using FE tags dies and stamp ‘Best Mum’ on to white tag using Dovecraft clear stamp.  Add tags to plant pot along with a pink adhesive gem.
  9. To finish, add pink adhesive gems to flower centres and slide sentiment stem / flowers into plant pot.

Painted Blooms Collection:
6x6 Paper Pad – DCPAP051
Satin Ribbon – DCRBB010
Adhesive Gems – DCDOT021
Plus:
First Edition Nesting Bloom Dies – FEDIE163
First Edition Tag Dies – FEDIE016
First Edition 12x12 Textured Card – FEPAD062
Dovecraft Clear Stamp – DCSTP094
Dovecraft Clear Stamp – DCSTP010
Dovecraft Fringe Paper – DCTOP040
Dovecraft White Glitter Card – DCGC02
Black Ink, Brown Ink
Adhesives: D/STape, 3D Foam Squares, Clear Drying Glue

Wednesday, 22 March 2017

Mother's Day Card - Step by Step - Papermilldirect DT


Hello, it's almost Mother's Day and I have another card to share with you. It could also be for Mum’s birthday. The ‘papercut’ panel effect is very popular at the moment and dies are a great way to achieve a similar look in an easy way.  I have been playing with one of the new Craft-A-Card dies and some of the gorgeous Papermilldirect Lustre Print cardstocks.  These are 300gsm, fabulous quality cardstocks with a luxury lustre finish and they cut beautifully through my Big Shot die cutting machine


 Step by Step:

 Cut the 5x7” craft a card die from Papermilldirect Periwinkle Lustre Print Silver card.


 Remove the waste from the die cut by shaking it, use a pokey tool for any tiny bits.

Trim the die cut panel down to leave an even border all around (I cut to approx. 18.5 cm x just over 13cm).  Add foam squares to the back of the panel, add them around the outside and to the larger shapes, cut them smaller if required for some areas.


Score and fold an A4 sheet of Papermilldirect Natural White Pearlised cardstock in half, trim down to create a 5 ½” x 7 ½” card base.  Carefully position die cut panel onto the front and when happy with positioning press down firmly to secure.

 Die cut letters to spell ‘MUM’ from PMD Natural White Pearlised card using an alphabet die set.


Glue letters to centre panel on card front, using a clear drying glue.  For even spacing, glue the first and last letter in place and then add the centre letter.


Die cut a selection of flowers and leaves from PMD Lustre print Silver card.  Spring Green for the leaves and the pink shades for the flowers.


Shape the flower petals and leaves in your fingers to give shape, layer some up using 3D foam pads and then glue as desired to card front.


To finish add an adhesive gem to the centre of each flower.

I love the pretty colours in Papermilldirect’s Lustre Print card range, The Periwinkle is sooo pretty and my favourite colour, so I themed this card around the purple and pinks.  There are lots of other shades to check out too, why not try experimenting and if you make a project using PMD card then please do share it over on the Facebook page, Twitter or Instagram, we love to see what you have been making.
Angela x
Products Used:
Lustre Print Silver 300gsm Card in Periwinkle, Spring Green, Persian Pink, Misty Rose, Red Wood – Papermilldirect.
Natural White Pearlised card 300gsm – Papermilldirect.
Craft A Card Die 5x7” FEDIE179 – First Edition
Alphabet Headliner Die XCU503153 – X Cut
Faux Quilled Blooms Dies CED1402 – Creative Expressions
Self Adhesive Pearls
Adhesives: Cosmic Shimmer clear drying glue, 3D foam pads


Monday, 20 March 2017

Painted Blooms MUM Card - Trimcraft DT


Hello I have a +Trimcraft Ltd DT card to share with you today.  Have you seen those pretty Flower topped paperclips in the new Dovecraft Painted Blooms collection?  They are so cute and I just had to use them along with the pretty papers and other matching embellishments to create this tag style bunting card.  This card would be good for Mother’s Day or Mum’s Birthday.

Step By Step:
  1. Score and fold A4 Dovecraft White card in half, trim down to create a 7 ½” x 5 ½” card base with fold across the top. Add a rectangle of striped Painted Blooms paper to card front leaving a white border all around.
  2. Cut Painted Blooms pattern paper approx. 6 5/8” x 4 5/8” and mat onto slightly larger white card using D/S tape, mat onto card front.  Using a white pen add a faux stitch detail around edges of pattern paper.
  3. Adhere a strip of lace ribbon across top of card, allow ends to overhang edges and trim at an angle, seal with clear drying glue to prevent fraying.  Glue a green mini bow to each end.
  4. Using the FE Scalloped Circle dies cut 3 smaller circles and 2 larger circles from Vellum (sized to fit onto tags).  Take 3 Different shaped Painted Bloom tags and add faux stitching all around these and the vellum circles using a white pen.
  5. Die cut letters to spell MUM from white glitter card using the FE Alphabet dies.  Glue a letter onto each small vellum circle and then again onto a larger circle.  Glue each letter to a tag using clear drying glue throughout.
  6. Take 3 flower paperclips and arrange across lace ribbon, use 3D foam to adhere at angles as desired.  Add 3D Foam to the back of each tag before slipping them onto the paperclips.  Arrange as required before pressing down to adhere.
  7. To finish, add a strip of Flower Tape across the bottom of the card.
Dovecraft Painted Blooms Collection:
8x8 Paper pad - DCPAP050
Printed Tags – DCTOP045
Paper Clips – DCTOP046
Lace Ribbon – DCRBB010
Mini Bows – DCRBN023
Flower Tape – DCTOP047
Plus:
Dovecraft A4 White Card
Dovecraft A4 Vellum
Dovecraft White Glitter Card
First Edition Alphabet Dies – FEDIE140
First Edition Scalloped Circle Dies – FEDIE071
White Pen
Adhesives: D/S Tape, 3D Foam Squares, Clear Drying Glue

Tuesday, 1 March 2016

Happy Mothers Day Floral Wreath Card


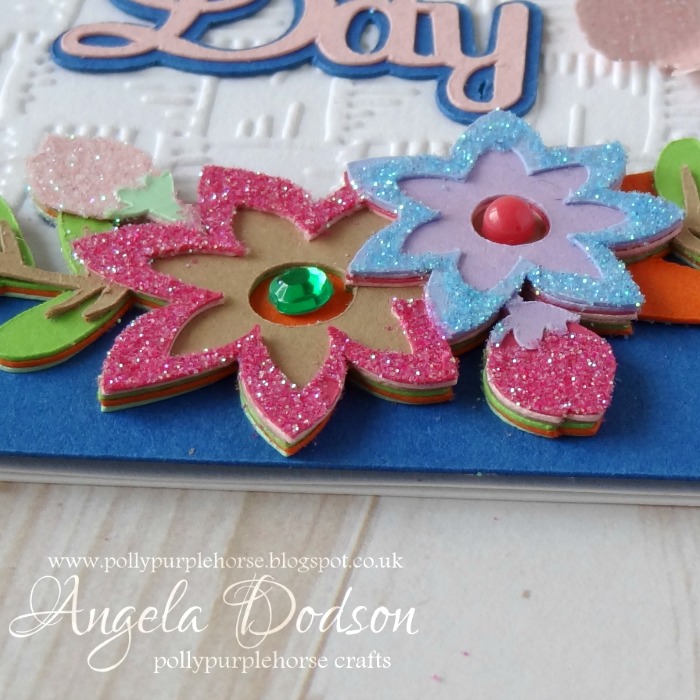
Hello I'm back here to share a Mother’s Day card with you.  This week I’m using a variety of coloured cardstocks from Papermilldirect’s lovely colours range, and teaming it with ‘Coniston Blue’ which is this week’s  +Papermilldirect Special Offer card.  If you're quick you can grab a small box for just £4-40!!  This is for 75-80 A4 sheets of premium quality 300gsm, a bargain!!

I cut this layered floral design on my Cricut Explore using images free from within the Design Space subscription. (I know they've changed the name to Access now :D ) If you would like to cut it exactly as I have, the link to my DS file is here: https://uk.cricut.com/design/#/canvas/37189424   I have sized it to fit a 6x6 card but you can of course adjust the size to suit your requirements.


If you don’t have a Cricut then why not use the coloured cardstocks as inspiration to die cut or punch a variety of flower shapes and leaves to form a wreath shape onto a card front.  I am using the ‘Coniston Blue’ as the backdrop and shadow for my ‘Happy Mother’s Day’ sentiment, as it is the perfect shade of blue to set off those lovely bright colours.
The flowers and leaves in my design are very dimensional and this is simply by layering up the shapes and gluing them on top of each other, using a wet clear drying glue such as Cosmic Shimmer allows some ‘wriggle time’ to line them up and not leave any glue marks.


For the Plain White Card panel I have embossed it with a Basket Weave effect embossing folder through my Big Shot to add some extra detail and texture, but it could also be left plain.  The card blank is also PMD Plain White card.
To add some extra sparkle I applied some of the Nuvo glitters by first using the Nuvo glue pen on the area to glitter and then sprinkling the glitter onto it from the bottle, when dry you can gently tap the excess off and pop it back into the bottle.   (I used a small clean paintbrush to gently brush away any stray glitter afterwards)


You can add different adhesive gems, pearls or enamel dots to the centres of the flowers to make them ‘pop’ and / or add some die cut butterflies as I have done here to accent the sentiment.
Although I designed this one as a greeting card, it would work well mounted in a little box frame too, perhaps as a Mother’s Day Gift?  You could even use different sentiments in the centre or perhaps a photograph to make it an extra special gift.


Materials Used:
Papermilldirect - Coniston Blue ‘offer card’
Papermilldirect - Plain White card
Papermilldirect Coloured card - Pale Turquoise, Marine Blue, Apple Green, Spring Green, Baby Pink, Raspberry Pink, New Lilac, Buff, Orange
Crafters Companion – Basket Weave Embossing Folder
Nuvo Glue Pen – Tonic Studios
Nuvo Pure Sheen Glitter – Candy Pink, Aqua, & Diamond – Tonic Studios
Adhesive gems, pearls, enamel dots
Double Sided Tape, Cosmic Shimmer Acrylic Glue


Thursday, 7 January 2016

Stacking Word Blocks Project with Deco Mache and Cricut Explore


Hello and welcome to another Blog Post to start the New Year. Although I love cardmaking I do also like to craft in other ways, so today I'd like to share this project with you.

Each year I like to create a handmade gift for my parents.  I’ve seen stacking word blocks before with individual letters and Christmas words on them, and thought it would be nice to create blocks with a verse for Grandparents.
I started by preparing 4 MDF blocks with white acrylic paint and then applied 3 different Deco Mache papers to create my base blocks.

I played around with a verse / phrase and adapted it to fit the blocks.  I created the wording in Design Space, so I could cut it out on my Cricut Explore.

If you'd like to find out more, including details of the materials used and a step-by-step Tutorial guide, then please pop over to my Trimcraft Gallery here: http://www.trimcraft.co.uk/projects/121004/stacking-word-blocks-with-santoro-deco-mache-cricut-explore

I really enjoyed making this project and I'm thinking it would also be ideal for a Mother's Day gift too :)


Tuesday, 3 March 2015

It's all about MUM - with Papermilldirect


March already!! and the +papermilldirect  Design Team are looking ahead to Mother's Day and creating lots of different designs and styles.  The Special Offer Card this week is the fab Ivory felt embossed which is just £15-60 for a Midi size box of A4.  It's also my turn to work with the Offer card and I was torn between creating a card with clean lines or getting a bit inky, the Ivory Felt Embossed is 300gsm and has such a great texture it lends itself well to lots of techniques hence my dilemma :D  In the end I just couldn't decide and created 2 cards instead.  These 2 cards are also featured on the +papermilldirect  Inspire Blog along with colour palette suggestions: 

For my first card I got the inks out and used them through a stencil mask to create a bright Daisy themed card for 'Mum'.  I used pigment Inks from Oak House Studio which are rich and juicy and gave a vibrant result. I also used a manual diecutter (Big Shot) to cut some flowers. For the flower centres I used a mixture of pigment ink and then I got a little paintbrush out and added some extra colour using sprays inks in pumpkin pie and glorious gold, the latter gives a lovely golden glow.  The butterfly was cut using a Fiskars punch and then coloured with OHS Paris Pink and Glorious Gold spray ink.  The 3 daisys and the butterfly were attached using 3D foam to create depth and interest.  Using blue pigment ink I stamped the sentiment of 'MUM' using a clear stamp that I had masked off the top wording. Faux adhesive pearls in 2 sizes added the finishing touches.  This card is almost entirely created using the Ivory Felt Embossed card, except for a touch of bright orange card to mat the design.

For my second card I wanted to show how well the Ivory felt embossed card will cut in an electric die cutter.  It is a 300gsm card and yet it cuts beautifully in my Cricut Explore and I didn't even need to change my cut settings.  I used it to cut the shaped card blank and it even coped perfectly with the intricate lattice / trellis work on the card front.  


The sentiment was also cut on the Cricut Explore using a variety of papermilldirect card from the colours range.  The sentiment panel and the lattice were attached to the card front using 3D foam to give height and I added a few faux pink gems and pearls to finish.

I loved experimenting with this card and finding out what it can do, which appears to be everything I asked of it, and at an extra special price too, what more could a crafter ask for?


Materials Used:  

Stencil Mask (I believe is from Splodgeaway but have lost the packaging so can't be 100% sure)
MUM clear stamp - Dovecraft
2" Butterfly Punch - Fiskars
Flower Dies - First Edition
Faux adhesive Pearls & Faux ahdhesive pink gems - from my crafty cupboards  drawers
Adhesives - Double Sided Tape, 3D foam pads, cosmic shimmer glue


Papermill Design Team:
if you have a moment, please do pop over and check out the other papermill teamies blogs and see what they got up to this week: 
Barbara 
Lisa  
Sylvia  
Sandie   

Craig 
Papermilldirect Inspire Blog 

Monday, 23 February 2015

A Mother's Day Gift Box - with Papermilldirect


Hello, today I'd like to share this Mother’s Day Gift Box with you.  I’ve sized this box so that you can pop all sorts of goodies inside, and  if you want to make an extra special gift it is the perfect size for you to fill with 3” square handmade notecards.


I decided to make the Gift Box using a scoring board and scissors rather then rely on my Electric cutter.  Sometimes it's nice just to get back to basics once in a while.  I did however use a manual die cutter and dies and a border punch to create the decorative panels.  I do like to stamp and so combined a pretty feminine stamp with the cream card and coloured using promarkers.

I have included a materials list, measurements, and lots of pics to show a step by step to create this Gift Box over on my Papermill Inspire Blog post (link here)

Please do pop over and take a look, let me know your thoughts, do you make your own gift boxes?, perhaps you have ideas for things to put into the box? 
 * Please Note - This weeks Materials List is over at the Papermill Inspire Blog link above


Papermill Design Team:
if you have a moment, please do pop over and check out the other papermill teamies blogs and see what they got up to this week: 
Barbara 
Lisa  
Sylvia  
Sandie   

Craig 


Monday, 3 March 2014

Playing with Bohemian Bazaar...Part deux!!

Wow can't believe I waited sooo long to get stuck into this collection and now that I have, I can't seem to tear myself away.  I've admired it for so long, stroked the papers, flipped through both the 12x12 and the 8x8, although I must admit that I haven't opened the little extras like the tags and pockets and chipboard embellishments yet.  Saving those treats for now :D

I like interesting card bases and I'm a bit choosy about quality.  So these elegant step cards from craftwork cards fit the bill nicely.  Again I think the colours of this collection really 'pop' when set off against a good quality intense black.  I've used many cardstocks over the years and never been 100% happy with the blacks.  Not sure why, but it seems really difficult to get a good even black.  So I was over the moon to recently re-discover Papermill Direct.  (Used to buy from there shops instore many years ago)  Anyway, I ordered some black card as part of a 'pick & mix' of 4 colours, which btw were all super quality and colours.  The black really caught my eyes though, at last a proper black to play with and i think it sets off the bright colours perfectly.

For the first card I inked around all the edges of the 'step card', that's quite a lot of edges, so i double-checked to make sure. Also inked up the paper edges using 'Broken China' distress ink before matting & layering the panels onto my new found friend, the black card.  Attached the panels to the card base using a combination of double sided tape and cosmic shimmer glue.  

I die cut the sentiment panels and the black accent shapes and flourishes, again using the papermill cardstock, perfect through my Big Shot.

After assembling the panels and adding the card accents, I turned my attention to the finishing touches.  I knew the card needed something extra, something tactile and to add dimension.  So I took some vintage rose lace ribbon, that was a cream colour, and decided to sponge it with 'broken china' distress ink.  I tapped some ink onto a mat, added a little water and sponged the rose trim all over.  After it has dried a little I then added a touch more of the blue ink (neat this time not watered down) just applying it to the raised edges of the rose folds itself, to add a little more definition.

A couple of wired fabric leaves (from my stash) and some black liquid pearls add the finishing touches.


Blue Roses Step Card

And next up is another step card.  Again using the papermill black card to set off the beautiful colours of the G45 papers.

This time I used 'Spiced Marmalade' to ink all around the card base edges and also the edges of the patterned paper.

Using the same method as before, I dyed my cream coloured American seam binding by adding a little water to some of the ink tapped onto a mat and dragging the seam binding through it, making sure it was completely coloured before setting aside to dry.  I love American seam binding, but I can't seem to find it locally, and am almost out!!  So if anyone can recommend a store for me?  

Okay I assembled the card panels as before using a combination of double-sided tape and cosmic shimmer glue.  I die cut the sentiment panels and some flourishes from black card.

As before, I needed to add something to the design.  I settled on making some die cut roses, using a die that cuts them as spirals, then I inked the cut edges and rolled them up into rose shapes, gluing the bottom of each with cosmic shimmer glue to hold them together.  Now I would normally use a hot glue gun for my rolled roses, but I thought I'd experiment and try the cosmic shimmer glue, and besides I wasn't sure where I last put the glue gun.  Anyway the experiment worked and the roses stayed rolled up in position.  I added a tiny faux pearl to the inside centre of each.  

Now I needed something to help set off my trio of roses.  out came the Big Shot again and I diecut some more flourishes in black and also some trailing ivy leaves in green bazzil cardstock.  I inked the edges of the ivy leaves to dampen down their greenness and co-ordinate with the rest of the card.

I added a bow made with the dyed seam binding and some black liquid pearls to finish the card.

Rose Trio Step Card
 I'm finding it hard to choose my favourite from these two.  They are both standing on my craft table looking at me :D  P.S. I must apologise for the quality of the photos, I'm not a good camera-woman :D