Showing posts with label floral. Show all posts

Sunday, 1 May 2016

'Lovely' Floral Card - A Step by Step Tutorial


Hello I'm back again with another Step By Step Tutorial for you.  This week the Papermilldirect Design Team are working on the theme of ‘Floral’ and I have a little card design to share featuring a layered Daisy.
Most crafters have flower dies and sentiments in their stash, along with background dies or embossing folders, so although I used my Cricut Explore (link at end of post) to cut the Daisy flower, it is easy to layer up any of your flower dies or use a flower template or even ready-made paper flowers for a floral make.
Die cut a trellis style design from Papermilldirect White Pearlised cardstock using a Spellbinders die.  (You could use an embossing folder if you prefer).  I didn’t need all the piece and so trimmed it down to less than 4” using the pattern as a guide to leave a fancy edge.
The card base is cut from PMD Marine Blue and measures approx. 5 ½” x 4 ¼” and I have rounded the bottom corners.  I also cut a panel of PMD New Lilac card to measure approx. 4 ½” x 4” and rounded all 4 corners.
Glitter glue was used to edge the front of the card base and also the New Lilac panel to add a little sparkle.
The Trellis die cut panel was then adhered to the lilac panel using a clear drying acylic glue and then the whole panel was mounted onto the card front using double sided tape.
Cut the flower layers, I used 3 layers to create a daisy style flower using Papermilldirect White Pearlised paper, layering the flower with 3D foam in the centre of each layer. Shape the petals and then glue the flower to the card front, adding some glitter glue in the centre and a yellow enamel adhesive dot. Cut leaves from PMD Spring Green card and shape to give dimension. Add a little 3D foam pad to the back of each leaf and glue the stem by tucking under the flower, the 3D foam pads will hold the leaves in place.

Die cut your sentiment in PMD Black card and PMD Marine Blue Card.  I have used the word ‘Lovely’ from a First Edition die set.  Layer the sentiments up using a clear drying glue, offsetting the Marine Blue one so that the black gives a shadow effect.
Glue the sentiment in place on the card front and smooth down using a bone folder or crease tool to ensure it is adhered onto the trellis work.  To finish add a little butterfly embellishment.

Using the Papermilldirect Pearlised card and paper adds a lovely sheen to your makes and I especially like the paper for diecutting flowers as it gives a delicate look that can be easily shaped yet retains a lot of strength. It also is a dream to cut on Cricut Explore where it cuts very cleanly.

Materials Used:
Marine Blue, New Lilac, Spring Green, Black coloured cardstocks – Papermilldirect
Ultra White Pearlised Paper, Ultra White Pearlised Card – Papermilldirect
My Design Space Link (for card base, Daisy & Leaves) - https://uk.cricut.com/design/#/canvas/39473641
‘Fancy lattice’ Shapeabilities #S5-152  - Spellbinders
‘Modern Sentiments’ #FEDIE038 – First Edition
Adhesives:  D/S Tape, 3D Foam Pads, Cosmic Shimmer Glue
Glitter Glue, Adhesive Enamel Dot


Wednesday, 2 March 2016

Mini Butterfly Wreath with Floral Muse Collection

Hello, today I'm sharing one of my +Trimcraft Ltd DT makes with you.  The Dovecraft Floral Muse collection is sooooo pretty I didn’t know where to start first!!  It’s been a little while since I made a hanging wreath and I had originally intended to make this to go onto a card front but I really liked it as a strand alone (or rather hanging) wreath and with the acetate strip it allowed the sentiment to ‘float’.

Step By Step:
    Make a little cardboard wreath shape (or use a ready-made one if you prefer).  A simple wreath shape can be cut from circles, the outer size for mine is approx. 5” dia. The inner circle approx. 3.5” dia. 
    Add glue to wreath shape and place down onto grey trellis pattern paper from the Floral Muse 6x6 pack.  When dry cut out, you may find a craft knife easier for the inner circle.  Sand the cut edges (I use a nail file) and then ink all around edges inside and out with a light brown ink.
    Using the distressed postage style text stamp form the Floral Muse clear stamp set, stamp randomly all over the wreath using a brown ink.
    Pierce holes into the wreath, 2 at the top for hanging ribbon and 6 evenly spaced around the wreath. Cut lengths of pink organza ribbon (Floral Muse) 6 smaller lengths and 1 larger length for hanging.  Using the same stamp and brown ink stamp onto the ribbon randomly.  When dry, tie each ribbon through holes and trim, then add the longer hanging ribbon securing knots on back with dab of glue.
    Using the First Edition Foliage die set and green card from the FE Textured card pad, die cut 4 leafy ferns.  Stamp randomly using the same text stamp and brown ink as before. Ink edges with light brown ink.
    Take 2 papers from the Floral Muse 6x6 and 1 piece of pink card from the FE textured card pad and cut 3 circles.  Using the same text stamp and brown ink as before, stamp randomly all over the front and back of each circle.  The cut into the circles to create spirals.  Ink cut edges with light brown ink and then rolls spirals to create roses, securing with glue at the bottom.
    Arrange die cut leaves and roses on wreath and when happy with position, glue into place.
    For Sentiment, use brown ink to stamp ‘Made with Love’ onto a pattern paper from the Floral Muse 6x6 pack and cut out.  Glue to a strip of Dovecraft Acetate and then glue acetate to back of wreath at ends so that sentiment is positioned in centre, trim acetate.
    Next stamp 4 butterflies from the Floral Muse clear stamps with brown ink, stamp 2 onto floral muse paper and 2 onto blue textured card from the FE pad.  Cut out and ink edges, bend wings and then arrange onto wreath and glue in place along their bodies only.
    Using the FE Butterflies die set, die cut 2 smaller butterflies from Floral Muse paper, over-stamp with text stamp and ink around with light brown ink.  Bend wings as before and add 1 butterfly to top of sentiment, the smaller one to the rose’s arrangement.
    To finish add Dovecraft 3D pearls effects in Pastel Pink colour to the centres of the roses

Products Used:
Dovecraft Floral Muse 6x6 Paper Pack (FSC)
Dovecraft Floral Muse Clear Stamps - Sentiments
Dovecraft Floral Muse Clear Stamps - Butterfly
First Edition Dies - Butterflies
First Edition Dies - Foliage
Dovecraft A4 Acetate Sheets
Dovecraft Pearl Effects Box – Pastels
First Edition Premium Textured Cardstock – 12x12 Papers

All Products are from +Trimcraft Ltd  and this project also appears in my Trimcraft DT Gallery link here: http://www.trimcraft.co.uk/projects/121439/mini-butterfly-wreath-with-dovecraft-floral-muse-collection


Tuesday, 1 March 2016

Happy Mothers Day Floral Wreath Card


Hello I'm back here to share a Mother’s Day card with you.  This week I’m using a variety of coloured cardstocks from Papermilldirect’s lovely colours range, and teaming it with ‘Coniston Blue’ which is this week’s  +Papermilldirect Special Offer card.  If you're quick you can grab a small box for just £4-40!!  This is for 75-80 A4 sheets of premium quality 300gsm, a bargain!!

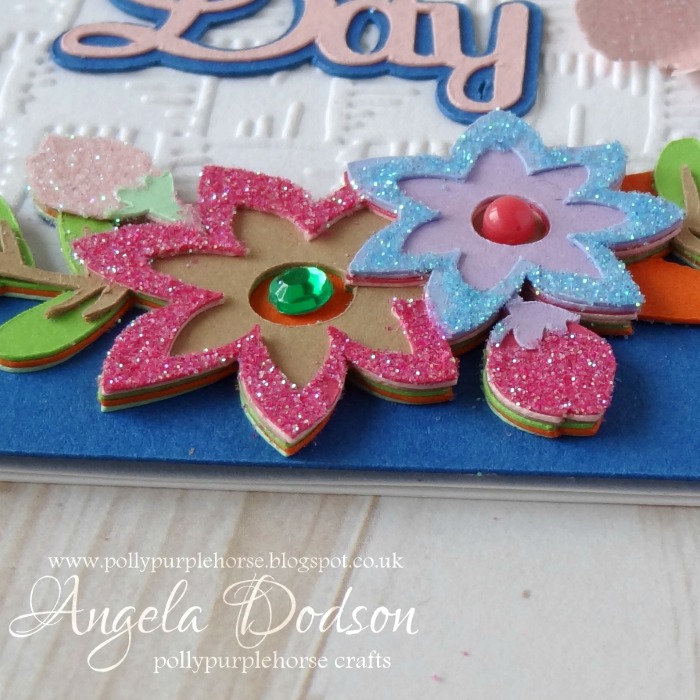
I cut this layered floral design on my Cricut Explore using images free from within the Design Space subscription. (I know they've changed the name to Access now :D ) If you would like to cut it exactly as I have, the link to my DS file is here: https://uk.cricut.com/design/#/canvas/37189424   I have sized it to fit a 6x6 card but you can of course adjust the size to suit your requirements.


If you don’t have a Cricut then why not use the coloured cardstocks as inspiration to die cut or punch a variety of flower shapes and leaves to form a wreath shape onto a card front.  I am using the ‘Coniston Blue’ as the backdrop and shadow for my ‘Happy Mother’s Day’ sentiment, as it is the perfect shade of blue to set off those lovely bright colours.
The flowers and leaves in my design are very dimensional and this is simply by layering up the shapes and gluing them on top of each other, using a wet clear drying glue such as Cosmic Shimmer allows some ‘wriggle time’ to line them up and not leave any glue marks.


For the Plain White Card panel I have embossed it with a Basket Weave effect embossing folder through my Big Shot to add some extra detail and texture, but it could also be left plain.  The card blank is also PMD Plain White card.
To add some extra sparkle I applied some of the Nuvo glitters by first using the Nuvo glue pen on the area to glitter and then sprinkling the glitter onto it from the bottle, when dry you can gently tap the excess off and pop it back into the bottle.   (I used a small clean paintbrush to gently brush away any stray glitter afterwards)


You can add different adhesive gems, pearls or enamel dots to the centres of the flowers to make them ‘pop’ and / or add some die cut butterflies as I have done here to accent the sentiment.
Although I designed this one as a greeting card, it would work well mounted in a little box frame too, perhaps as a Mother’s Day Gift?  You could even use different sentiments in the centre or perhaps a photograph to make it an extra special gift.


Materials Used:
Papermilldirect - Coniston Blue ‘offer card’
Papermilldirect - Plain White card
Papermilldirect Coloured card - Pale Turquoise, Marine Blue, Apple Green, Spring Green, Baby Pink, Raspberry Pink, New Lilac, Buff, Orange
Crafters Companion – Basket Weave Embossing Folder
Nuvo Glue Pen – Tonic Studios
Nuvo Pure Sheen Glitter – Candy Pink, Aqua, & Diamond – Tonic Studios
Adhesive gems, pearls, enamel dots
Double Sided Tape, Cosmic Shimmer Acrylic Glue