Monday 30 October 2017

Pumpkin Tealight Holder - Trimcraft DT


Hello, Today I have a Pumpkin Tealight Holder to share with you.  This is a project I designed for the +The Craft Blog by Trimcraft where you can find the tutorial and a FREE downloadable Template (links at end of post)


I love the Wow gold embossing powder and just had to use it to emboss this fab sugar skull stamp, for a distressed look.

A battery operated tealight is perfect to use inside, I found some that were orange for halloween.  You can find them in different colours and some have flickering lights too.

Why not make one or more for your very own seasonal pumpkin patch? 

You will need:
Download your Free Pumpkin Template Here
Step by Step Tutorial - Link Here
Dovecraft A4 Coloured Card, Twine, Candy Skull Stamp, A4 Kraft Card, Embossing Ink Stamp Pad, Light Brown Ink Pad
WOW! Gold Embossing Powder


Thursday 26 October 2017

Star Easel Card - Cherish The Memory Guest DT


Hello, I was recently invited to be a Guest on the DT over at Cherish The Memory to work with the Sweet Winter Season collection from Studio Light. (All product links and Youtube Video at end of post)

For my 2nd project I took inspiration from the star shaped sheep image, which is a sweet 3D layered decoupage, and created a star shaped easel card using star dies that echoed the shape.  A little piece of clear Acetate invisibly provides a base for the easel to rest on the stopper


I covered the easel card with blue paper from the 12x12 pack, inking the edges with a blue distress ink. This collection also includes a really nice clear stamp set.  I used the snowflakes and music stamps, along with one of the sentiments, stamping in Versamark ink and heat embossing in Gold.

To finish, the card was embellished with adhesive pearls and ribbon trim. This star shaped easel folds down to fit into an envelope all ready for posting out.

The 3D decoupage elements are die cut and easy to press out, layer up with 3D foam pads and add to your makes, there is a great selection of images on the sheets, perfect for your winter themed makes. I do hope you like todays project and please do pop back for more makes with this collection.


All products can be purchased direct from Cherish The Memory.
Products Used:
Plus:
White Card
Dovecraft A4 Acetate
Versamark Inkpad
Gold Embossing Powder
Adhesive Pearls
Ribbon Trim
Adhesives: D/S Tape, Clear Drying Glue, 3D Foam Pads


Monday 16 October 2017

Halloween Bridge Card - Trimcraft DT


Hello, Today I have a simple Halloween themed bridge card to share with you.  The Free Halloween downloadable papers from Trimcraft are fun, cute and have funky colours perfect for making a simple ‘Bridge’ card design, especially as they have sentiments included too.

I decided to make a little spider and add a web along with a floating Ghost for a fun Halloween greeting.


Step By Step:
Cut Dovecraft black card approx. 11” x 6”
With long side across your scoring board, score from left at 1 ½”, 3”, 8”, and 9 ½”
Download and print off the free Halloween papers, link here: https://www.thecraftblog.com/freebies/downloads?page=2
Decorate card panels by matting pattern paper onto white card and then again onto panels using double sided tape.  I’ve used pink pattern paper for centre and inner panels and turquoise skull paper for the 2 out panels.
Cut a ‘bridge’ strip from white card approx. 8” x 2” and decorate with a strip of ghost pattern paper. 
Attach bridge strip by folding in left side of card and adhering the strip to the first panel, take it across the card and adhere where it meets the edge of the end panel, this will allow the card to fold down.  Use a clear drying glue to allow adjustment.
Cut out Halloween sentiment, bat, skulls and ghost. Adhere sentiment to centre panel at top and bat to overhang left panel. 
Adhere ghost to a strip of acetate and attach to centre panel using clear drying glue on the back, hold in place for s few seconds to prevent it slipping.  Adhere skill trio to acetate and attach under bridge section.
Adhere a piece of white spiders web trim to panel at right hand side, apply adhesive where it will be covered by spider and eyeball)
Make a spider by cutting a circle of Dovecraft black glitter card, adhere black cord ‘legs’ to the back and then cover with a circle of black card. Add 2 googly eyes to spider before adhering to spider’s web.
To finish, add a couple of eyeballs (these were from last year’s Trimcraft free Halloween download papers) add black adhesive gems to ghost’s eyes and centre of eyeballs.  Add a panel to the back of your card for the greeting.
Here’s a little video to show the card:

Trimcraft Products Used:
Dovecraft White A4 Premium Card – DCBS137
Dovecraft Black A4 Premium Card – DCBS138
Dovecraft Black Glitter Card – DCGC01
Dovecraft A4 Acetate – DCBS106
Plus:
Black Adhesive Gems. Googly Eyes, Black Cord, Spiders Web
Adhesives: D/S Tape, Clear Drying Glue

Wednesday 20 September 2017

Sweet Winter Season Pop Up Box Card - Cherish The Memory Guest DT


Hello, I was recently invited to be a Guest on the DT over at Cherish The Memory to work with the Sweet Winter Season collection from Studio Light. (All product links and Youtube Video at end of post)


For my first project I created a simple pop-up box card from white card.  Decorating the panels with the 12 x 12 pink snowflake paper.  This pretty paper is double sided, the reverse is a light beige colour featuring a stag.


I selected elements from 2 of the labels sheets and glued to acetate strips using a clear drying glue, then mounted them inside the box design on 2 card supports, decorated to match.

Teaming the 'winter wonderland' sentiment with other elements from the label sheets to decorate the 'flaps' of the box.  To finish, I added adhesive clear gems and dabs of glitter glue to highlight the main pop up images.


The Label sheet elements are die cut and easy to press out and add to your makes, there is a great selection of images on the sheets, perfect for your winter themed makes. I do hope you like todays project and please do pop back for more makes with this collection. 


All products can be purchased direct from Cherish The Memory.

Products Used:
Sweet Winter Season Labels EASYSWS502
Plus:
White Card
Dovecraft A4 Acetate
Dovecraft Glitter Glue - Crystal
Clear Adhesive Gems
Adhesives: D/S Tape, Clear Drying Glue, 3D Foam Pads


Sunday 27 August 2017

Kimono Paper Doll Card – First Edition Floral Fusion Papers - Trimcraft DT


Hello, today I'm sharing a make with my favourite papers at the moment, which are the fabulous First Edition Floral Fusion, I love the oriental style. I also love paper folding and have always wanted to fold a kimono paper doll, it’s really simple and there are guides online. Why not make them with different sleeve and hair styles?

Step By Step:
Create a little folded Kimono shape first, there are guides online but they use washi paper which is a lot thinner than the high quality First Edition papers, so I have made the Obi (belt) as just one layer rather then rolled over.  The Kimono is created in 4 pieces (the Kimono gown, 2 sleeves and 1 Obi belt) and the head is 4 pieces (face, neck, hair, fringe) There are no exact measurements, just play with the paper until you are happy (you could practice with scrap paper first if you prefer)

I started with a sheet of 6x6 double sided paper and trimmed a piece off the left hand side, basically to make it a rectangle.  I then folded over the top about 2cm and then folded it back about 1cm to give a collar of about 1cm.  then took the paper from the top left corner and brought it across the front about half way, lined up the bottom hem and then pressed flat, it will give a slight shoulder fold.  The do the same with the right hand top corner, bring it over the front and line up with side edge of kimono and bottom, crease to give the shoulder fold as before.  Fold over the top layer slighter to give a reveal of the d/s paper.

Next cut a strip of paper to match for the Obi belt (I’m using the other side of the double sided paper used for the kimono so it will coordinate).  Cu the Obi strip approx. 2cm deep and fold around the Kimono.  It needs to sit high up and will cover the top fold details.  Glue the Obi ends together to complete the belt on the back.  (If you are keeping as a doll then be neat on the back too, if it’s going onto a card then you don’t have to worry about the back)  (I understand that the younger a lady is, the higher she wears the Obi, so if yours is lower it just means she’s a bit older: D)

Next cut 2 sleeve shapes for the arms in paper to match the Kimono gown, basically 2 squares, cut into them to create L shapes (left & right versions) and round edges to create shaped sleeves (again you can be creative with the sleeves.  Position sleeves and adhere at back of gown.

To create the head, cut a circle approx. 3cm from white card, and a strip for the neck, colour with First Edition markers.  Glue neck to back of head.  Create front of hair by cutting a 3cm circle from white card and colour with black marker (or use black card), cut into the circle to create chosen fringe shape and adhere to head using 3D foam squares.   Create hair length as desired, coloured to match fringe and adhere to back of head, using 3D foam squares.  Slide neck into kimono body and glue into position.  You know have a little paper doll.

I have added this paper doll to a card as follows:
Create white card base by scoring & folding A4 White Card in half.  Cut Floral Fusion paper approx. 12.75cm x 18.75cm.  Add 2 strips of text pattern and 2 strips of leaf pattern paper across card front.  Mat paper panel onto black card and then again onto card front using d/s tape.  Cut pennant shapes from patter papers using the FE Bunting die set and adhere at top left corner.  Position paper doll on card front and adhere in place.

Products used:
First Edition Floral Fusion 6x6 Paper Pad – FEPAD157
First Edition Floral Fusion 8x8 Paper Pad – FEPAD156
First Edition Bunting Dies – FEDIE147
Dovecraft Black Card – DSBS138
White Card
First Edition Markers (face & hair)
Adhesives: D/S Tape, Clear drying Glue, 3D Foam Squares

Wednesday 23 August 2017

A Papercut Style Heart Wedding Card - Papermilldirect DT


Hello, today I'm going to share a recent Wedding card design idea with you.  I love to use Papermilldirect White Linen card not only for it’s lovely texture and the luxury look it gives, but also because it cuts beautifully on my Cricut Explore.  I needed to make a Wedding card with a lemon and white combo so I choose the PMD Pastel Canary card to partner the linen card centrepiece.

Step By Step.  
The design of the card is based around a papercut style heart, I used a heart shape from Design Space and adapted it by welding in some shapes to close some of the open spaces and make it easier to mount onto it’s backing. (The Design Space images I've used are shown at the end of this post)


Mount the White Linen papercut heart onto it’s Pastel Canary backing shape using 3D foam pads and decorate with adhesive pearls and clear gems.  Prepare an 8x8 white card base by adding a mat and layer of embossed white card onto Pastel Canary using d/s tape.  Affix decorative heart to card front using d/s tape and clear drying glue.


Attach a panel of Pastel Canary card inside the card and add a panel for the greeting.  I have cut another heart from smooth white card and used my Cricut to write ‘On Your Wedding Day’ upon it.  I have also added a die cut Wedding Cake and 2 Champagne Flutes using die sets.


Cut the centrepiece heart panel from White Linen card and add to it’s Pastel Canary backing shape using 3D foam pads.  (I have personalised the centre heart by slicing the words into the shape using a Cricut Font, you could use the write function if you prefer?) Decorate heart with small adhesive gems and then add to card front.


Add other decoration to card front if desired, I have added a bride and groom die cut from White Linen card using a FE Wedding Die set and mounted using 3D foam pads.


Add personalised layered hearts to bottom left and bottom right. I have used my Cricut to write ‘Mr&Mrs’ on one and the Wedding date on the other. To finish, add a trio of paper flowers using sticky dots, twirl the wire stems if they have and arrange as desired.  I used a ready-made white box to hold the card and decorated it with a personalised layered heart and a paper flower to match,
Angela x

Products Used:
White Linen Card – Papermilldirect
Pastel Canary 160gsm – Papermilldirect
Smooth White Card – Papermilldirect
Wedding Die Set – FEDIE042 - First Edition
Congratulations Die Set – DCDIE038 – Dovecraft
6mm Adhesive Pearls – SCDOT045 – Simply Creative
3mm Adhesive Clear Gems – SCDOT017 – Simply Creative
Adhesives: D/S Tape, Clear Drying Glue, 3D Foam Pads
Design Space Images used:


Wednesday 26 July 2017

Romantic Gypsy Caravan Gift Box - Trimcraft DT


Hello, back with another catch up post, the First Edition papers are the perfect quality and weight for 3D paper crafting projects. I found the ‘Sweet Nothings’ papers perfect for this gypsy caravan gift box, with it’s romantic florals, soft spring colours and those fabulous wood pattern papers!  I have a video to show the caravan inside and out, link here: https://youtu.be/nxw_SIvG2yU


Step By Step:
This project has been cut on the Cricut Explore using Design Space images.  (Although I have cut this project on my Explore, a similar design could be made manually by adapting a box, shape the top sides and add a roof. Glue box onto larger card base and add wheels)
I chose the plain wood effect papers to construct the base of the box, as this was also double sided with a lovely rose print for the inside of the box.


The main top body of the caravan using the matching wood effect paper that has the rose pattern on it, which gives the appearance of stencilled flowers on the caravan.

For the wheels I cut an extra set to double them up and give extra strength, this also gave the wheels a pink paper backing to match the front.
Wheels have been attached using little brads (or split pins) the heads are hidden behind the little hearts which have been glued onto the head of the brad after assemble.


I’ve kept the decorations simple but you could really have fun dressing this one up, perhaps adding trailing flowers, etc. I have used the solid roof for the caravan but you could you the slotted roof option that would allow little notes to be posted into the box, idea for weddings etc.
To see the project in better detail, I have a video link here: https://youtu.be/nxw_SIvG2yU
This project also appears in my Trimcraft DT Gallery link here: www.thecraftblog.com/inspiration/romantic-gypsy-caravan-gift-box

Products Used:
First Edition Sweet Nothings Papers 12 x 12 – FEPAD143
4 small brads or split pins
Cricut Explore
Cricut Design Space file free with access
Adhesives: Clear Drying glue, Perma fix tape,

Friday 7 July 2017

Love a Creative Life! - Trimcraft DT


Hello, I'm back again with a +The Craft Blog by Trimcraft  catch up post.  Since creating this card I have now framed it in a natural wood shadow box frame for display.

The beautiful FE Wild Flower papers, Creative Life phrase, and flamingo die conspired with my imagination to create this one.  The beautiful paper made me imagine a lush landscape inhabited by Butterfly Flamingos (I'm calling them Fla-Wingos!) with lots of creative messages, ‘creative life = happy life’, ‘LOVE to create’ ‘own style’, the words can be interpreted in different ways.  I’ve used the ‘wink, wink’ ribbon to remind me to never take myself too seriously. My message is always to have fun creating in your own style.


Step by Step:
Cover front of Dovecraft 6x6 Kraft card base (fold across top) with purple pattern Wild Flower paper.  Add a panel of Wild Flower paper inside card to write greeting on.
Cut green canvas effect Wild Flower paper approx. 14cm using Dovecraft decorative edge scissors, mat onto slightly larger square of pink paper (Dovecraft Colours) using d/s tape. Doodle a faux stitch effect around edges using a white pen, when dry add to card front.

Place the ‘Creative Life’ sticker (Kiss & Make Up) to top left on card front. Die cut letters to ‘LOVE’ from text print paper (FE Sweet Nothings) using First Edition alphabet dies and glue to right of chipboard sticker. Add 3 small glitter dots and a heart shaped pearl to decorate.

Using the Dovecraft Flamingo die, cut 3 different colours from Dovecraft Glitter card, purple green & pink, cut 3 butterflies from lilac, white and pink.  Glue flamingos in a row across centre of card front, fold up butterfly wings, apply glue to body part only and glue to flamingos. Add a small gemstone to each butterfly.  Glue a colour matched sequin to each flamingo for the eye and top with a clear adhesive gem.

Take ‘wink,wink’ ribbon (Kiss & Make Up) and adhere across card front just under flamingos feet, allow ribbon to overhang card edges and fish tail ends.
Using black ink stamp letters on to green paper to spell out ‘To’ ‘Create’ ‘Own’ Style’, cut out words and doodle faux stitching around cut edges.  Glue words into place around flamingos.

Die cut a layered flower and leaves from purple Wild Flower paper and white glitter card, assemble flower with 3D foam square and then add to ribbon at right, shape leaves and glue into place around flower, add a glitter dot to the centre of flower.

To finish, add a ‘love’ chipboard sticker (Kiss & Make Up) to first flamingo as if holding in it’s foot. Add 3 enamel hearts under ‘Love’ word, and glue a ‘sea’ of green, purple and pink sequins along the bottom of card.


Products Used:
First Edition Wild Flower 6x6 paper pad
Dovecraft Colours Paper 6x6 pack
First Edition Sweet Nothings Paper (for text pattern)
First Edition Alphabet Dies
Dovecraft Flamingo Die
Dovecraft Layered Flower Die
Dovecraft Butterfly Die
Dovecraft Kiss & Makeup Chipboard Stickers
Dovecraft Kiss & Makeup Heart Shaped Pearls
Dovecraft Kiss & Makeup Ribbon
Simply Creative Alphabet Clear Stamps
Dovecraft Glitter Card
Dovecraft Victorian Edge Scissors
Dovecraft Enamel Stickers
Dovecraft Sequins
Dovecraft Adhesive Gems
Adhesives: D/S Tape, Clear Drying Glue, 3D Foam Pads
White Pen, Black Ink

Thursday 6 July 2017

Peacock Twisted Easel Birthday Card - Trimcraft DT


Hello, playing catch up blogging my crafty makes, here is a recent DT make for +The Craft Blog by Trimcraft

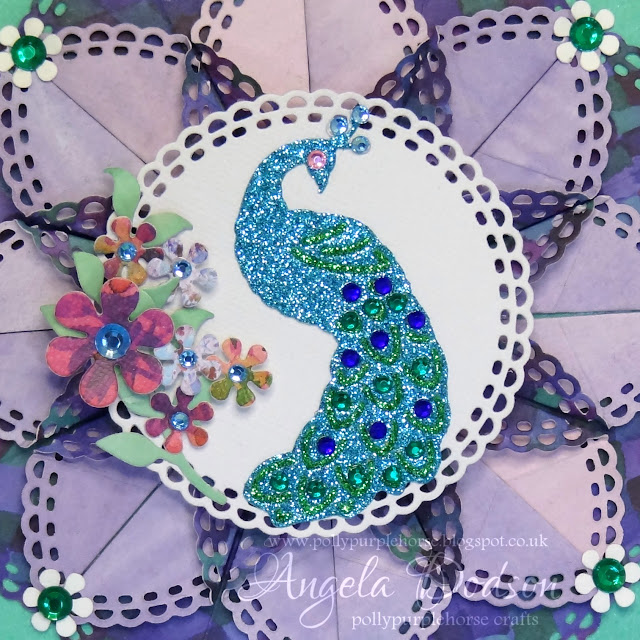
There is a peacock die in the newest selection of dies from Dovecraft and I thought it would work well with the pretty greens, blues, and purples of the FE Wildflower papers.  I quite like paper folding and it’s been a while since I last made a card with the ‘Dahlia Fold’, this is a really easy fold based on circles and I felt the Scalloped circle dies teamed with the double sided Wildflower papers would echo the shapes of a peacocks feathers.  I made this one a Twisted Easel, it’s a great way to add more to a card but still keep the same 6x6 size for posting, it also makes a great display piece for the recipient.

Step By Step:
Create a 6x6 white card base (or use a sturdy ready-made), score and fold the card front diagonally to give the easel part.  Cut a 6x6 square of white card and adhered to the easel part of the base card, line up the panel and only add adhesive to the bottom triangle.

Add layer panels to card front and inside card, lilac pattern Wildflower paper as the first layer, then cut green panels (I’m using a card base from the Pic n Mix pack as I liked the shade of green).  Round corners of green card panels and add faux stitching using white pen.  Adhere panels to front and inside using d/s tape.


Cut 8 doily circle shapes (about 7cm dia.) from double sided Wildflower paper and fold each one in dahlia fold (google dahlia fold, there are lots of diagrams to help).  When you’ve created your 8 folded pieces, arrange them onto a circle and glue into place.  Add the completed medallion to the card front using d/s tape and glue.

Die cut the peacock from blue and green glitter card, paper piecing the green into the blue. Add adhesive gems to ‘eyes’ of feathers, top of head and peacock’s eye.  Glue peacock onto a doily die cut from white card.


Die cut leaves and flowers from Wildflower papers, shape, arrange and adhere with 3D foam squares to white circle alongside peacock.  Use 3D foam to adhere the peacock panel into the centre of the Dahlia folded medallion.

Inside card, Cut a large doily shape from silky wildflower paper and adhere using d/s tape and glue.  Create a ‘stopper’ for the easel by die-cutting a small doily from white card, die cut a 2nd and glue together to create strength.  Adhere stopper inside card with 3D foam, test position first by opening card into easel before pressing down the stopper to fix in place. Die cut a layered flower from Wildflower paper and blue glitter card, top with adhesive gem and add to centre of stopper.


Die cut Happy Birthday from Wildflower paper and glue to left of stopper.  Add die cut flowers and leaves, topping with adhesive gems.

To finish, add a small die cut white flower to each dahlia fold point using glue, top each with alternate stones in green and purple.  Add a pale blue adhesive gem to each corner of the card front.  Your message greeting can be added to a doily die cut and adhered to the base or the back panel of the card.


Products Used:
First Edition Wildflower 8x8 Paper Pad – FEPAD147
First Edition Wildflower 6x6 Paper Pad – FEPAD148
First Edition Doily Dies – FEDIE164
Dovecraft Peacock Die – DCDIE092
Dovecraft Layering Flowers Dies – DCDIE085
Dovecraft Happy Birthday Dies – DCDIE067
Dovecraft Flowers & Leaves Dies – DCDIE066
Dovecraft Let’s Picnic Cards & Envs – DCCE056
Dovecraft Glitter Card Emerald – DCGC07
Dovecraft Glitter Card Topaz – DCGC16
Simply Creative Adhesive Gems 6mm – SCDOT027
Simply Creative Adhesive Gems 3mm – SCDOT026
White Card, White Pen
Adhesives: D/S Tape, Glue, 3D Foam Squares