Showing posts with label rabbit. Show all posts

Monday, 10 April 2017

Blooming Lovely Spring Bunny - Trimcraft DT


Hello, Easter is almost here and I have a few projects to share with you, starting with this fun bunny make which is not just for Easter but will see you throgh the Springtime too.  I have a couple of these free standing MDF bunny kits which I bought in a clearance sale and thought it would be nice to decorate one in the pretty 'Blooming Lovely' spring collection by Dovecraft. 


I started by priming the MDF pieces using white acrylic and then used various papers from the collection to cover the shapes. 
Deco Mache gloss glue and varnish worked perfectly with these papers, applying it before the paper and after the paper to ensure it was well coated.

The bunny tail was covered with Dovecraft white glitter card, and the whiskers were formed from Dovecraft cream & white twine, which i strengthed by coating with clear drying glue and leaving it to dry before adding to the bunny face.

Around the neck i added Dovecraft Fringe Paper, pink organza ribbon and a little purple ribbon bow. 

Paper flowers decorate the head. For detail on the face I used Dovecraft 3D Enamel effects in white and used the 3D pearl effects in clear to cover the pink paper nose.


Products Used:
First Edition Deco Mache Gloss Glue & Varnish
Dovecraft Blooming Lovely 8x8 Paper Pack - DCPAP053
Dovecraft Blooming Lovely Paper Flowers - DCFLW012
Dovecraft Glitter Card White - DCGC02
Dovecraft Blooming Lovely Mini Bows - DCRBN024
Dovecraft Floral Muse Organza Ribbon - DCRBB005
Dovecraft Fringe Paper - DCTOP040
Dovecraft 3D Enamel Effects White - DCBS98
Dovecraft 3D Pearl Effects Pastel Clear -
Dovecraft Cream & White Twine -

Thursday, 28 July 2016

Happy Days 3D Sandcastle Easel Card - Belle and Boo - Trimcraft DT


Hello, Today I'm sharing this DT Project I created for +Trimcraft Ltd .  Living at the seaside, I was very drawn to the gorgeous Belle & Boo II Ice-cream stamp set, cute nostalgic images of characters and shells teamed with fun Ice Cream stamps too.  Immediately I thought of childhood playing on the sand, using Kraft card to inspire a sandcastle theme.  Using an easel card shape allowed me to create a larger than life sandcastle as the backdrop for Belle & Boo.  I thought the striped ribbon reminded me of the sea and the dotty papers of sand. Using acetate to attach the characters gave a more 3D depth to the scene and also they wobble when touched giving an extra interactive element.  I absolutely adore this stamp set and looking at this card reminds me of childhood.

 Step By Step:
  1. Take a 5 x7” Kraft card blank, score & fold the front to create an easel card.  Cover inside base and top half of easel card with blue pattern paper from the 6x6 pack, ink edges with light brown ink before adhering to card base using d/s tape.
  2. Create a stopper for your card by cutting kraft card 14cm x 5cm and add a panel of dotty paper (ink edges).  Add stopper platform to bottom of card base using 3D foam pads to raise it up a little. Add ‘Happy Days’ die-cut sentiment from the decoupage pad using 3D foam pads.
  3. I cut the sandcastle shape on my Cricut Explore (My Design Space link is here:  https://uk.cricut.com/design/#/canvas/39524858 if you wish to cut it exactly as mine).
    However you could easily draw a very simple castle shape onto Kraft card and cut out.  My sandcastle is layered with Belle & Boo paper from the 8x8 pack added with 3D foam pads to give depth.  Inking around all the cut edges of the Kraft card and papers with a light brown ink.  Add sandcastle to easel card using combination of d/s tape and glue.
  4. Stamp a variety of shells and starfish from the Ice-cream stamp set using black ink and colour with First Edition Markers.  Add extra highlights with a white pen.  Edge with lightest grey marker and cut out.

    Stamp, colour, and cut out 3 large ice-creams in the same way.
    Stamp Boo the bunny, colour and cut out but leave a section at the bottom uncut.
    Stamp Belle and colour everything but her dress, stamp her again onto the lilac paper from the 6x6 pack, cut the dress parts only out of the lilac paper and paper piece onto the main Belle image. Add extra highlight with a white pen and then cut out same way as for the bunny, leaving an uncut portion at the bottom.
  5. Cut 2 thin strips of Dovecraft acetate to fit behind the characters and make 2 bends in each strip, the space between the bends will determine how far from the card the character will stand away (just over 1cm worked well for me)  Glue an acetate strip to back of each character and then trim if required.  Cover bottom uncut areas of stamped images with dotty pattern paper to resemble sand, shape with scissors and ink around.  Position characters in front of sandcastle and glue other ends to card front, you may need to trim to size before gluing.
  6. Take 2 lengths of blue & white striped ribbon to fit width of card, fishtail the ends and adhere 1 length just under sandcastle where it will also cover where acetate is fixed to card.  Adhere other ribbon length across base of card below the stopper platform.
  7. Take the stamped & coloured shells & starfish and add along the ribbon ‘sea’ behind belle & boo using 3D foam pads.  Glue a small starfish to top of ‘castle’ and glue some shells and a starfish to the stopper platform.
    Add the 3 stamped and coloured ice-creams at jaunty angles across the base ribbon using 3D foam pads and glue.
  8. To finish add blue & white twine across sandcastle, add a little twine bow to each end, then cut little bunting triangles from different pattern papers in the Belle & Boo 6x6 pack, add along the twine using 3D foam pads to create a bunting effect.

Products Used
Belle and Boo II - Clear Stamp – Ice cream
Belle and Boo II 6 x 6 Paper Pack
Belle and Boo II - 8 x 8 FSC Paper Pack
Belle and Boo II - 8 x 8 FSC Decoupage Pad  
Belle and Boo II Half Ribbon Box  
Dovecraft Kraft 5"x7" Cards & Envelopes  
Dovecraft Back to Basics - Blue Skies Twine
Dovecraft A4 Acetate Sheets
Cricut Explore Machine
First Edition Twin Marker - Blender
First Edition Twin Markers - Greys
First Edition Twin Markers - Skin Tones
First Edition Twin Markers - Purples
First Edition Twin Markers - Pinks
First Edition Twin Markers - Browns
First Edition Twin Markers - Yellows


Friday, 8 January 2016

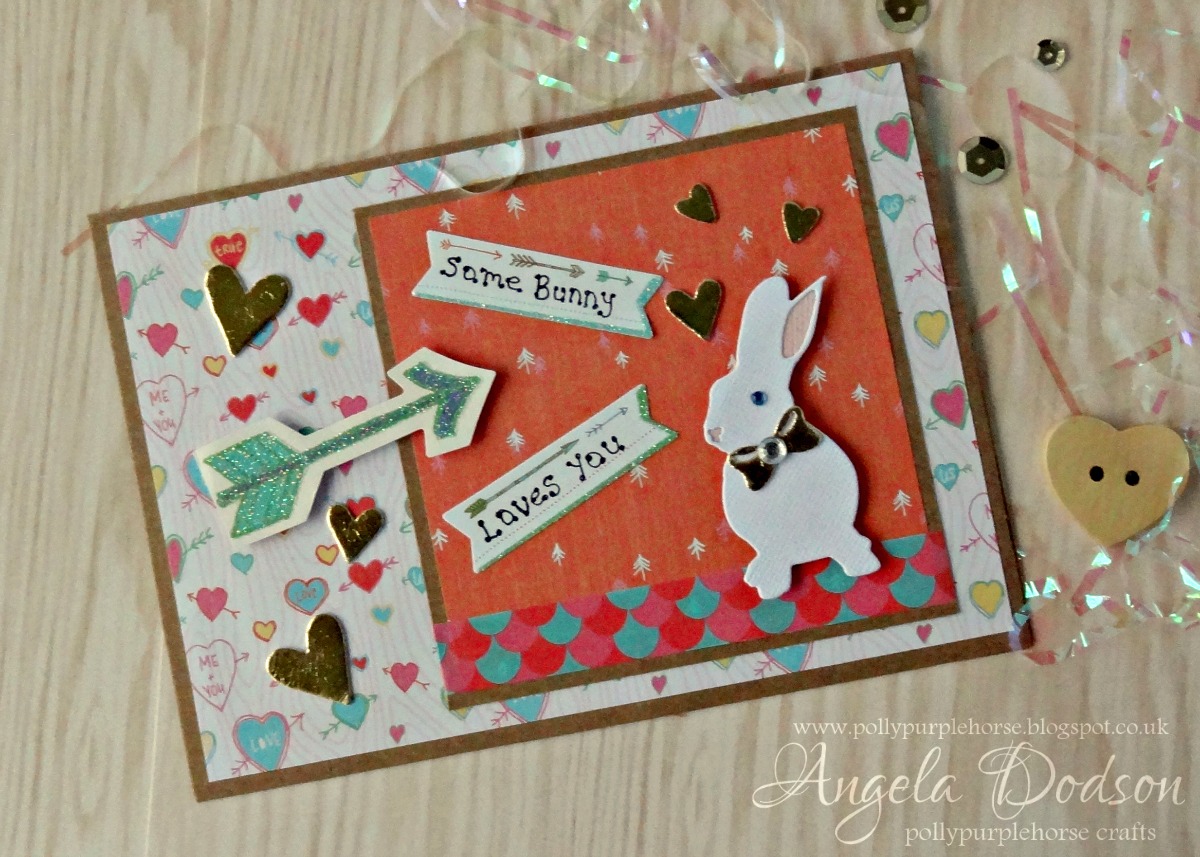
Some Bunny Loves You!!


How cute is the new Grace Taylor Forest Friends collection from +Trimcraft Ltd , I couldn't resist teaming them with the cute bunny from the new First Edition Animal Die set to create a Valentines card.   I also had fun playing with the Gold Foiling and adhesive foam sheets.  (If you've not tried foiling then give it a go, you can still get great results if you haven't got the applicator machine, all my foiling is done with the adhesive foam on this project)

The Forest Friends collection is perfect for card making as well as scrap booking as it has lots of lovely embellishments such as the fun sticker book , shaped paper cuts and washi tape.
 
 
Thank you for popping by and I hope you will join me again as I have another card to share with you later :)