Showing posts with label valentines. Show all posts

Tuesday, 9 February 2016

Love is in the Air...

Hello, I have another make for you this week using Papermilldirect cardstocks.  This week the Design Team are looking at Free Printables and creating Valentines projects with them.  I found a set of printable mini notecards designed by The Tom Kat Studio and available for free from their website. The set I am using is the Printable Mini Notecards - Set #1
These printables are great for quick makes as they print out with 3 mini notecards per A4 sheet, simply download, print, colour, cut out and fold and they are ready to go, or if you have a little more time why not make them into a bigger design as I have done here.

I printed the design sheet off onto an A4 sheet of Papermilldirect Plain White card, there are 3 different designs on the sheet, I chose the Balloon design to work with.  I coloured the balloon using First Edition marker pens in shades of purple and pink, and the lettering in pink and yellow.

I used a light grey marker pen to outline the image and sentiment, then trimmed the image down to just under 3” square. A light grey marker pen was used to outline the cut edge before mounting the square onto a slightly larger square of Papermilldirect  Purple Grape Card.
Using a Sizzix embossing folder with a bubbles design I embossed Papermilldirect Plain White card and trimmed down to approx. 4” square.  I decided I quite liked the debossed side to work with the balloon image and matted it onto a slightly larger square of PMD Raspberry Pink card.

The card base was created by scoring and folding and A4 sheet of PMD Plain White card and then trimming down to create a 5.5” square card.  I added the embossed panel centrally to the card front using double sided tape and used 3D foam pads to adhere the balloon panel to create height.
To finish a touch of white gel pen adds a little highlight to the balloon.Choosing a simple image to work with makes colouring quicker and easier and teaming with a simple embossed panel adds extra interest. I decided to leave the card as more of a 'clean & simple' style but you could of course add extra embellishments or ribbons if you prefer.

Materials Used:
Plain White Card - Papermilldirect
Purple Grape Card - Papermilldirect
Raspberry Pink Card - Papermilldirect
Free Valentines Printables - http://www.thetomkatstudio.com/2013/01/freeprintablevalentinesforparenting
Craft Twin Markers - First Edition
Sizzix Embossing Folder
Double Sided Tape, 3D Foam Pads


Monday, 8 February 2016

Love Grows Here ...


Hello, today I'm sharing another make with the new and very pretty First Edition Love Story papers from +Trimcraft Ltd .  My cards often evolve by way of a phrase and this time in my mind I had the ‘Love Grows Here’ theme to play with.  It also gave me chance to try out the tree shape from the new First Edition Foliage die set and I added little hearts to 'grow' on the tree.

Here's my Step By Step:
  1. Cut a rectangle of peach card from the Dovecraft Premium Colour Card pack approx. 5 3/8” wide by 4 3/8” high. Cut a rectangle of floral patterned paper from the Love Story 6x6” pad approx. 6” wide by 4” high.  Ink around the edges of both with pink ink.
    Pierce holes around the edges of the floral rectangle paper and add faux stitching with a white pen. Mat floral paper onto peach card using double sided tape.
  2. Using the First Edition Border die cut 2 loopy borders from beige Love Story paper and attach across lower section of matted paper panel using glue along the centre section.  Adhere Dovecraft  ‘Love’ printed ribbon across the border slipping the ends under the border end sections and securing with tape at back of panel.
    Attach panel to card blank using double sided tape.  I have used a green scalloped edged 5” x 7” card from the Glad Tidings pack.

  3. Next cut 3 panels, 1 from green card (to match card blank) approx. 3 3/8” wide by 4 ¼” high, 1 from the peach card approx. 3 1/8” wide by 4” high, and 1 from the Love Story pale hexagon pattern paper approx. just under 3” wide by 3 7/8” high.  Pierce holes in pale panel and add faux stitching with white pen.  Ink around all 3 panels with pink ink.  Mat smallest panel centrally onto peach card panel, then adhere onto green panel at an angel (see photos).
  4. Using the Tree die from the FE Foliage die set, cut tree in green card and glue centrally onto panel.  Die cut hearts from pink Love Story paper using Santoro die set and glue 5 small ones direct to the tree, add 2 larger ones raised with 3D foam pads.  Die cut 2 heart borders from the Borders, Frames & Buckles set using 2 of the pink Love Story papers, trim them a little and glue across bottom of tree.

  5. Add the sentiment of ‘Love Grows Here’ to a rectangle of pale Love Story paper, ink edges with pink ink, and adhere to tree panel to look like a tab.  I used my Cricut Explore to write and cut the tab ( If you want to use my file already sized my Design Space Link is here: https://uk.cricut.com/design/#/canvas/35665234  )  but you could type and print out from your computer or handwrite wording if you prefer.  Cut a small piece of Dovecraft heart patterned ribbon, loop it and attach to tab.
    Position completed Tree panel to card front at an angle (see photos)
  6. Take 2 stick pins, a pink heart (Sweet Paris) and green leaf (Willow) and slide & secure into place just behind tree panel where it joins the ribbon border.  A dab of glue or tape just under the head of each pin and under the ribbon will help keep them in place.  Top pins with a little green ribbon bow (Sweet Paris).
    To finish add a small adhesive pearl to ribbon bow and 3 small pearls to top right of tree panel.


Products Used:

Santoro Pearls SNGE003


All materials from +Trimcraft Ltd  and the project can also be seen in the Trimcraft DT Gallery link herehttp://www.trimcraft.co.uk/projects/121223/love-grows-here-card-with-first-edition-love-story-and-dies


Tuesday, 2 February 2016

LOVE a simple Valentines card make

Hello, I'm back again to share a simple Valentines card make with you, and this one could not be more different from the card I posted yesterday.  This week the Design Team are working on Valentines Day cards that are easy to create and do not involve any die cutting or other expensive tools.
For my make I have simply used ready cut scrap booking elements, along with some ribbons and gems from my stash and teamed them with coloured card from Papermilldirect's fab range of colours.
I created a card blank by scoring and folding an A4 sheet of Papermilldirect Baby Pink card and then trimmed it down to 5" x 7" (a standard card size that for quickness will fit into a ready bought or made envelope)
Taking the Hedgehog glittered die cut from the pack I used 3D foam pads to adhere to a slightly larger piece of Papermilldirect Ruby Red Card and then layered again onto a slightly larger piece of PMD Baby pink card this time using double sided tape to create my image panel quickly.
For the sentiment panel I cut PMD Ruby Red card to measure approx 2 3/8" x 2 1/4" and matted this onto slightly larger PMD Baby Pink card the same as previous.  Taking the glittered alphabet stickers from the Sticker book I chose letters to spell out 'LoVe' and as these are self adhesive it is a quick way to create a sentiment.  There are a few different styles of letters in the sticker book to play with and I also added 2 of the arrows to frame the sentiment.
To create the back panel I simply cut a piece of pattern paper to approx 6" x 4" and matted to a piece of PMD Ruby Red card measuring 6.5" x 4.5".  I took a sentiment ribbon from my stash and added it across the paper panel, securing the ends on the back with double sided tape.  The back panel was then adhered to the card front using 3D foam pads to give a little height.
Adhere the hedgehog panel to card front using 3D foam pads so that it sits over the ribbon.  Adhere 'love' panel at an angle using double sided tape, just slipping the corner under the ribbin  at RH side.  To finish I looped pink & white bakers twine round the ribbon and tied in a double bow trimming the ends to suit, and added  3 Self adhesive heart gems to lower RH side of paper panel.
This is an easy make requiring only a paper trimmer (or craft knife and ruler if you prefer) to trim card to size.  Using coloured cardstocks adds more interest to simple makes and using ready die-cut shapes and sticker elements helps to create a quick and co-ordinated look. 

Materials Used:
Baby Pink Card - Papermilldirect
Ruby Red Card - Papermilldirect
Forest Friends 12x12 papr pad - Grace Taylor
Forest Friends Sticker Book - Grace Taylor
Forest Friends Paper Die Cuts pack - Grace Taylor
Sentiment Ribbon, Pink & White Twine, Adhesive Heart Gems
Double Sided Tape, 3D Foam Pads

Papermill Design Team:
if you have a moment, please do pop over and check out the other papermill teamies blogs and see what they got up to this week: 


Friday, 29 January 2016

Moustache Heart Valentine Card


Hello, I'm back again with another Moustache themed project for Valentines Day.

I wanted to show that the lovely new First Edition ‘Love Story’ papers from +Trimcraft Ltd  are very versatile and suitable for Modern, Masculine and fun makes too, as well as feminine and romantic makes.


One of my favourite First Edition die sets is the Vintage Gentleman set and so I created this fun Mr. Moustache Heart Valentine card using the Wood Textured canvas effect paper in the Love Story pad and teaming it with black, red and kraft for an easy modern make.


 Step By Step:
  1. Cut a sheet of Wood patterned canvas effect paper from the 6x6 Love Story Pad to measure approx. 5 3/8” square.  And Ink around the edges with red ink.  Mat onto a slightly larger square of Dovecraft black card and again onto a 6x6” Kraft card blank (fold along the top) using double sided tape. 
  2. Using black ink and the Dovecraft ‘Be My Valentine’ clear stamp, stamp the sentiment along the bottom of the woodgrain paper, pressing evenly & firmly to ensure a good print on the textured surface.
  3. Cut 2 heart shapes from Love Story paper by hand or by using a die, template or your Cricut machine to cut simple hearts.  Ink around edges with red ink and adhere largest heart to card front.  Mat the small heart on top using 3D foam pads to add height.
  4. Using the FE Vintage Gentleman die set, cut 1 curly moustache shape from Dovecraft black card and attach to heart using 3D foam pads.  Glue 2 googly eyes in place if you have them, if not you can create eyes with circles of black and white card.
  5. To finish I created black pearls by using a First Edition black marker to colour pearls, when dry I added 1 large and 2 small to either side of the stamped sentiment.
     
    Products Used:

    all materials from +Trimcraft Ltd  and the project can also be seen in the Trimcraft DT Gallery link here http://www.trimcraft.co.uk/projects/121192/moustache-heart-valentine-card-with-first-edition-love-story-papers-dies

Tuesday, 26 January 2016

Be Mine - Fun Valentine Gift Box Idea


Hello, the Papermilldirect DT have been busy creating all different kinds of gift boxes this week and I'm sharing a fun gift box idea for Valentine’s Day.  Although I have used my Cricut Explore to cut the box for this project, you could easily use the elements to decorate a plain box blank or score and fold a box similar and use heart shapes to decorate.
Cut box shape elements using my Design Space link here: https://uk.cricut.com/design/#/canvas/35853997
I have sized the box to fit A4 card all ready for you but you can easily change the dimensions if you wish.  (For those using earlier Cricut machines the box is from ‘Box It Up’ cartridge and also available free within the subscription images)  Cut the 2 side sections and lid from Papermilldirect White Hammered cardstock and the 5 red panels from Papermilldirect Post Box Red card.  Remember to pop the scorer into the holder if you want your machine to add the score lines for you.
Crease and fold lid along score lines, add glue or tape to inside of lid and adhere the red panel to show through the heart aperture.  Glue tabs to assemble box lid.
Crease and fold along score lines for the 2 box side sections, glue tabs to join panels together.
Slip the 4 red card sections into the side ‘pockets’ to show through the small heart apertures on each side of the box.  You can glue these in place if you prefer.

Fold over tabs at the bottom of box to close it.  If you wish to line the box you can add a square of red card or pattern paper inside.
Apply washi tape around the lid of the box, I have chosen a gold tape with white dots.

Using the First Edition Vintage Gentleman die set cut 1 curly moustache shape from papermilldirect black card and glue onto heart.  Add 2 googly eyes to create a fun face on the lid.
Using a sentiment stamp set and black ink, stamp ‘Be Mine’ onto white hammered card, cut out and glue to box lid.   Cover a small piece of red card with the gold washi tape and die cut into a heart.  Glue heart to box lid as shown.
As the box is a simple 2 part box shape you could easily score and fold your own using Papermilldirect cardstock.  I chose to use hammered card to give texture to the box but you could use Papermilldirect plain white card or even another colour from across the range.  You could also use templates or dies to cut your heart shapes.  Googly eyes add a fun element and come in different sizes, styles and colours so you can add lots of character to your designs, why not make a set of different ones?
Are you making gift boxes for Valentine’s Day?  Why not share your designs over on the Papermilldirect facebook page, we’d love to see them.

Materials Used:
White Hammered Card - Papermilldirect
Post Box Red Card - Papermilldirect
Black Card - Papermilldirect
Vintage Gentleman Die Set - First Edition
Sweet Little Sentiments stamp set - Clearly Besotted
Gold Washi Tape, Googly Eyes
Cosmic Shimmer Clear Drying Glue
Black Archival Ink
Cricut Explore with subscription or older cricut with 'Box it Up' images
Design Space Link:https://uk.cricut.com/design/#/canvas/35853997
 
Papermill Design Team:
if you have a moment, please do pop over and check out the other papermill teamies blogs and see what they got up to this week: 


Monday, 25 January 2016

How Sweet It Is...Rosette Accordion Card


Hello, I have a new +Trimcraft Ltd DT card to share with you today. First play with the new First Edition papers ‘Love Story’ and as always there was a lot of ‘ohhing and ahhing’ as I looked through the pads.  These papers are so pretty, beautiful traditional florals mixed with modern patterns and wood effects, the colours are just right too, soft shades of pink, peach, and creamy beige with sprinklings of soft greens and browns. Perfect for Valentines but also all year round as there is such a nice versatile selection of designs.

I recently made a Rosette Accordion Heart and wanted to create another, so this time it’s a large circular shape as the main focus of the design.
  Step By Step:
  1. Take a 6 x 6” Kraft card blank and cut the front in half diagonally to give a card with a half front.
    Take the floral xoxoxo paper from the 6x6 Love Story pad and trim it down just a little (it will be a mat inside the card)  Ink around the edges with red ink and when dry edge around with Dovecraft glitter glue in ‘crystal’  When dry use double sided tape to adhere inside the card.
  2. Cut 2 triangles of paper (use the off cut from the card front to help you size it) from the Love Story striped paper. Inking around and adding the glitter glue as before.  When dry adhere 1 triangle to cover the inside cover and 1 to the card front.
  3. To create your Accordion Rosette, take sheets of the ‘with love’ text paper from the Love Story Pad, and cut each sheet at 2” strips  (you will need about 4 strips) score and fold these strips at 1cm intervals and join each together using glue to form a loop.  When dry press down on loop onto a circle of card with glue in the centre, gently push the pleated rosette together so that the centre is small and the rosette is the size you wish.  (Mine is approx. 4 3/8” wide).
    To neaten the back of the rosette, cut a circle from pink Love Story paper, edge with red ink and glitter glue to match the design and glue to the back of rosette. Also do the same to the rosette front with the inking and glitter glue around the edges and along the raised folds.
  4. Using the first edition alphabet die set, die cut letters to spell ‘LOVE’ in pink paper and Kraft card (use waste from card front).  Glue the letters to a wooden heart shape offsetting them so the pink is on top with the kraft as the shadow.  Ink and glitter glue around the edge of the heart before adding to centre of rosette using 3D foam.
  5. Using the FE Border dies die cut border from Kraft card (use waste from card front) glue to card front along the bottom.  Die cut a matching piece of border and trim down to a single motif, gluing this inside card at top right.
  6. Adhere rosette to card front centrally where it will overlap so be sure to only put adhesive on the parts that won’t be seen when the card is opened.
  7. From the Love Story papers, cut out the tag ‘How Sweet it is’, ink and glitter glue edges, then glue inside card where it will be hidden by the rosette on the front
  8. To finish, tie organza ribbon (santoro) in a bow, trim ends and stick in place just above heart.  Add a small adhesive pearl to centre of motif border piece and add 3 adhesive pearls along diagonal front of card.


     Products used in this project:

     all materials from +Trimcraft Ltd  and the project can also be seen in the Trimcraft DT Gallery link here:http://www.trimcraft.co.uk/projects/121174/how-sweet-it-is-rosette-accordion-card-with-first-edition-love-story-and-dies


Sunday, 17 January 2016

Jar of Hearts


Hello Today I have a bright card to share with you.  When I first saw the First Edition Pots & Vases die set I thought it would be fun to make a ‘jar of hearts’  but then I got distracted with other crafty ideas.  Recently, whilst looking through the new Grace Taylor paper pads, the idea popped back in my head, thanks to the heart patterned papers.

 Step by Step Tutorial:
  1. Cut a 5 ¼” square of heart patterned paper from the Grace Taylor Sherbet Sky pad, then mat onto a slightly larger square of Dovecraft Kraft card using double sided tape to adhere. 
    Cut  3 ¼“ square of grid patterned paper from the Sherbet Sky pad and again mat onto a slightly larger square of Kraft card using d/s tape.  Adhere smaller mat centrally onto larger mat using d/s tape. 
  2. Take bright patterned Dovecraft washi tape, sticking across the bottom of the smaller mat and taking it round to the back of the larger mat so the ends are neatly stuck at the back, I used 2 lengths of washi tape to create a wider strip.  Take a length of Dovecraft ‘With Love’ sentiment ribbon and use permafix tape to attach across the washi tape stripe, take ends to the back of panel and secure.  Cut a piece of washi tape and angle the ends before sticking across the top LH corner of the smaller mat.
  3. Take a 6 x 6” bright green card blank from the Bright Spark pack and position with fold along the top, attach layered paper mat panel centrally to card front using D/S tape.
  4. Cut jar shape using the FE Pots & Vases die set.  I cut one from a pale blue section of paper in the Sherbet Sky pad.  I then added a little extra blue paper behind the cut outs and then cut the jar again from white card and glued the paper jar to the white jar to create a sturdier piece.
  5. Cut different sized small hearts using the heart dies from the Santoro die set and the pink geometric paper from the Sherbet Sky pad.  Glue some of the hearts so they look to be inside the jar.  The attach jar to card front using 3D foam pads, position jar so it looks to be sitting on the washi tape / ribbon border.
  6. Next using the Modern Sentiments die set, cut the words ‘Love’ ‘You’ using spare card to match the card blank, attach the words using glue and position at angles to look like they are coming out of the jar.  Arrange the rest of the die cut hearts around the jar using glue, except one larger heart attached with a small 3D foam pad to bottom left of jar and a larger heart attached with 3D foam pad to ribbon trim at RH side.
  7. To finish add 3 small clear adhesive gems to the heart on the ribbon and a clear gem to the ‘o’s in Love You.
 Materials List: 
  • 6 x6" Bright Spark Card Blank - Dovecraft
  • Grace Taylor 'Sherbet Sky' 12x12 paper pad
  • First Edition 'Sentiments Modern' die set
  • First Edition 'Pots & Jars' die set
  • Santoro Willow Die Set - Trimcraft
  • Washi Tape - Dovecraft
  • Sentiment Ribbon - Dovecraft
  • 6mm Double Sided Tape - Dovecraft
  • small 3D Foam Squares - Dovecraft
all materials from +Trimcraft Ltd  and the project can also be seen in the Trimcraft DT Gallery link here: http://www.trimcraft.co.uk/projects/121098/jar-of-hearts-card-with-grace-taylor-sherbet-sky-first-edition-dies

Friday, 8 January 2016

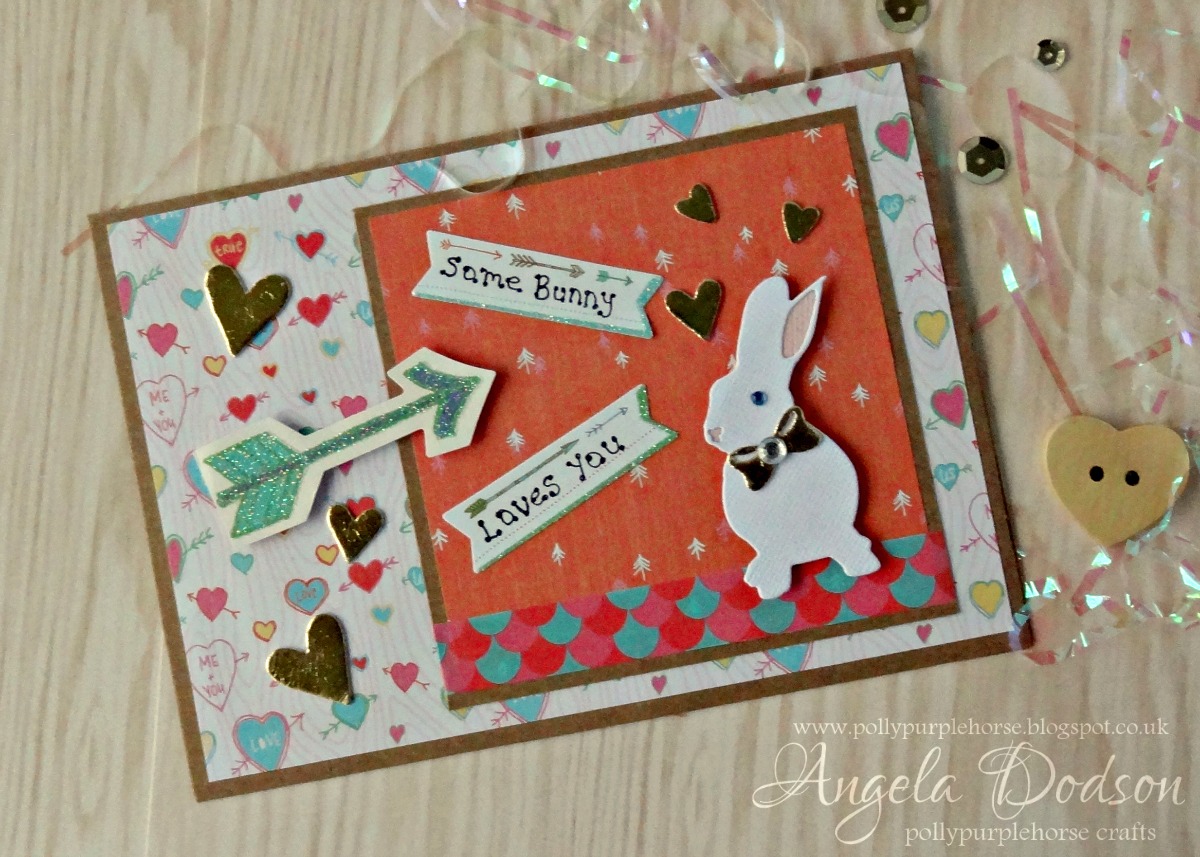
Some Bunny Loves You!!


How cute is the new Grace Taylor Forest Friends collection from +Trimcraft Ltd , I couldn't resist teaming them with the cute bunny from the new First Edition Animal Die set to create a Valentines card.   I also had fun playing with the Gold Foiling and adhesive foam sheets.  (If you've not tried foiling then give it a go, you can still get great results if you haven't got the applicator machine, all my foiling is done with the adhesive foam on this project)

The Forest Friends collection is perfect for card making as well as scrap booking as it has lots of lovely embellishments such as the fun sticker book , shaped paper cuts and washi tape.
 
 
Thank you for popping by and I hope you will join me again as I have another card to share with you later :)

Monday, 2 February 2015

Heart Valentines Easel Card - with papermilldirect

Waving hello and welcome to my Blog, I'm trying to get it a bit better organised and will be adding more links and tutorials, so please bear with me as I'm learning as I go. :)

So onto this weeks post and I have news of another fabulous +papermilldirect Offer just launching - it is a 250gsm Lakeland Green Cambric Embossed card, and for just £6 you can snap up a small A4 boxful.  (we also have a brand new member joining the Team - you can find out more over on the website).


The Design Team have again this week been working on their Valentines projects and I have one to share with you.  I thought as I had done the 'grown up' valentine last week I would make a 'cute' design in tradition colours and I am entering this one in the February Challenge over at House of Cards as the theme is 'LOVE'. (as always materials list and links are at the end of the post).

So here is my Heart Shaped Valentine Easel Card featuring my favourite Bumble Bee die set.
 I cut the Easel base card from Papermilldirect Christmas Red card using Framelits dies, cutting smaller mats from the white card and embossing them with a 'bubbles' design embossing folder.


The bumble bee was cut from Black and Daffodil yellow papermill cards.  A touch of white for the eye area and a touch of grey for his legs.  I used pale yellow vellum for the wings and added a little sparkle to them with detail glitter.  I thought I'd add a little to give him a twinkle in his eye too ;)
 I cut 6 small red hearts and stamped them using black memento ink with various sentiments from the Marianne Collectibles set,  the bee is holding the 'Honey' one and the others read 'Love', XoXo' and 'Sweet'.  3D foam pads were used to mount the completed Bumble or Honey bee to the card front and also the 3 hearts at the top.  2 of the bottom hearts were adhered flat to the card and I raised one with 2 layers of 3D foam to create the 'stopper' for my easel.  

 The card folds down to fit into an envelope. I suppose I should really refer to him as a 'honey' bee :D

Materials Used:  

Hearts, Scallop Framelits Die set - Sizzix
Bee Die set - Go Kreate
Dies & Stamps set COL1307 - Marianne Design
Bubbles Large Embossing Folder from the Summer Set - Sizzix
Detail Sparkle in 'White Shimmer' - Imagination Crafts
Adhesives - Double Sided Tape, cosmic shimmer glue, 3D foam pads
Tuxedo Black Ink Pad - Memento
Pale yellow Vellum

Tools - Big Shot for Diecutting & Embossing


Challenges Entered:
'Love' - February Challenge - House of Cards Challenge Blog
 http://houseofcardschallenge.blogspot.co.uk/2015/02/february-challenge-love.html

Papermill Design Team:
if you have a moment, please do pop over and check out the other papermill teamies blogs and see what they got up to this week: 
Barbara 
Lisa  
Sylvia  
Sandie  
Sharon


Monday, 26 January 2015

Love Heart Valentine with papermilldirect and Oakhouse Studio

Waving hello and welcome to this week's +papermilldirect DT post. We are all still busy with our Valentine's Day makes, but before I share mine, I must tell you about this week's special offer card which is a sumptuous 300gsm called 'Teddy Bear Brown' you can get a small box of A4 for just £6!! Do pop over and see what Barbara has created with this offer card, links at the end of this post.

So what did I make this week?  Well I'm not really the pink & white kind of Valentine Girl, Purple is my colour of passion and since I am quite fond of using the papermilldirect black I thought I'd team the two together to create a dramatic Valentine's card.
I have this gorgeous heart stamp from Oak House Studio that I discovered last year and have used it a few times.  I love the detail and it's versatility and so I stamped it using versamark ink onto papermilldirect smooth white card, before gently blending over with a Violet coloured pan pastel to create the main focal point.

I then used the stamp again, this time quickly and randomly onto regular white card and the idea was to not be as precise, to give the background a more out of focus effect.  I then stamped the word 'Love' a few times also in versamark ink before swiping over it all with the violet pan pastel.

I cut mat layers from papermilldirect black card and sprayed with 'Glorious Gold' ink-in-a-bottle and set aside to dry whilst i then sprayed over my pan pastel heart panels.  I sprayed extra onto the main Heart to try and get a few larger 'splodges' of the gold.  This is a fab spray ink and gives lots of shimmery detail.  Love the effect not only on the Violet but the extra dimension it gave to the black card too. I matted again with just a touch of white to set off the centre panel and then mounted everything onto a white card base created by scoring & folding papermilldirect white card.

I just added a sheer antique gold ribbon and metal heart charm to finish. 

Materials Used:  
Violet Pan Pastel - Pan Pastels
Ribbon & heart charm from my craft stash
Adhesives - Double Sided Tape, cosmic shimmer glue
Tools - Hougie Board to score card base, guillotine to cut panels

Papermill Design Team:
if you have a moment, please do pop over and check out the other papermill teamies blogs and see what they got up to this week: 
Barbara  

Lisa  
Sylvia  
Sandie  
Sharon