Showing posts with label happy. Show all posts

Thursday, 16 June 2016

Cute Happy Birthday Card - Step By Step Tutorial


Hello, gosh I just realised how far I am behind with my blogging!!  My first catch-up is to share a simple step-by-step Tutorial for my +Papermilldirect  DT, we were working on the theme of Free Printables or Downloads and I have a cute little birthday chick card to share with you.  The image used is from a set of 4 free download digi images available from Simply Cards & Papercraft magazine (Link at end of post).

Step By Step:

Download and print off your chosen image form the set of 4  (I have chosen the chick with birthday cake) I like to print onto Papermilldirect White Linen cardstock as I love the effect. Use your chosen medium to colour the image, I have used my favourite First Edition craft marker pens and as this is a simple design you can simply block colour for ease or get more detailed with shading if you wish.

Cut out image using a circular nesting die and cut a slightly larger shape from PMD Marine Blue coloured card. Mat image onto blue shape using glue. I have added extra interest by cutting the coloured layer using a scalloped circle die, but you can use a plain circle if your prefer and of course if you don't have a die cutting machine then just cut image into a square panel.

Use a Birthday themed embossing folder to emboss a piece of PMD White Linen Card and trim down to measure approx. 3 3/4" x 5".

Mat embossed panel onto a slightly larger panel of PMD Daffodil Yellow card using double sided tape, and mat again onto a panel of PMD Marine Blue cardstock approx. 4 1/4" x 5 1/2".
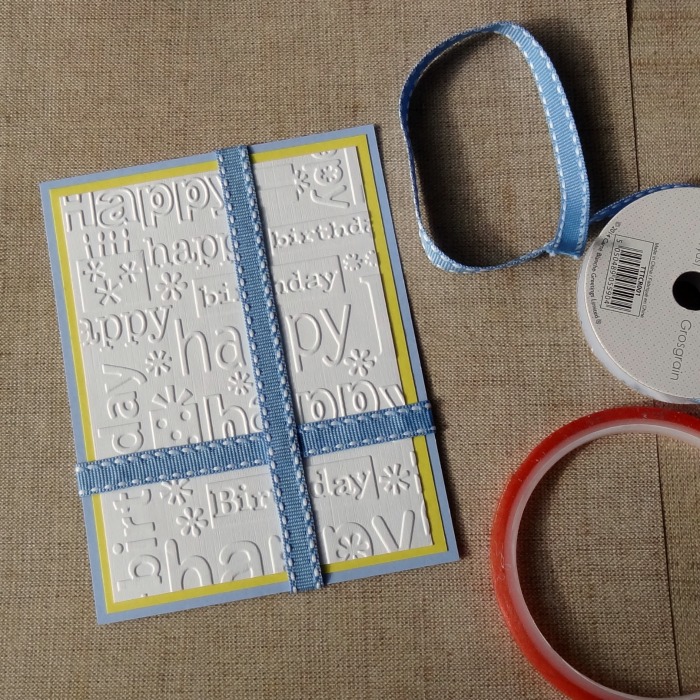
 Add blue grosgrain ribbon across matted panel as shown adhereing with permafix tape and securing ends at back of panel.  Cut 2 small pieces of ribbon, fishtail ends and add where ribbons cross.
Score & fold Papermilldirect Plain White card and trim down to create a 4 1/2" x 5 3/4" card base.  Add embossed panel to card front using 3D foam pads.  Add layered image towards bottom of card on top of where the ribbons meet, again using 3D foam pads.


To finish, add glitter glue to icing on the cake and decorate card front using pale blue adhesive gems.

Materials Used:
White Linen Card - Papermilldirect
Marine Blue Card - Papermilldirect
Daffodil Yellow Card - Papermilldirect
Plain White Card - Papermilldirect
Free digi download image - http://www.papercraftmagazines.com/downloads/item/652-simply-cards-papercraft-150-downloads
Dies - Nesting Circle Dies - Sizzix
Embossing Folder - Happy Birthday - Cuttlebug / Provocraft
First Edition Craft Markers - First Edition
Blue Grosgrain Ribbon, Blue Adhesive Gems, Glitter glue
Adhesives: Double Sided Tape, Perma-Fix Tape, 3D Foam Pads.


Monday, 21 March 2016

Happy, Happy, Happy...


Hello, today I'd like to share this easy card make with you.  I really like this silhouette of a girl with butterflies in her hair which is a digi stamp image from LC Designs (all links at end of post)  so it’s an easy print out to give a perfect image every time.  I have teamed it with some of my favourite Papermilldirect coloured cardstocks to create this simple card that would also work as a display piece too.  This is my first time working with this image and I am also entering this card into the Little Claire Challenge #67 - Anything Goes! , the House of Cards March Challenge: Silhouette and the Ribbon Girl Any Image Challenge
I started by scoring and folding an A4 sheet of PMD white linen card in half and then trimming down to create a regular 5” x 7” card base.
I printed off the digi image onto PMD white linen card too, the linen texture adds a lovely canvas style to digi stamps.  My printed image panel measures approx. 3 ½” wide x 2 ¾” high and I matted it onto a slightly larger piece of PMD black card to give a small border to frame it.
Using a dots patterned folder I embossed a piece of PMD Raspberry Pink card approx. 4 ½” wide x 3 ¾” high and adhered to top of the card base using double sided tape.
 
Mounting the matted digi image panel on top of the embossed panel using 3D foam pads to give a little height.

Using the ‘happy’ die I cut the word 3 times: 1 from PMD black card, 1 from PMD purple grape and 1 from PMD raspberry pink. Gluing the words into position under the image at the right hand side, graduating the colours, black at the top, then purple, then pink at the bottom.
I cut 2 larger butterfly shapes from the FE Butterfly die set, 1 from PMD new lilac and 1 from PMD raspberry pink.  I also cut some tiny butterflies for any extra embellishment.
Using clear drying glue I glued the pink butterfly flat to the card front, to left of happy words.  The lilac butterfly was layered on top with just glue along the body part so the wings could be bent up to give dimension.
I decided to just add one of the tiny card butterflies to the image panel, I chose the purple butterfly and added glue just to the body part so the wings could be bent up.  I wanted the girl image to look as though she was following the  butterfly!  A little detail sparkle was added to the tiny butterfly and to the body of the larger butterfly to highlight them.

I chose to use the ‘happy’ word 3 times as I really liked how it looked stacked up, but you could of course use ‘happy’ and ‘birthday’ or add ‘birthday’ to the inside if you wish to make as a birthday card.  I’ve kept the design simple as it worked well with the black & white image but can easily be further embellished with pearls, gems, extra butterflies, etc.

Challenges Entered:
Materials Used:
White Linen Card - Papermilldirect
Black, Raspberry Pink, Purple Grape, New Lilac coloured card - Papermilldirect
Meadow Girl digi image - LC Designs (Little Claires)
Swiss Dots embossing folder - Cuttlebug (Provocraft)
Butterfly die set - First Edition
Happy word die - Clearly Besotted
White Shimmer Detail Sparkle - Imagination Crafts
Cosmic Shimmer clear drying glue, Double Sided tape, 3D foam pads