Saturday, 28 January 2017

Year of The Rooster, Dream Big! - Trimcraft DT


Hello, as it’s the Chinese New Year – Year of the Rooster for 2017.  I thought it would be fun to make a themed card that would also be suitable to give as a Birthday card or a Good Luck card.  The theme of a New Year and ‘Dream Big’ are quite motivational too.  Rather than reds, I have used the muted colours in the Simply Creative Sweet Dreams papers to create a modern card with silver to highlight.

 Step By Step:
  1. Take a Dovecraft Silver 6x6 card base (I’m using one from the Christmas Basics pack) using with fold across the top.
    Cut a slightly smaller square of pink ‘Sweet Dreams’ paper and adhere inside.  Cut another square of different pattern paper and adhere to card front using d/s tape.  

  2. Cut a 12.5cm square of pale pink polka dot paper and adhere to card front in the centre.
    Cut a strip of Dream Big paper and adhere across bottom third of card front using d/s tape.
  3. Using the nesting star dies (FEDIE137X16) cut 1 large from feather pattern paper and next size down from pale pink paper.  Mat smaller star onto larger star, and then again onto card front using d/s tape and glue.
  4. Die-cut the Rooster / Chicken (FEDIE065) from silver card twice (I’m using a spare card base to match) and glue both together to add depth before gluing to centre of star on card front.
  5. Using the Bird die set (FEDIE059) die cut 3 feathers (2 from silver card and 1 from Sweet Dreams paper.  Arrange feathers at right of stars, gluing only at the bottom so you can shape the feathers for dimension.  Top with a die cut star from silver card.
  6. Use Simply Creative adhesive stickers in silver foil to add lettering to spell ‘Rooster’ across top of card and ‘2017 across bottom.  On the sticker sheet there are some circles, add one to each corner of paper panel and add a star to the die cut star with the feathers.
  7. To finish, add a small clear adhesive gem to the eye of the Rooster.

    Products Used:
     
    • Simply Creative FSC Paper Pad 6x6 Sweet Dreams SCPAD040
    • Dovecraft Christmas Basics 6x6 Cards & Envelopes - Gold and Silver DCCAE011X16
    • First Edition Dies - Farmyard FEDIE065
    • First Edition Dies - Birds FEDIE059 
    • Simply Creative Alphabet & Number Stickers - Classic Foil Silver SCSTK018

Monday, 23 January 2017

Love is in the Air! A Penny Spinner Card - Trimcraft DT


Hello, I'm back to share a Valentines card with you.  I love to make penny spinner cards, you may spot a few in my Trimcraft gallery or on my facebook pages, but this time I’ve made a valentines themed one using the new Simply Creative ‘Around the World’ papers which team perfectly with the Dovecraft hot air balloon die.

I have made a little video to show the card in action: https://youtu.be/NJWp0D1ySyA

and here's the Step by Step:
  1. To create the penny spinner base card you may find it easier to follow my previous Trimcraft Tutorial link here: http://www.trimcraft.co.uk/articles/first-edition-travel-notes-penny-spinner-card-tutorial Use cloud pattern paper from the Simply Creative ‘Around the World’ 6x6 paper pad for the background and to cover the central circle.
    Use the hot air balloon pattern paper from the same pad to cover the raised panel.
  2. Die cut the hot air balloon from different papers in the pad and again from Kraft card, glue the papers on top of the kraft card to give strength to the piece.  Dovecraft red glitter card has been used for the heart on the balloon.
  3. Die cut 2 clouds from white card using the First Edition Weather die set. 
    Stamp letters to spell out ‘LOVE’ on 1 cloud using black ink and the S/C Alphabet stamp set. 
    Stamp letters to spell out ‘is the Air’ on the other cloud. 
    Glue the ‘LOVE’ cloud at top left on card front and the other cloud into the centre circle.
  4. Use perma fix tape to adhere a 1p coin to back of hot air balloon shape, add 3D foam to centre being careful to only place in the centre and add the 2nd 1p coin.  Slip the bottom coin under the channel on card front and test the spin. 
    You can carefully pull apart to adjust the foam if required, you may need a double height of foam.
    I have made a little video to show the card in action: https://youtu.be/NJWp0D1ySyA


    Products Used:
     
    Simply Creative FSC Paper Pad 6x6 Around the World SCPAD046

    Dovecraft Kraft 6"x6" Cards & Envelopes

    DCCE024

    Dovecraft A4 Kraft Card

    DCBS103

    Dovecraft A4 White Laid Card

    DCBS100

    Dovecraft Die – Hot Air Balloon

    DCDIE070

    Simply Creative Alphabet Stamp - Typewriter

    SCSTP001

    First Edition Dies - Weather

    FEDIE052

    Dovecraft A4 Glitter Card - Ruby (Red)

    DCGC05


Thursday, 19 January 2017

Back to Blogland with this Butterfly GAP Card - Trimcraft DT


Hello, yes it's me! I'm back again after a little break.  A lot happened towards the end of 2016, some good (Cardmaker of the Year!) unfortunately some sad (a very dear friend passed away). But with a New Year comes new beginnings and new inspiration and I'd like to start by sharing this  +Trimcraft Ltd project with you.


Have you seen the free Dovecraft die set on the cover of Crafts Beautiful magazine (February Issue #302)?  It consists of 2 dies, a large and detailed butterfly die and a ‘With Love’ sentiment.  I thought I would update my Butterfly GAP card style with a modern look, so have teamed vibrant Cerise glitter card with the black & white papers of FE ‘Black Out’. The turquoise inside panel adds just a pop of contrast colour to peep out from the ‘gap’.  Gap cards don’t always have to involve straight lines, you can easily alter the look by using a gently curving line like this one.

Step By Step:
  1. Score and fold Dovecraft A4 black card and trim down to create a 7 ½” x 5 ½” card base with fold across the top.
    Cut a panel of turquoise paper from First Edition ‘Story Teller’ 8x8 paper pad and adhere inside card using d/s tape.

  2. Cut a panel of floral black & white paper from the FE ‘Black Out 8x8 pad and adhere to card front using d/s tape around the edges but also glue on the reverse particularly along where the diagonal line with go.
  3. Open up card blank with card front paper side upwards and using a craft knife or scissors carefully cut a simply wavy line across the card front, see photos. (You may wish to pencil the line first to guide you).
    Remove the bottom part and trim a small strip off the bottom so the wavy line is now a small gap when positioned against the card base.
  4. Using the free Dovecraft die set, cut 1 sentiment and 3 butterflies from Dovecraft Cerise glitter Card (DCGC18). 
    Using a clear drying glue, adhere the sentiment and 3 butterflies onto Dovecraft Vellum and cut each out leaving a border all around. 
  5. Next cut 3 more vellum butterfly outlines and use these to ‘attach’ the top and bottom of the card front, you will need to use a clear drying glue and position them at angles so they look to be flying across the card.  (Use something heavy to hold down the card front whilst the vellum butterflies dry.

    When Gap card is attached, add the 3 glitter & vellum layered butterflies on top of their matching vellum shapes along the ‘Gap’.  Fold up the wings on each butterfly and glue only along the body.  When dry you can bend up the wings a bit more.
  6. Adhere the Glitter & Vellum layered sentiment to card front at top left.
    Add a length of purple ric rac ribbon across the bottom of the card (Santoro) using clear drying glue and allow to dry.
  7. To finish, add a sprinkle of Bohemian Sequins gluing in place. 
    Note*If you wish to add more strength to your card front, then just cut a piece of Dovecraft Acetate the same size as card front and use a strip of perma fix tape along the top only and attach behind card front panel to give an extra independent clear layer.  (You could also use this to add a hidden sentiment if you wish).

Products Used:
Free Cover Gift - Dovecraft Die Set - Crafts Beautiful Magazine

First Edition 8x8 FSC Paper Pad Black Out

FEPAD141

First Edition 8x8 FSC Paper Pad Storyteller

FEPAD138

Dovecraft A4 Black Card

DCBS102

Dovecraft A4 Premium Vellum

DCBS78

Dovecraft A4 Acetate Sheets

DCBS106

A4 Glitter Card (Cerise)

DCGC18

SANTORO®'s Willow Ribbon Box

SNCR003

Dovecraft Bohemian Sequins 

DCSEQ002


Wednesday, 30 November 2016

What's in the Boxes? Exciting News to Share!!


Hello, Sorry I've been a little quiet on the blog lately, I have been crafting but I've been keeping a huge secret for quite a few weeks now!  If you've seen the current issue of Cardmaking & Papercraft magazine then you already know my secret!!  I was amazed, thrilled, over the moon and literally jumping for joy to find out I had won the title of Cardmaker of the Year 2016!! 
This is the first year I've actually plucked up courage to enter and almost talked myself out of it, in fact I didn't post my entry off until a couple of days before closing date, talk about cutting it fine. I used some of my favourite +Trimcraft Ltd products to create my entries. As well as the Title, there are prizes with a value of £2,000!!  and the chance to design for the 3 magazines which has always been my dream.

I've been asked by a few friends to post about the prizes, so here's what greeted me when the postman arrived (please excuse the hallway - we're redecorating :D)  Three super duper crafting machines!!  How amazing are those! I have already been testing out the Big Blue and the Scan n Cut (I've just bought some Todo foils & foil dies so I can test out the Todo next.


Lots of dies, some luxury Couture collections with a pack of cardstocks.


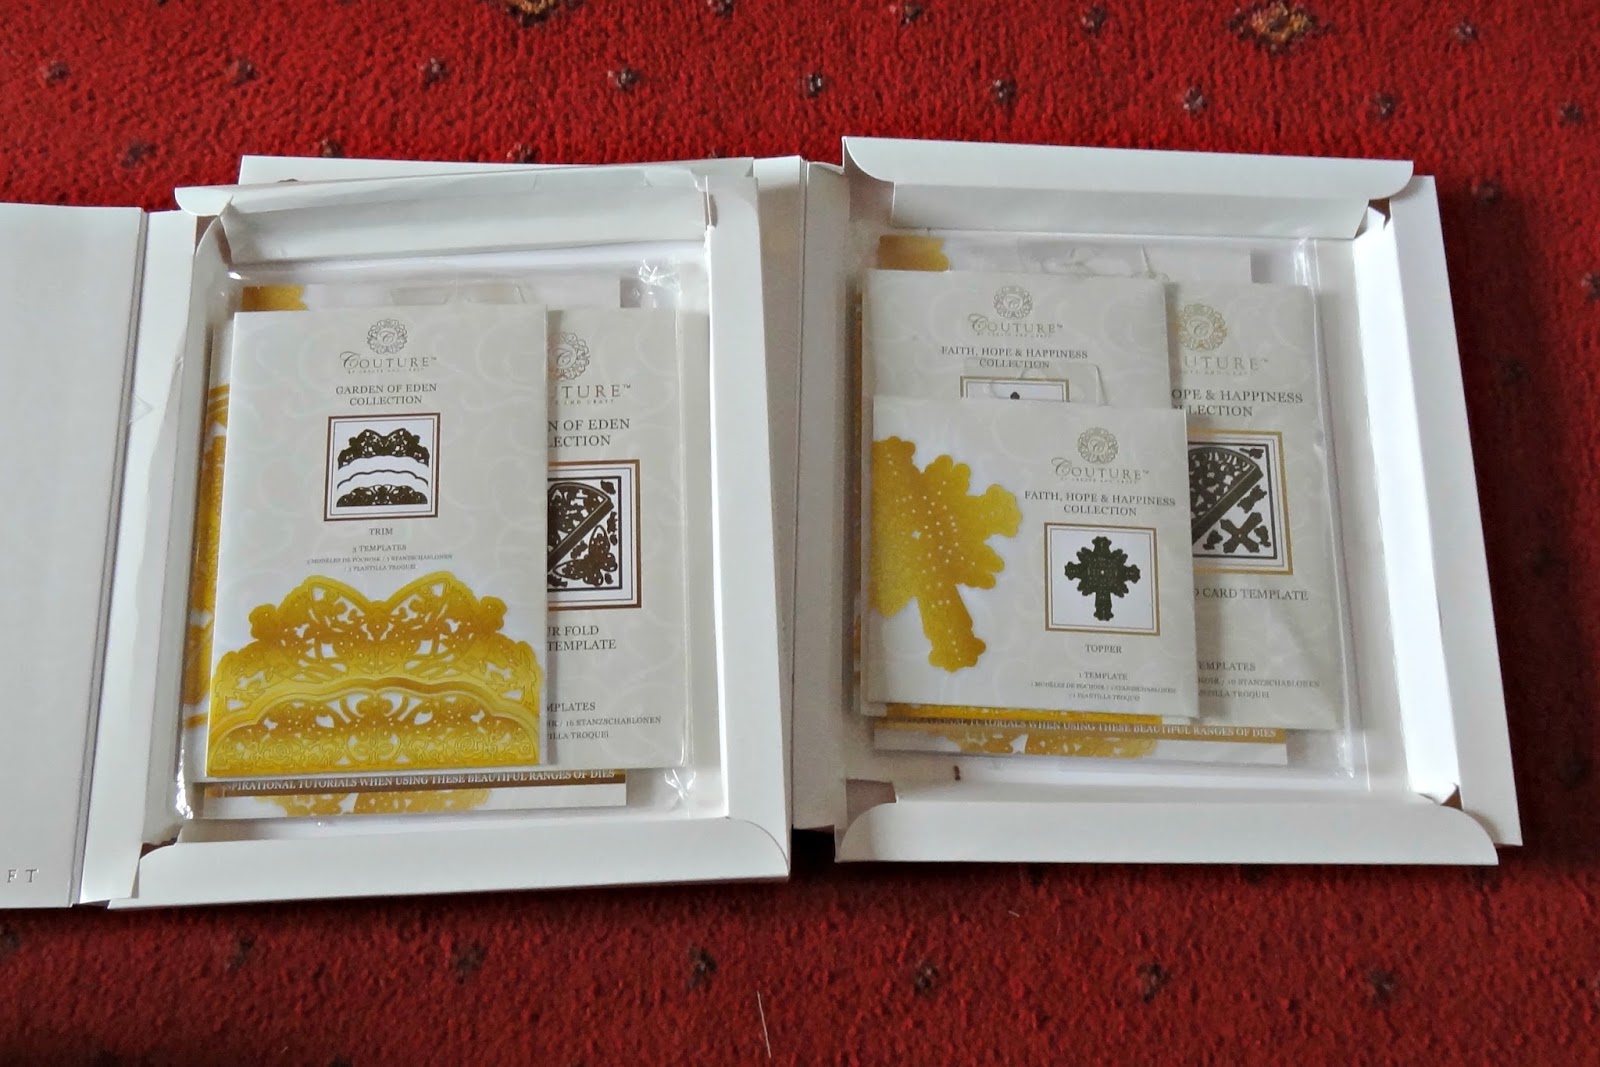
and more Couture die sets, these are in presentation boxes with CDs and books to accompany them

and a selection of Tattered Lace dies, 2 come with CD's, a scoring board, some magnetic sheets and cut tidy thingys.

3 big boxes full of Hunkydory and Kanban collections

I'm sure there was more too, like extra accessories for the Scan N Cut machine. The prizes will be put to good use and the eagle eyed will know I've already been using some of these in my recent projects.

I'd like to say thank you to the Editors of +Cardmaking & Papercraft Quick Cards Made Easy and +Papercraft Inspirations and also to my friends for giving me the confidence and persuading me to actually get my entry posted off :D  
and thank you for reading this far, I'm always happy to help with any queries or just pop by and say hello!!

Angela
x

Wednesday, 26 October 2016

Dreaming of a Pink Christmas - Step by Step Tutorial with neon card


Hello I'm back again to share a +Papermilldirect  DT card design with you.  This week I thought it would be fun to try out some of the new Papermilldirect neon paper colours and create a Christmas card that is bright, modern and a bit zingy.  If you were a fan of the Pink Petticoat download papers and images then you will be thrilled to learn that they are slowly coming back under ‘The Lovely Studio’ name alongside new releases.  I have chosen the fun ‘Festive Flamingos’ to work with, Flamingos have been extremely popular this year and are sure to be a hit at Christmas too.


STEP BY STEP:
Visit the link and download the image set, (all designs are currently just £1-50) there are 4 images with sentiment and 4 without. Print off onto PMD White Linen card, you’ll get 4 different images on an A4 sheet.


Colour your image/ images – I’ve chosen ‘I’m dreaming of a Pink Christmas’ and have coloured in using alcohol marker pens in shades of pink and grey, with hints of green for the holly, etc.  You don’t need to be an expert colourist as this is a simple image and the texture of the linen card adds interest.  Don’t forget to outline your image with the lightest grey marker to help define it and add a little squiggle along the bottom to ‘ground it’.
Cut out your image using shaped nesting dies, I’m using a circle die and using a small piece of washi tape to secure in place before running through the die cutter to stop it slipping.

 
Next cut some mats and layers for your design – I cut a slightly larger circle of PMD Intensive Pink card and slightly larger again scalloped circle of Neon Kiwi Green paper, using d/s tape & glue to adhere the layers on top of each other.
Next create a card base by scoring & folding an A4 sheet of PMD Grey Pearlised card.  Trimming it down to create a square card base that will be just under 6”x6”.


Cut mats for your base – a large square of PMD Neon Kiwi Green paper slightly smaller than card front. A square of PMD White Linen card approx. 4 ¾” square, and a square of Neon Raspberry Pink paper slightly larger.  Mat the three layers together one on top of each other using d/s tape and glue.


Assemble card by adding the square mat panel to card front using d/s tape.  Add the circular matted image panel to the centre using 3D foam to give a little height.


I have added extra details to the image with a white gel pen, just some dots to add texture and some dashes for highlights.

Die cut snowflakes from PMD White Linen card and add adhesive pink gems to the centres.  Add to card front by gluing the small ones flat and adding the larger ones with 3D foam.  To finish add a trio of small adhesive gems to top left and bottom right of white linen square.


I love the bright neon papers and being 80gsm they are perfect to add as layers to your designs without adding too much weight.  The bright colours are really modern and work well for a fun theme such as the flamingos. 

Products Used:
White Linen 255gsm – Papermilldirect
Intensive Pink 160gsm  - Papermilldirect
Neon Raspberry Pink 80gsm – Papermilldirect
Neon Kiwi Green 80gsm – Papermilldirect
Grey Pearlised 300gsm – Papermilldirect
Festive Flamingos digi downloads - Pink Petticoat Portfolio - Thelovelystudio.co.uk
Snowflake Dies – DCDIE057X16 – Dovecraft
Circle Framelits dies – 657551 – Sizzix
Scalloped Circle dies – FEDIE071 –First Edition
Alcohol Markers, white pen
Adhesive gems – Whiz Kids collection
D/S Tape, Clear drying glue, 3D foam pads / tape


Friday, 21 October 2016

Trick or Treat?


Hello, I'm back to share an easy Halloween make I created for the Papermilldirect Design Team.  I’m teaming the fun colorflute card with black cardstocks for a traditional orange & black Halloween colour scheme.

I created a file in Cricut Design Space (link here: https://us.cricut.com/design/#/canvas/45482082 ) to cut from Papermilldirect Black Smooth card, this is a lovely 250gsm weight and cuts like a dream on my Explore.  I cut the cobweb frame, Trick or Treat words and bats from the 250gsm card.
Adhere black cobweb frame onto a sheet of PMD Mandarin Orange Colorflute card.  I used a strong permafix tape for all 4 sides and some dabs of clear drying glue for the webs parts, pressing down to ensure adhesion.  Trim orange colorflute card to give a small border around the black frame.


Glue wording to sign using clear drying glue.  An easy way to line them up is to use the waste from your cut out as a template to adhere your letters through, when letters are glued carefully lift template away.
Glue bats as desired around ‘Trick or Treat’ sentiment.  You can also resize the bats or cut more if required to create your own layout.  Add eyes with a white gel pen.
Papermilldirect’s Extra Thick Charcoal Black card at 550gsm is the perfect weight for a backing to this sign, sturdy but easy to punch 2 holes into using a hole punch.  Use a combination of d/s tape and glue to adhere sign to backing.  Tie black and orange ribbons through the holes to finish and you have a Halloween Sign all ready to display.


I love the texture of the Colorflute card, it is easy to cut on my paper guillotine and the colours are bright and eyecatching, I've used the Mandarin Orange for this design but there is also a Lime colour perfect for Halloween makes too.
If you don't have a Cricut to use the file to cut, you can still make your own Halloween designs using the colorflute card and Extra thick cardstock, just die cut lettering or adhesive stickers for the greetings, bats are easy to cut out or try dies or punches, don't forget to share what you make over on the +Papermilldirect  facebook page.

Products Used:
Extra Thick Charcoal Black Card 550gsm – Papermilldirect
Black Smooth card 250gsm – Papermilldirect
Mandarin Orange Colorflute Card – Papermilldirect
Design Space File for Cricut Explore Link: https://us.cricut.com/design/#/canvas/45482082
Adhesives: Perma Fix Tape or D/S Tape, Clear Drying Glue,
Black & Orange ribbons, White gel pen
 

Wednesday, 12 October 2016

Eek! Rolling Eyeball Halloween Card


Hello, today I'm sharing this fun card idea with you. I don’t often get chance to play with printable papers so when I saw the Free Halloween ones from Trimcraft I thought they would be fun to play with and test out my new printer at the same time. The papers are Modern, fun and bright and print beautifully and the striped paper is not just for Halloween.
I also made a little video to show the card in action : https://youtu.be/Mb8i-TE8jF0


 Step By Step:
  1. Take a Dovecraft 6x6 Kraft card blank to use with fold across the top.  Cut a slightly smaller square of the orange paper from the Simply Creative ‘Play Days’ pad and adhere to card front using d/s tape.  Download the Free Halloween papers link here: http://www.trimcraft.co.uk/articles/free-halloween-printable-papers
  2. Cut a piece of Kraft card approx. 5 ½” square and measure out a long rectangle approx. 4” long by about 5/8” using a pencil to mark the lines.  Carefully cut the rectangle out using a craft knife.  Test the cut out is wide enough by joining two 2p coins together using 3D foam, cut the foam so it’s in the centre of the coin only with space all around (see pics), slip the joined coins into the cut out by sliding 1 coin through and move the panel to check the coins move freely backward and forward when the panel is tipped.
  3. Cover front of panel with the striped paper from the Trimcraft Halloween download papers, turn over and cut away the paper covering the cut out channel.  Add panel centrally to card front with cut out to the top, using double height of 3D foam tape.
  4. Cut a large eyeball from the download papers, I did this by using my computers ‘snipping’ tool to select an area of the paper onscreen and then sending it to print. (you may have a preferred method). The size can be adjusted on the print screen, size doesn’t need to be exact as long as it covers the 2P coin.  I have adhered the eyeball to cardstock and then cut out to give it more strength.  Glue the large eyeball on top of the 2p coin and you should now have a rolling eye element.

  5. To finish, cut 2 strips of the Eyeball patterned download paper and adhere across card front.  Cut out an ‘Eek! Sentiment and mat onto kraft card before adhering to card front using d/s tape.
  6. I made a little video to show the card in action : https://youtu.be/Mb8i-TE8jF0


Products Used: 
DCCE024
Simply Creative FSC Paper Pad 6x6 Play Days
SCPAD028