Thursday, 16 June 2016

Cute Happy Birthday Card - Step By Step Tutorial


Hello, gosh I just realised how far I am behind with my blogging!!  My first catch-up is to share a simple step-by-step Tutorial for my +Papermilldirect  DT, we were working on the theme of Free Printables or Downloads and I have a cute little birthday chick card to share with you.  The image used is from a set of 4 free download digi images available from Simply Cards & Papercraft magazine (Link at end of post).

Step By Step:

Download and print off your chosen image form the set of 4  (I have chosen the chick with birthday cake) I like to print onto Papermilldirect White Linen cardstock as I love the effect. Use your chosen medium to colour the image, I have used my favourite First Edition craft marker pens and as this is a simple design you can simply block colour for ease or get more detailed with shading if you wish.

Cut out image using a circular nesting die and cut a slightly larger shape from PMD Marine Blue coloured card. Mat image onto blue shape using glue. I have added extra interest by cutting the coloured layer using a scalloped circle die, but you can use a plain circle if your prefer and of course if you don't have a die cutting machine then just cut image into a square panel.

Use a Birthday themed embossing folder to emboss a piece of PMD White Linen Card and trim down to measure approx. 3 3/4" x 5".

Mat embossed panel onto a slightly larger panel of PMD Daffodil Yellow card using double sided tape, and mat again onto a panel of PMD Marine Blue cardstock approx. 4 1/4" x 5 1/2".
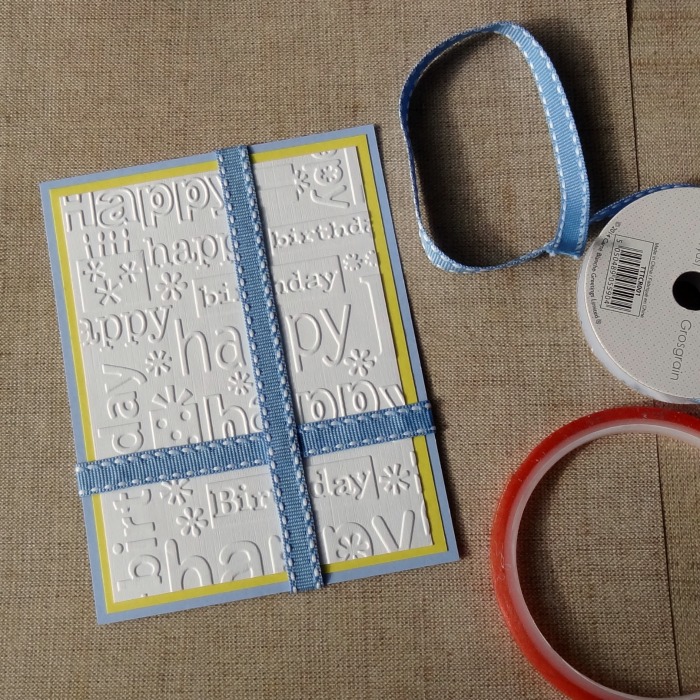
 Add blue grosgrain ribbon across matted panel as shown adhereing with permafix tape and securing ends at back of panel.  Cut 2 small pieces of ribbon, fishtail ends and add where ribbons cross.
Score & fold Papermilldirect Plain White card and trim down to create a 4 1/2" x 5 3/4" card base.  Add embossed panel to card front using 3D foam pads.  Add layered image towards bottom of card on top of where the ribbons meet, again using 3D foam pads.


To finish, add glitter glue to icing on the cake and decorate card front using pale blue adhesive gems.

Materials Used:
White Linen Card - Papermilldirect
Marine Blue Card - Papermilldirect
Daffodil Yellow Card - Papermilldirect
Plain White Card - Papermilldirect
Free digi download image - http://www.papercraftmagazines.com/downloads/item/652-simply-cards-papercraft-150-downloads
Dies - Nesting Circle Dies - Sizzix
Embossing Folder - Happy Birthday - Cuttlebug / Provocraft
First Edition Craft Markers - First Edition
Blue Grosgrain Ribbon, Blue Adhesive Gems, Glitter glue
Adhesives: Double Sided Tape, Perma-Fix Tape, 3D Foam Pads.


Wednesday, 25 May 2016

Heartfelt Thanks Card - Step By Step Tutorial


Hello, I'm back again to share another Step by Step card tutorial.  This week the +Papermilldirect Design Team are working on the theme of ‘Pinterest Inspired’ and I’m using this card pinned here as my inspiration.  From this design I decided to choose the trio of embossed shapes on bright backgrounds and bird as elements for my own card.

Step-by-Step:
Using nesting circle dies, cut 3 from Papermilldirect White Linen card and 3 larger ones from papermilldirect coloured cardstocks (Mandarin Orange, Dark Violet and Marine Blue).  Emboss the white linen circles using 3 different effect embossing folders.


Cut a panel of PMD White Linen approx. 4 5/8” x 6 5/8” and stamp sentiment of ‘Heartfelt Thanks’ in bottom Right corner using black Archival ink, mat onto slighter larger panel of PMD Black card.  Glue embossed white circles onto coloured card circles and then arrange onto card front as shown.  When happy with layout, glue top circle to card base and then add the other circles using 3D foam pads, allowing each circle to overlap the previous one.
Take a woodgrain embossing folder and add memento rich cocoa ink to one side of the inside, use to emboss a small piece of PMD Buff cardstock.  Trim into a small branch shape approx. 3” long.  Die cut some small individual leaves from PMD Apple green cardstock.

Die cut a bird shape from PMD Teal and buff card and add to card front using 3D foam pads, positioning across the overlapping circles.  Add 3D foam  pads to back of branch.

Adhere branch onto card front, positioning it so the bird looks to be perching on it.  Add small pieces of 3D foam to the back of each leaf and add to branch in pairs.  A small dab of clear drying glue on the stalks to adhere them under the branch.  Score & Fold and A4 sheet of Papermilldirect plain White cardstock, trim down to create a standard 5” x 7” card base and attach completed panel using a combination of double sided tape and glue.

This is a great way to make use of those scraps of gorgeous bright papermilldrect cardstocks and the embossing adds lots of extra interest, the use of white linen gives a lovely texture and plenty of white space which adds impact to those bright colours.  I felt my design needed a 'sentiment' to finish it off, but you could make this card for all occasions simply by changing the sentiment and / or centre element.

Materials Used:
White Linen Card, Plain White Card – Papermilldirect
Black, Mandarin Orange, Dark Violet, Marine Blue, Teal, Buff, Apple Green coloured card – Papermilldirect
Swiss Dots, Divine Swirls, & Tiny Mosaic Embossing Folders – Cuttlebug
Woodgrain Textures Embossing Folder – Crafters Companion
Circles #65755 Die set – Sizzix
Wildlife Dies set #FEDIE053 – First Edition
Foliage Die Set #FEDIE019 – First Edition
Sentiment Stamp – Clearly Besotted
Inks: Jet Black Archival Inkpad, Rich Cocoa Memento Inkpad
Adhesives: D/S Tape, 3D Foam Pads, Cosmic Shimmer glue


Friday, 13 May 2016

Fathers Day Card - Step By Step Tutorial


Hello, sorry I'm running a little late with another blog update for you.  This week the Papermilldirect Design Team are working on ideas for Father’s Day cards and I have been playing with ink and dies again for this cog themed make.


Step by Step:
Take Papermilldirect Plain White cardstock and apply Vintage Sepia & Juicy Orange Colour Chemistry inks.  I used a foam make up sponge and also a water brush to randomly apply the inks to give a mottled effect.  Leave to dry or use a heat gun
Die cut a variety of cog shapes from the inked card.  Using a spray bottle to spray the cogs with Glorious Gold Colour Chemistry Ink or use a brush if you don’t have a spray.

Ink up another piece of Papermilldirect Plain White card as before, but this time applying Jubilee Blue & Tempting Teal Colour Chemistry Inks.  Dry fully before die-cutting 2 geometric trims and letters to spell out ‘DAD’.  Also cut the ‘DAD’ letters from Papermilldirect Navy Blue card.
Cut a piece of PMD Plain white card approx. 4 ¾” square and mat onto a piece of PMD Navy Blue card approx. 5” square, using double sided tape to adhere.  Glue the 2 blue inked geometric trims to card front using cosmic shimmer clear drying glue.
Work out your desired positioning of the cogs, with the DAD sentiment running across the centre.  When you’re happy with position, glue in place with clear drying glue.  Create a card base by scoring and folding an A4 sheet of PMD Plain White card in half, then trim down to just under 6” square.  With card fold across the top, add the completed panel using 3D foam pads to give height.

I really liked the fresh look of the Papermilldirect Plain White card against the inked elements and thought the cogs and geometric die cuts would be great for a masculine make. The gold spray added a subtle metallic element to the cogs and I really like the mix of blues and oranges together for a modern look.  I haven’t used ‘Father’s Day wording on the front as I wanted this card to be suitable for other occasions such as birthdays too and an extra sentiment could be added inside if required.


Materials Used:
Plain White Card – Papermilldirect
Navy Blue Card – Papermilldirect
Vintage Sepia, Juicy Orange, Jubilee Blue, Tempting Teal, & Glorious Gold – Colour Chemistry Inks – Oak House Studio
Cog Dies #FEDIE009 – First Edition
Alphabet Dies #FEDIE007 – First Edition
Tuck In Geometric Dies #ETL172 – Tattered Lace
Adhesives Used: Cosmic Shimmer glue, D/S Tape, 3D Foam Pads


Monday, 9 May 2016

Inked Gate Fold Card - Step By Step Tutorial


Hello, sorry I'm a little late posting my Papermilldirect DT make.  This week the Design Team are working with the theme of Gatefold Cards, for my version I am using a simple 2 fold design but adding extra interest with a 2 part heart flap and some random inking.  This is a very easy method, no stamping or heat embossing is involved, just simple colour-washing and splashing of water to create a random effect. This simple technique is not only ideal for those who are maybe not confident with stamping but also for those who just want to play with ink!!
Step By Step:
Cut Papermilldirect Plain White cardstock to approx. 28cm long x 14cm.  With long side across scoring board, score at 7cm and 14cm and use a bone folder or scoring tool to fold the card into a gatefold shape.
Die-cut a scallop heart shape from papermilldirect White Linen card using a nesting heart shaped dies, centre a smaller heart die inside the shape and secure using low tack tape before cutting again to give a heart shape frame.  (Keep the inner shape for inside the card later)
Cut 3 panels from PMD White Linen: 1 approx. 13cm x 13cm and 2 panels approx. 6cm x 13cm. (Alternatively start with 1 sheet and cut to size after inking if you prefer).  Apply Oak House Studio Colour Chemistry ink in Peacock Green (if using the pure inks you will need to water it down) using a make-up sponge or craft sponge, just swipe the ink over the surface to colour and add a little water if needed to colour wash.

Add Oak house studio inks in Paris Pink and Regal Claret, swiping randomly across the linen cardstock (again water down the inks if you are using the pure colour versions).  Use a paintbrush or your fingers to splash or sprinkle water onto the panels and then blot with kitchen towel.  (I also inked an extra scrap piece of card with just Peacock Green so I could die cut a sentiment to co-ordinate)

When dry, mat the 3 inked panels onto slightly bigger Papermilldirect Dark Violet card to leave a small even border all around.  Adhere the large panel inside the card and the small panels to the outside using a combination of double sided tape and glue to allow a little ‘wriggle time’ for lining up.
Die cut Hearts to decorate (I’m using Tattered Lace Tuck-ins) from PMD White linen and have snipped into them to cut them down a little (keep waste)  glue to front panels using Cosmic Shimmer clear drying glue.  Take the heart frame and carefully glue to left hand side of Gatefold card, positioning it centrally over the card opening and adding glue only to the LH side where it will attach to the left panel, leave RH side free.
Cut a smaller nesting heart from PMD White Linen and smallest heart from inked scrap card and layer on top using glue.  With the gatefold card closed position this smaller layered heart centrally into the heart frame to check positon, then apply glue carefully only to the RH side where it will adhere to the RH side panel leaving the LH side free.  You will now have a card that opens with a frame on LH side and heart on RH side.  Cut sentiment twice, once from scrap inked card and once from PMD Dark Violet card, I’m using a First Edition sentiment of ‘Be Happy’ and have snipped into it to separate the words.
Take the smaller heart (Waste from Heart Frame) and positon it inside the card using the front heart frame to help line it up if you wish.  Glue in place inside card using clear drying glue.  Layer up the sentiment offsetting the Dark Violet as a shadow and gluing in place on inside heart panel.  To finish add extra heart motifs from the snipped waste or die cut extra to decorate as desired.
I really love the random inking effect and the contrast of the white card and diecuts in this design.  Although I have used nesting hearts you could use any shape nesting dies and different sentiments, experimenting with different coloured inks too.  Have you made gatefold cards recently?  Or perhaps you like inking onto Papermilldirect cardstocks too?

Materials List:
Plain White Card, White Linen Card, & Dark Violet Card - Papermilldirect
Peacock Green, Paris Pink, & Regal Claret - Colour Chemistry Inks - Oak House Studio
Hearts Scallop #657562 -  Framelits Dies - Sizzix
Modern Sentiment Dies #FEDIE038 - First Edition
Tuck In Hearts Dies #ETL173 - Tattered Lace
D/s tape, Cosmic Shimmer glue


Sunday, 1 May 2016

'Lovely' Floral Card - A Step by Step Tutorial


Hello I'm back again with another Step By Step Tutorial for you.  This week the Papermilldirect Design Team are working on the theme of ‘Floral’ and I have a little card design to share featuring a layered Daisy.
Most crafters have flower dies and sentiments in their stash, along with background dies or embossing folders, so although I used my Cricut Explore (link at end of post) to cut the Daisy flower, it is easy to layer up any of your flower dies or use a flower template or even ready-made paper flowers for a floral make.
Die cut a trellis style design from Papermilldirect White Pearlised cardstock using a Spellbinders die.  (You could use an embossing folder if you prefer).  I didn’t need all the piece and so trimmed it down to less than 4” using the pattern as a guide to leave a fancy edge.
The card base is cut from PMD Marine Blue and measures approx. 5 ½” x 4 ¼” and I have rounded the bottom corners.  I also cut a panel of PMD New Lilac card to measure approx. 4 ½” x 4” and rounded all 4 corners.
Glitter glue was used to edge the front of the card base and also the New Lilac panel to add a little sparkle.
The Trellis die cut panel was then adhered to the lilac panel using a clear drying acylic glue and then the whole panel was mounted onto the card front using double sided tape.
Cut the flower layers, I used 3 layers to create a daisy style flower using Papermilldirect White Pearlised paper, layering the flower with 3D foam in the centre of each layer. Shape the petals and then glue the flower to the card front, adding some glitter glue in the centre and a yellow enamel adhesive dot. Cut leaves from PMD Spring Green card and shape to give dimension. Add a little 3D foam pad to the back of each leaf and glue the stem by tucking under the flower, the 3D foam pads will hold the leaves in place.

Die cut your sentiment in PMD Black card and PMD Marine Blue Card.  I have used the word ‘Lovely’ from a First Edition die set.  Layer the sentiments up using a clear drying glue, offsetting the Marine Blue one so that the black gives a shadow effect.
Glue the sentiment in place on the card front and smooth down using a bone folder or crease tool to ensure it is adhered onto the trellis work.  To finish add a little butterfly embellishment.

Using the Papermilldirect Pearlised card and paper adds a lovely sheen to your makes and I especially like the paper for diecutting flowers as it gives a delicate look that can be easily shaped yet retains a lot of strength. It also is a dream to cut on Cricut Explore where it cuts very cleanly.

Materials Used:
Marine Blue, New Lilac, Spring Green, Black coloured cardstocks – Papermilldirect
Ultra White Pearlised Paper, Ultra White Pearlised Card – Papermilldirect
My Design Space Link (for card base, Daisy & Leaves) - https://uk.cricut.com/design/#/canvas/39473641
‘Fancy lattice’ Shapeabilities #S5-152  - Spellbinders
‘Modern Sentiments’ #FEDIE038 – First Edition
Adhesives:  D/S Tape, 3D Foam Pads, Cosmic Shimmer Glue
Glitter Glue, Adhesive Enamel Dot


Wednesday, 20 April 2016

Hoppy Birthday Card - Step by Step Tutorial

Hello I'm back again in Blogland to share my Papermilldirect DT make with you, this time a step by step Birthday card design with a fun frog theme.
This week I’m using a stamp & matching die set with spring coloured papermilldirect cardstocks to create a fun ‘Hoppy Birthday’ card.
Start by stamping a Lily Pad onto Papermilldirect Apple Green card using black Memento ink.  Then stamp the frog image onto PMD White Hammered card.
Colour the frog using a selection of First Edition marker pens, blending colours and adding some extra details with a white gel pen.
Carefully line up the matching die over the Lily Pad and Frog and cut out using your die cutter machine. (I find it easier to first cut a mask from scrap card and position this over the image so it is lined up, attach with washi tape and then secure die in place with washi tape to prevent it slipping).
 
Cut PMD White Hammered card approx. 4” x 5 ¼” and stamp ‘Hoppy’ in black ink towards the top left.  Stamp ‘birthday’ onto a strip of White Hammered card approx. ¾” wide.
Mat ‘Hoppy’ panel onto slightly larger piece of PMD Daffodil Yellow card using double sided tape.  Add 2 strips of washi tape across lower section and secure ends on the back. (I used a gold & white dotty pattern tape).
Score & fold PMD White Hammered card and trim down to create a 4 ½” x 5 ¾”card blank with fold across the top.

Stamp the flies using black ink to front panel then mount the panel onto the card base using double sided tape.  Cut ‘birthday’ strip into a fishtail end and adhere onto washi tape border.  Add the Lily Pad using 3D foam pads to give height.
Add the frog to card front using 3D foam pads so he looks to be hopping off to catch the flies.  Add a little pale colour to flies using marker pens and add extra details using a black fine liner pen.  Add 3 small green adhesive pearls to ‘birthday’ wording to complete the design.

I had fun making this little card and by stamping the lily pad onto an already coloured card stock it cut down on colouring time, although I did add a little shading using a green marker pen.  The frog is an easy design to colour.  I used marker colours of ‘Pistachio’ green, ‘Primrose’ and ‘Warm Yellow’ for the body.  The tongue is ‘Sorbet’ pink and a little ‘baby blue’ to the eyes of the frog and wings of the flies.
I really like this stamp set as it allows you to create your own little scenes along with some alternative sentiments.  The matching die set is nice to have but you could also cut out the shapes using scissors if you prefer.

Materials Used:
White Hammered Card – Papermilldirect
Daffodil Yellow Card – Papermilldirect
Apple Green Card – Papermilldirect
Hoppy Birthday II – stamp set – Clearly Besotted
Hoppy Birthday – die set – Clearly Besotted
Alcohol Craft Markers – First Edition
Tuxedo Black ink pad – Memento
Gold washi tape, green adhesive pearls
White Gel Pen, Black Fine Liner pen
Double Sided Tape, 3D Foam Pads


Tuesday, 12 April 2016

Giraffe Thank You Card using Digi Images - Step by Step Tutorial


Hello, hope you all had a lovely Easter, I have had a little break from blogging for a couple of weeks to enjoy the holiday time before my son went back to school, but I am back and ready to share a new card tutorial with you.  Sometimes it’s nice to have a few thank you cards already made ‘just in case’.  Today I’m following on from my last digi image card where I worked with a silhouette style, this time I’m printing and then colouring the image with alcohol marker pens.  I am printing onto Papermilldirect white linen card and using a free image from LC Designs (Little Claires) and also entering the Little Claires Blog Challenge #67 Anything Goes.

First visit LC Designs website (all links at end of post) to download your image, print off onto PMD White Linen card by first choosing how big you want the design (mine measures just under 4” dia.) and also select the quality of the print (I used fine).

Take the printed image and colour using your preferred medium, I used a selection of First Edition alcohol markers.  This is a simple image so you don’t need to get too worried about lots of shading, just colour however suits you.  When the image has been coloured, take a pale grey marker and outline to add extra definition. Highlights can be made with a white gel pen if you wish.
Take a circle die and place over the image, use tape to secure in place before die cutting. It doesn’t matter if you die cut before or after colouring. (or even halfway through as I have)

Take a piece of PMD Buff coloured card and die cut using a scalloped circle die that is slightly bigger than the image so that it leaves a nice border all around.  Mat image onto scalloped circle using d/s tape. 
From PMD Mandarin card die cut the ‘Thanks’ word die and emboss a rectangle of card using the ‘tiny mosaic’ folder. 
Trim embossed card to approx. 5” x 4” and round the corners using a corner rounder if you have one.  Score and fold an A4 sheet of PMD Plain White card and trim down to 5.5” square.  Position with fold across the top and round the bottom corners.  Using D/S tape to attach embossed panel to top of card.  Add image panel to card front using 3D foam pads.  Use a clear drying glue such as Cosmic Shimmer glue to adhered the ‘thanks’ to card front.  To finish add 3 small orange adhesive gem stones.
I do like the pop of colour from the mandarin orange card and the embossing folder is one of my favs for adding texture. Have you tried crafting with digital images before?  Don’t forget to share your makes over on the Papermilldirect Facebook page.

Challenges Entered:

Materials Used:
Plain White Card – Papermilldirect
White Linen Card – Papermilldirect
Mandarin Card – Papermilldirect
Buff – Papermilldirect
Giraffe Free Digi – LC Designs (Little Claire)
Alcohol Marker pens – First Edition
Tiny Mosaic Embossing Folder – Cuttlebug (Provocraft)
Thanks word die – Clearly Besotted
Circles dies #657551 – Sizzix
Scallop Circles dies #657552 – Sizzix
Corner Rounder, d/s tape, 3D foam pads & adhesive gems