Thursday, 25 June 2015

Party Time!! with Papermilldirect


Hello welcome to this week's +papermilldirect  blog post.  The theme is Party Invitations and the Design Team have been busy creating some fun kids themed invites, (links as always are at the end of the post).


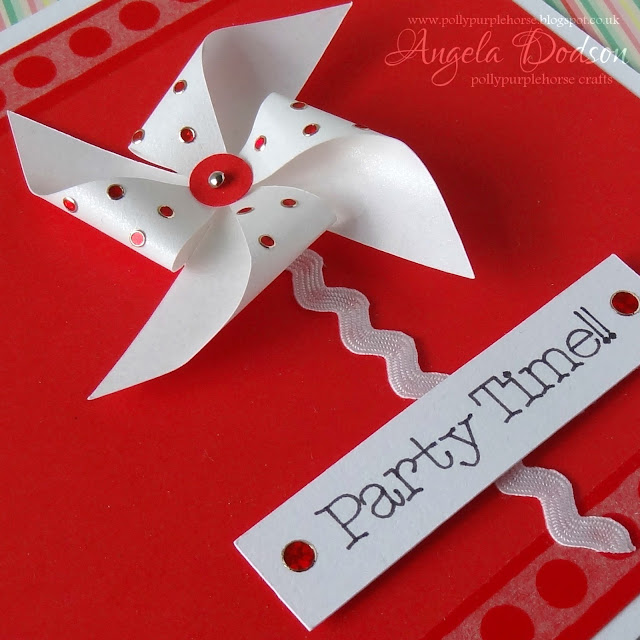
Today I'm sharing with you my Party Time!! Windmill Invitation card.  I combined bright colours of Red & White with spots to create a bright fun windmill style Party Invite. A simple design which could be personalised to suit different colour schemes and party themes. Using the white Pearlised paper gave a sheen to the windmill and allowed the right flexibility and strength to form the shape.

papermilldirect Plain White card was scored and folded to create a card base measuring just under 6” x 6” square.For the main panel, papermilldirect Postbox Red card was cut to approx. 5 ½ “x 5 ½ “, a strip of decorative red & white washi tape was applied across both the top and bottom and the panel adhered to the card front using double sided tape.

Using papermilldirect White Pearlised paper I cut a windmill / pinwheel shape out using my Cricut Explore but these are also easy enough to cut by hand from a basic square shape. The windmill was assembled and secured using a small metal brad which I pierced through a small circle of red card and then each arm section of the windmill, closing the brad on the back.

Small self adhesive Dazzles circles were used to decorate the windmill. The Dazzles I chose were a holographic red with a gold outline as I felt they were a good match for the washi tape.  I glued a strip of white Ric Rack ribbon to the card front using clear drying Cosmic Shimmer glue and added the completed windmill to the top using 3D foam pads.

The sentiment of ‘Party Time!!’ was printed onto PMD Plain White cardstock using my Cricut Explore and the black ‘midnight’ pen. You could also handwrite, stamp or use peel offs if preferred.  To finish a medium sized Dazzle adhesive was added to each side of the sentiment and 3 larger ones were added along the washi tape border at bottom right hand side.

Materials Used:
White Pearlised Paper – Papermill Direct 
Post Box Red Card - Papermill Direct
White Ric Rac Ribbon,
Small metal Brad
Self Adhesive (peel offs) Jewel Dazzles
Washi Tape
(optional) Cricut Explore to cut shape and write sentiment
Adhesives used: Double Sided Tape, Cosmic Shimmer Glue, 3D Foam Pads

Papermill Design Team:
if you have a moment, please do pop over and check out the other papermill teamies blogs and see what they got up to this week: 

https://www.papermilldirect.co.uk/
Click Logo to go direct to papermill


Thursday, 18 June 2015

Saying Hello!! Giraffe Style with Papermill Direct


I'm saying Hello!! with this Giraffe card I created with this week's Special Offer from +papermilldirect:


As the theme this week is ‘Printables’ I thought I would combine a free download with this week’s special offer to create a bright ‘hello’ card. I chose the ‘Safari Animals’ free download from Crafts Beautiful magazine. (links at end of post) Downloads are easy to use and are also perfect for anyone that likes the look of stamped images but perhaps isn’t as confident using ink and stamps, plus they can be printed onto different cardstocks and papers, at different sizes, and you can add colour to them too.


The ‘Safari Animals’ download set consists of a Lion, Tiger and the Giraffe which I have chosen to use. My old printer is a bit temperamental and not always happy to print on thick card but I find that it quite likes the PMD White Linen and when I saw how striking the black & white image was upon the linen texture I decided I would leave it un-coloured. The great thing about printables is that you get to choose what size you want to work with and if you are not sure, then it is easy to test print onto plain copy paper until you are happy with sizing. I trimmed the image panel down to approx. 8cm x 12.5cm and matted onto PMD black card to frame it.


The gorgeous Bright Green Laid card has been used to create a background. I like to put the card stocks through their paces in various ways this week I’m embossing & die-cutting. The back panel has been embossed using a ‘mosaic’ patterned embossing folder and you can see how well it takes the embossing creating a lovely textured background which adds shades and interest as well as being very tactile. The panels have been mounted to the card front using 3D foam pads to give height.


The Bright Green Laid Card is also perfect for die-cutting; you can see it happily copes with both the leafy branch and the ‘hello’ word sentiment perfectly. (The branch actually had a bird on it which I have trimmed off easily with scissors for this project). The die-cut shapes were given a shadow of black card by simply cutting the image again and slightly offsetting, adhering with cosmic shimmer glue, this is a subtle way to help them stand out without being too prominent. I have tried to keep the clean look of the card by keeping to the three basic colours of black, white, & green, Adding some natural coloured Jute trim strip and black sequins topped with pale green adhesive pearls to finish. Completed card size is just over 5” x 7”.

Materials Used:
Bright Green Laid Offer Card – Papermill Direct

Black Card – Papermill Direct 
Giraffe Image from Safari Animals – Free Download – Crafts beautiful magazine

Mosaic Embossing Folder – Cuttlebug 
Branch Die Creatables LR0138 – Marianne Design

Hello Word Die – Clearly Besotted
Adhesives: Double Sided Tape, 3D foam pads, cosmic shimmer glue

Jute Trim, Black Sequins, Pale Green adhesive pearls
Papermill Design Team:
if you have a moment, please do pop over and check out the other papermill teamies blogs and see what they got up to this week: 

Tuesday, 9 June 2015

Simple Makes - Kids Thank You Card with Papermill Direct

Hello, this week I'm sharing a simple thank you card that children can make by themselves using simple everyday materials.
This is the resist technique at it’s most basic. I think every child will have access to Wax Crayons and some type of watercolour paints or even water with a little food colouring would work.  

But first I have news of this week's Special Offer from +papermilldirect which is a 300gsm card in a really rich Violet colour, this gorgeous card can be yours in an A4 box for just £5-28 a saving of 40%!!  - Link Here

Back to the thank you card, which children can create by simply writing with a white or pale coloured wax crayon and washing over with watercolours to reveal the sentiment or picture they have drawn. For very young children you could assemble the greeting onto a card base for them. Older children can have fun adding twine and buttons to their design, perhaps adding drawings as well as a sentiment.

To create this simple but bright card I wrote the word ‘Thanks’ onto Papermilldirect Plain White card using a white wax crayon. As I already had some water based Aqua Markers I used those to add strokes of colour across the wording and then washed over with a water-brush. The same effect can be made by using any water based colours and a paintbrush to reveal the sentiment. I then trimmed the design to measure 4” wide x 3 ¾ “and matted this onto PMD Apple Green card to leave a small border using double sided tape. Twine was wrapped around the completed panel and secured on the reverse. 
The card base was created by simple folding and scoring PMD Plain White Card and trimming down to measure 5” x 4 ½ “ which accommodates the design and is a child friendly size. The completed panel was attached to the card base using 3D foam pads to give height and extra interest, it is also easier for your child too, and if a little wonky will only add to the beauty of a card a child has made themselves. A bright pink coloured button threaded with twine and tied in a bow was added to finish the design.

**There is also exciting Design Team news as we welcome Nessa to the team, welcome aboard Nessa!! (you can find her blog link below)**


Materials Used:
Papermilldirect Plain White Card
Papermilldirect Apple Green Card
White Wax Crayon
Letraset Aqua Markers in Rose Carmine, Flame Red, Straw Yellow, & Celery
Water and brush
Natural Button Twine, Bright Pink Button,
Adhesives: Double Sided Tape, 3D Foam Pads


Papermill Design Team:
if you have a moment, please do pop over and check out the other papermill teamies blogs and see what they got up to this week: 


Wednesday, 3 June 2015

Making Gift Boxes with Papermill Direct


Waving hello and welcome to another week, another month in fact  and another blog post from me.  This time the +papermilldirect DT theme is Gift Boxes and I have created two different styles which will work for all sorts of occasions.


Thanks Gift Box
This little pear shaped gift box is easy to fill and secure using the two little holes at the top to thread ribbon through. The cutting file is found within the subscription images available within Design Space (or if you have the cartridge and / or a different Cricut machine, the cartridge is called ‘Fancy Boxes’). I chose Papermill’s Raspberry Pink card to create a bright gift box and the letters cut out to spell Thanks show the contrasting panel. I chose to cut the inner panel in a pearlescent white paper and then ran it through my Big Shot using a Dots embossing folder to add some texture to the words. The box is easy to put together and features a choice of two cutting files, one is a single piece to fit a 12x12 card and the other is in 2 pieces so it can easily be used with A4 card. I chose to use A4 and only needed to add a strip of double sided tape to one panel to assemble. To finish I added one large clear adhesive gem at the top and 3 smaller clear gems along the flourish just under the Thanks wording. The top of the box was thread with sheer white organza ribbon and tied in a bow.
Candy Box Gift Box
The sweetie shaped Candy Box has been cut on the Cricut Explore using a cutting file purchased from MyScrapChick, (files are on special offer at the moment for just $1). I chose Papermill’s Pale Turquoise card for the main body of the gift box. The software cuts the score lines for you, or you can do as I did and change the cut score lines to basic score lines that use the Cricut Scoring Tool, I prefer the look of the score line. The Candy Box file comes with a straight edged wrap but I wanted to add a more decorative effect, so I searched the Subscription Images and found a lace border which I then resized to fit the box. The lace border did have extra eyelet holes in the centre but I decided I would prefer it plain, so I easily removed them by simply selecting some basic circle shapes to fit over the eyelet holes, when all were covered I selected ‘weld’ and the circles disappeared leaving me with the plain inner to the lace that I required. I cut the lace wrap from papermill's pretty pearlised paper.


Once cut I went over the score lines with a bone folder to crease a bit more firmly and then assembled the box using a little cosmic shimmer glue. Using distress ink in ‘Broken China’ I inked around the blue card to emphasise the shape a little. The lace border was attached around the centre using double sided tape and a strip of patterned paper cut from 'Bright Spark' collection was added on top. To finish pink & white twine was doubled up and tied in a bow at each end.

PMD Pearlised Paper - Papermilldirect
Cuttlebug Swiss Dots embossing folder
Clear sparkly adhesive Gems
White organza ribbon,
Pink & White Twine 
Double Sided Tape, Cosmic Shimmer GlueDovecraft Bright Spark patterned paper
Broken China Distress Ink
Cricut Explore
(Pear shaped Thanks Box file from Subscription Images)
(Lace doily wrap created in Design Space from subscription Image)


Papermill Design Team:
if you have a moment, please do pop over and check out the other papermill teamies blogs and see what they got up to this week: