Showing posts with label special offer. Show all posts

Monday, 1 August 2016

Twist Turn Card - Step By Step Tutorial


Hello, I have a new Step By Step Tutorial to share with you.  This week the Papermilldirect Design Team are working on the theme of ‘Twist Turn’ cards, these are great little cards to make adding an extra fun element to your designs.  There is also a new Special Offer card:  Natural White Matt 260gsm which I am using to make my Twist Turn card this week:


Step By Step:
There are lots of videos and instructions online for Twist Turn cards, (this version is adapted from the June Issue of Quick Cards magazine) Trim an A4 sheet of PMD Natural White Matt (special offer card) to measure approx. 21.5cm x 14cm.  Daw a central line across the sheet, then mark a line down at 7cm and another at 10cm.  Draw the diagonal lines from 7cm to centre line at 10cm and do the same in reverse for the bottom diagonal.  Score and fold all lines: the 7cm line down will be a mountain fold, the 10cm line down will be a valley fold. The small diagonals will be mountain fold. And the centre score will be mountain fold to create the card base.  Crease folds firmly using a crease mouse or flat scoring tool.
Take a pieces of PMD Natural White Matt card and watercolour, I’m using Peacock Green Colour Chemistry inks and a water brush.  Add random spatters of Jubilee Blue and Vintage Sepia inks by flicking them from the end of a brush.  Blot with a paper towel, then leave to dry or use a heat gun for speed.
Stamp text onto 1 piece of the water coloured card using Triple Blue Skies inkpad to give an ombre effect.  I am using the OHS ‘English Garden Words stamp’ as it is a nice size to fit the card panels.  Leave to dry or speed up using a heat gun.
Using versamark ink, stamp a medium sunflower image onto scrap PMD Natural White Matt card and sprinkle with gold detail embossing powder.
Tip off excess embossing powder and pour back into pot for next time.  Use a heat gun to heat emboss the image until all the powder has melted and it has turned a lovely gold colour.  Colour the sunflower with shades of yellow and orange, I’m using the Triple Sunshine Yellows inkpad, along with Citrus Yellow, and Juicy Orange inks.
Continue adding as much detail to the sunflower as you wish with the inks, I have used a reddish brown colour ink to make the centre darker and add more shading to the petals.  Add a colour wash around the outside edges and when dry cut around the sunflower using scissors or craft knife.

Ink around the card base edges and outer folds using orange inks to add definition.  Trim the text stamped panel to approx. 10.5cm x 6.5cm and adhere to card front, add a matching panel (without text) to the back, adhere using d/s tape and /or glue.  Add 6.5cm squares of water-coloured card to the 2 square panels and small triangles to the LH inner folds if desired.

Diecut a ‘Thanks’ sentiment from PMD Black Card and add to text panel using glue to adhere.  Add 3D foam pads to back of sunflower and add to the front square of the twist turn card.
I was really impressed with how the Papermilldirect Natural White Matt card takes the watercolour inks and the heat embossing with no pilling or warping,  it scores and folds beautifully and is a perfect weight for these card styles, so it’s a versatile all round card to have in your stash.
Have you made any Twist Turn cards using papermilldirect cardstocks?, don’t forget to post your makes over on the PMD facebook page, so we can take a peek, Angela x

Materials Used:
Plus: Versmark Inkpad (or embossing inkpad), D/S Tape, Glue, 3D foam pads


Tuesday, 1 March 2016

Happy Mothers Day Floral Wreath Card


Hello I'm back here to share a Mother’s Day card with you.  This week I’m using a variety of coloured cardstocks from Papermilldirect’s lovely colours range, and teaming it with ‘Coniston Blue’ which is this week’s  +Papermilldirect Special Offer card.  If you're quick you can grab a small box for just £4-40!!  This is for 75-80 A4 sheets of premium quality 300gsm, a bargain!!

I cut this layered floral design on my Cricut Explore using images free from within the Design Space subscription. (I know they've changed the name to Access now :D ) If you would like to cut it exactly as I have, the link to my DS file is here: https://uk.cricut.com/design/#/canvas/37189424   I have sized it to fit a 6x6 card but you can of course adjust the size to suit your requirements.


If you don’t have a Cricut then why not use the coloured cardstocks as inspiration to die cut or punch a variety of flower shapes and leaves to form a wreath shape onto a card front.  I am using the ‘Coniston Blue’ as the backdrop and shadow for my ‘Happy Mother’s Day’ sentiment, as it is the perfect shade of blue to set off those lovely bright colours.
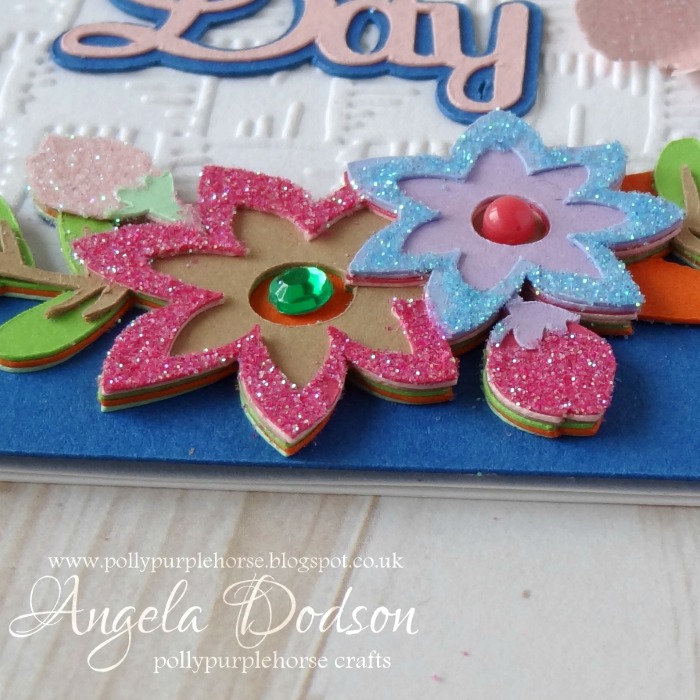
The flowers and leaves in my design are very dimensional and this is simply by layering up the shapes and gluing them on top of each other, using a wet clear drying glue such as Cosmic Shimmer allows some ‘wriggle time’ to line them up and not leave any glue marks.


For the Plain White Card panel I have embossed it with a Basket Weave effect embossing folder through my Big Shot to add some extra detail and texture, but it could also be left plain.  The card blank is also PMD Plain White card.
To add some extra sparkle I applied some of the Nuvo glitters by first using the Nuvo glue pen on the area to glitter and then sprinkling the glitter onto it from the bottle, when dry you can gently tap the excess off and pop it back into the bottle.   (I used a small clean paintbrush to gently brush away any stray glitter afterwards)


You can add different adhesive gems, pearls or enamel dots to the centres of the flowers to make them ‘pop’ and / or add some die cut butterflies as I have done here to accent the sentiment.
Although I designed this one as a greeting card, it would work well mounted in a little box frame too, perhaps as a Mother’s Day Gift?  You could even use different sentiments in the centre or perhaps a photograph to make it an extra special gift.


Materials Used:
Papermilldirect - Coniston Blue ‘offer card’
Papermilldirect - Plain White card
Papermilldirect Coloured card - Pale Turquoise, Marine Blue, Apple Green, Spring Green, Baby Pink, Raspberry Pink, New Lilac, Buff, Orange
Crafters Companion – Basket Weave Embossing Folder
Nuvo Glue Pen – Tonic Studios
Nuvo Pure Sheen Glitter – Candy Pink, Aqua, & Diamond – Tonic Studios
Adhesive gems, pearls, enamel dots
Double Sided Tape, Cosmic Shimmer Acrylic Glue


Monday, 4 January 2016

Thank You Card step-by-step Tutorial

Hello and Happy New Year!! I'm back after the festive break with my first PMD Design Team blog post for 2016. It's that time of year when we may be sending 'Thank You' cards to family and friends, so using this week's special offer 'Mustard Yellow' cardstock from Papermilldirect, I created this little ‘Thank You’ card design as follows:
 Score and fold a sheet of A4 PMD Black card in half then trim down to create a square card blank.  I cut mine to measure approx. 5 ¾”.
Cut a square of PMD Mustard Yellow card to measure approx. 5 ½” square and emboss using the ‘distress’ effect embossing folder through your die cutter.
 Position black card blank in ‘tent’ position (with fold along the top) Adhere the embossed panel centrally onto card front using double sided tape.
Cut 2 strips of pattern paper approx.  1 ¼” deep by just over 5” wide. Mat the pattern papers onto PMD black card to leave a small equal border showing all around on both strips.
 Using a red-brown ink and the sentiment stamp, stamp ‘Thank You’ onto PMD Mustard Yellow card.  When ink is dry carefully position a frame die over it and run through your die cutter (tip: I use a little low tack washi tape to hold dies in place). 
Cut the same frame die again using PMD black card, you will see that there are 2 parts to each die cut frame set, use the thin black outer piece to frame the stamped piece, use a little strip of card and / or tape on the back to hold them in place.
Cut a ¾ “deep strip of PMD black card to fit across the mustard embossed panel.  (I was using up scraps so mine is shown as 2 pieces).  (Optional) Spray with gold ink and leave to dry. (you can mix your own spray using a gold ink and water into a mister bottle and giving it a shake before using)
Assemble card as follows:  add 3D foam pads or tape to back of paper pattern panels and position bottom one first, then add top panel so that it is equally spaced and lines up with bottom panel.
Add 3D foam pads to black gold sprayed card strip and position across the centre of the card between the patterned panels.  Add sentiment to centre using 3D foam to give height.
To finish add black sequins to right of sentiment.  I used 2 small and 1 large black sequin and glued in place using cosmic shimmer clear drying glue.
This is a simple card layout and of course you could add different sentiments to the centre to suit other occasions.  It also makes use of any pretty paper scraps you may have laying around.  The pretty bird paper strips were left over from other projects and way too pretty to discard, they worked well with the PMD Mustard Yellow and Black cardstocks and the addition of height and embossed texture added to the effect. 
 
Materials Used:
Mustard Yellow Offer Card – PMD
Black Card – PMD
Distress Embossing Folder – Textures by Crafters Companion
Botanical Notes 6x6 paper pad – First Edition
Borders, Frames & Buckle Die Set – First Edition
Thank You sentiment stamp – Oak House Studio
Ink Pad – Oak House Studio
Spray Ink – Oak House Studio
Black sequins
Double Sided Tape, 3D Foam Pads (or Tape) Cosmic Shimmer clear drying glue

Papermill Design Team:
if you have a moment, please do pop over and check out the other papermill teamies blogs and see what they got up to this week: 


Tuesday, 27 October 2015

Star of Wonder... with Papermilldirect


To create my card base I scored and folded an A4 sheet of PMD White Linen card and then trimmed it down to approx 5.5" square. The card will be used in 'tent' position with the fold at the top.
I thought I would test the Canary Yellow card in my Cricut Explore and created this 2 layered Christmas Star ornament shape, I chose the shape from the 'Quilted Ornaments' design set / cartridge, which is free if you have the subscription.   The intricate design top layer cut perfectly in my Explore and I cut a bottom layer from PMD Ultra White Pearlised to add a subtle sparkle, using cosmic shimmer clear drying glue to adhere the layers together.

Using my Explore and a black pen, I cut a square of PMD White Linen card approx 4 5/8" square and 'attached' some text to run along the bottom, the sentiment being 'Star of Wonder', I wanted to add a modern look and went with 'Wonder Star of Wonder Star' so that it stretched across the bottom of the white linen square.  I must confess that my black Cricut pen has run out and so I have improvised and am using a Black Pilot V5 pen instead which I am pleased to report has given a great result on the linen textured card.

A square of Canary Yellow card was cut at approx 5" square as a mat layer to add the pop of colour that will cordinate with the star shape, and the text square was adhered ontop using double sided tape.  I found some elasticated gold twine and wrapped it across the top of the card and secured the ends on the back with strong doubled sided tape.  The panel was then mounted onto the card front  using 3D foam pads to give height.
I wanted to keep a clean simple look to the star, as a lot of the design element is in the cut out detailing, so I just added a faux pearl to the centre and a few clear adhesive gems, before mounting the star to the card front using 3D foam pads.  I positioned the star at an angle and added a bow of gold fluted ribbon to the loop so that it looks as if the ornament is hanging from one of the strings of gold twine.
This was a really quick idea and quick to make, I was happy with how it turned out and how well this particular shade of yellow worked for a Christmas theme.

Materials Used:
Canary Yellow 240gsm - Special Offer Card - Papermilldirect
White Linen Card - Papermilldirect
Ultra White Pearlised Card - Papermilldirect
Gold Twine, Gold Ribbon, Adhesive Pearl and Clear Gems - from stash
Adhesives used: Cosmic Shimmer clear drying glue, 3D foam pads, double-sided tape
More ideas for using Papermilldirect cardstocks with a Cricut machine can be found by using this quick link here:http://pollypurplehorse.blogspot.co.uk/search/label/cricut


Papermill Design Team:
if you have a moment, please do pop over and check out the other papermill teamies blogs and see what they got up to this week: 

Tuesday, 29 September 2015

Just For You...with Papermilldirect


Hello I'm back again with one of the two designs I had fun creating with this week's Special Offer Tangerine Card from Papermilldirect.  This card has been created using a manual die-cutter (my old trusty Big Shot) and a selection of dies.  (please see other post for a design using the Cricut Explore)
Using just 3 colours I created this little shaped standing card.  Tonic dies were used to cut the fancy ‘loopy lace’ front panel from this week’s special offer ‘Tangerine’ cardstock, I cut a backing panel and card back from PMD Ivory smooth cardstock and assembled a little card as follows. 
Taking one of the Ivory card shapes I scored and folded the back before joining to the other Ivory shape to form a little standing card, using a strip of double sided tape and a little cosmic shimmer glue just above the score line.  The tangerine ‘Loopy Lace’ panel was attached to the front using 3D foam pads in the centre only, to create depth.

I then cut a smaller ‘Loopy Lace’ panel set reversing the colours, so an Ivory panel was on top.  I stamped a sentiment in the centre of the panel  ( I used ‘Just For You’ from the Belle & Boo stamp set) stamping in an orange toned ink and then sprinkling with clear embossing powder before embossing with an heat gun.   Then mounted the sentiment panel on top of its base mat of Tangerine card using 3D foam pads and gluing the completed sentiment panel to the base card using Cosmic Shimmer glue.
The flowers were die cut from Ivory Smooth card and the leaves from Spring Green card using Sue Wilson ‘Faux Quilled Blooms’ die set. The layered butterfly was also die cut from Ivory smooth card using a Sizzix butterfly die set.
Detail Sparkle in ‘White Shimmer’ was applied to the flowers and also to the top layer of the butterfly.  When dry the flowers and leaves were shaped and added to the card front at right hand side using 3D foam pads, topping each with a faux gem in pale green or pale orange.  The butterfly was assembled with 3 small orange faux gems along the body, wings shaped and then it was glued to the card front using Cosmic Shimmer Glue.

Materials Used:
Tangerine ‘offer’ card - Papermilldirect
Ivory Smooth  card - Papermilldirect
Spring Green card – Papermilldirect
Verso Ovals ‘Loopy Lace’ die set - Tonic
Sue Wilson Finishing Touches ‘Faux Quilled Blooms’ die set - Creative Expression
Butterflies 4 - #658290 Die & Stamp set – Sizzix
Sentiment Stamp – Belle & Boo stamp set
Colour Chemistry Ink Pad ‘Triple Sunshine Yellows’ – Oak House Studio
Clear Embossing Powder
Detail Sparkle ‘White Shimmer’ – Imagination Crafts
Adhesives Used: Cosmic Shimmer ‘clear’ glue, 3D foam pads, double-sided tape

Papermill Design Team:
if you have a moment, please do pop over and check out the other papermill teamies blogs and see what they got up to this week: 


https://www.papermilldirect.co.uk/
Click Logo to go direct to papermill

Monday, 28 September 2015

Be Your Own Sunshine...with Papermilldirect


Hello!!  Today I'm sharing one of the two designs I've made using this week's Papermilldirect Special Offer Tangerine card.  This card uses the Cricut Explore (another post will feature a card created with a manual die-cutter and dies).  So first up is this little Layered Quote which uses the ‘Be Your Own Sunshine’ quote set from within the subscription images in Cricut Design Space (or the intricate quotes cart or image set if you have that instead). I sized this design to measure approx.  5” x 7” so that it would fit a 5x7 envelope as a card or can be used as a small display piece as I have done here.  You can of course cut this one as large as you wish for displaying.  (I have provided my Design Space link below if you wish to cut to the dimensions I have used).
 The design consists of 3 layers, the main image has been cut from this week’s special offer ‘Tangerine’ cardstock.  Using Cosmic Shimmer clear drying glue I added blue denim effect paper behind the girl silhouette to add a pop of extra colour and interest, blue being a great contrast to orange colour tones. Just for a little extra definition I did edge the sections that make up the girl figure with a Versa Mark pen, it's quite subtle and  I highlighted the word ‘Sunshine’ using detail sparkle in ‘White Shimmer’ and left to dry.
When dry I assembled the quote design as follows,  using double sided tape to adhere the Daffodil yellow card (middle layer) onto the Bright Orange card rectangle (bottom layer).  The top panel of Tangerine was then carefully positioned on top using 3D foam pads to give height and depth to the image.  I really like the zingy colours teamed with such a bright and cheery sentiment.
    
Materials Used:
Tangerine ‘ Special Offer’ card - Papermilldirect
Daffodil Yellow card - Papermilldirect
Bright Orange card - Papermilldirect
Denim effect paper is from Me To You Tiny Tatty Teddy paper pack
Detail Sparkle ‘White Shimmer’ – Imagination Crafts
Versa Mark Pen (optional)
Adhesives Used: Cosmic Shimmer ‘clear’ glue, 3D foam pads, double-sided tape
Cricut Explore  - my Design Space Link: https://uk.cricut.com/design/#/canvas/31695738


Papermill Design Team:
if you have a moment, please do pop over and check out the other papermill teamies blogs and see what they got up to this week: 


https://www.papermilldirect.co.uk/
Click Logo to go direct to papermill


Tuesday, 22 September 2015

Autumn Wishes... with Papermilldirect


Waving hello and welcome to another Blog post, Autumn is now with us and crafters find lots of wonderful inspiration with all the colours that brings.  

This week over at +papermilldirect  the special offer is a really nice A4 size 270gsm Ivory Stucco card, I have a particular liking for the textured cardstocks and this Stucco effect is especially nice, very similar to the hammered effect.  This week you can get your hands on a small box of the Stucco for just £4!! it is also available in the Midi box size too at just £11-50, but be quick as I believe there is only a very limited amount available (link here:)

I thought the lovely texture of the Ivory Stucco card would work well to create this autumn themed card with the help of my Cricut Explore. (DS link below)  You can see that although it’s a textured card it cuts very cleanly and is able to take a sentiment written directly to it.  I used an A4 sheet of Ivory Stucco to create a card base measuring approx. 5.5” wide x 7.5” high, this size fits into a C5 envelope.  The 270gsm of the Stucco card means it is perfect to create a sturdy card base and carry embellishments.


I used my Cricut Explore and images from within the subscription to design this leaf pennant focal point with extra leaf and an acorn design.  I have included my Design Space link below so that you can create this card too, everything will be sized and colour co-ordinated so it is all ready for you to cut.  The card base is included in the design just remember to insert a black pen into the pen holder so that your Explore can write the sentiment for you.  I have ‘attached’ the sentiment to the card shape and so it is all ready to press ‘go’.


After cutting you should have 1 base card (Ivory Stucco) with sentiment ‘Autumn Wishes’ written upon it, 3 layers to the Pennant, 2 layers to the leaf and 2 layers to form the Acorn. 


Score and fold the card base in half so that the sentiment is on the front of the card.  Glue the layers of the pennant, leaf and acorn together on top of each other to form the 3 shapes, I used a clear drying glue to make this easier and give a neater finish.

To add some extra definition I outlined the cut out sections of the brown card using a versa mark pen, I did the same to the leaf and to the acorn to add some extra detail, if you don’t have a Versa mark pen then you could use a marker, chalk, or ink, or leave it plain if you prefer.


Take the Pennant Shape and add a length of Jute ribbon across the top and secure the ends on the back using double sided tape.  Wrap 2 lengths of paper twine or cream coloured twine across the top of the Jute Ribbon and secure ends on reverse side.  Add 3D foam pads to the back of the pennant and attach to card front near to the top, so that it doesn’t cover the ‘Autumn Wishes’ sentiment.


Add 3D foam pads to the back of the leaf and acorn and arrange on top of the jute ribbon, adhere when happy with placement.  I also added some of the waste pieces of card cut from the inner leaf and the pennant background to add some extra interest.  To finish I glued 3 sequins and a little bow of paper twine.


Materials Used:

My Project Link: https://uk.cricut.com/design/#/canvas/31387757  - Cricut Design Space


Cosmic Shimmer Clear Drying Glue – Creative Expressions

Double Sided Tape, 3D Foam Pads

Papermill Design Team:
if you have a moment, please do pop over and check out the other papermill teamies blogs and see what they got up to this week: