Hello I'm back again with this week's +papermilldirect post and I was hoping to post the details of this week's Special Offer but it seems it has sold out already!! However if you pop on over to the Special Offers section there are still some other delights to tempt you, and perhaps a browse through the card and paper selections too? (As always all links to materials, DT Blogs and Challenges Entered appear at the end of the post).
So onto my make for this week which is a little shaped Christmas card idea which has been inspired not only by the beautiful papermilldirect cardstocks,
but by 2 new additions to my crafting stash. The Little Claire’s snowman stamp (which I was lucky enough to win recently) and the
Crealies Patchwork dies which I have had my eye on for quite a while
now.
I started off by using the large circle die within the Crealies set to die-cut 2 large circles from Papermilldirect White Linen cardstock,
one for the card front and one will be the back. The Crealies die set
also comprises of nesting shapes that you can assemble to create
different patterns (patchwork effects) to make your own simple or more
involved designs. I chose to keep it simple for my first test and used 2
of the nesting quarter circle shapes. I cut the larger one 4 times
from the PMD Ocean Blue card and the slightly smaller one 4 times from
the White Linen
card. The sentiment of ‘ Wishing you a Sparkly Christmas’ was stamped
onto one of the white linen quarters using black Memento ink, before
stamping I took the clear stamp and curved it a little on the stamp
block so that it would roughly follow the curve of the shape. I then
glued the smaller shapes on top of the larger ones using a clear drying
glue as this allowed me a little time to ‘wriggle’ them into place. I
then glued the completed quarters onto one of the large White Linen
circles, evenly spacing it out, using the clear glue again is very
helpful to achieve an even space (there is also a downloadable template
available to help with spacing the patchwork dies). As it is a
symmetrical design you can arrange the segments however you wish, I
chose to position the stamped sentiment segment at the bottom.
To create the card blank, I took the other large white linen circle
shape and scored a line across the top of the back a little way down,
just over an 1”, I then cut a very small piece of card off the bottom,
this will enable the card to stand by itself, unless you want your card
to rock n’ roll, which is also a fun alternative I have used sometimes.
Add clear drying glue or double sided tape to the inside back section
above the score-line and stick it to the back of your segmented card
front, you should now have a circular card that stands up.
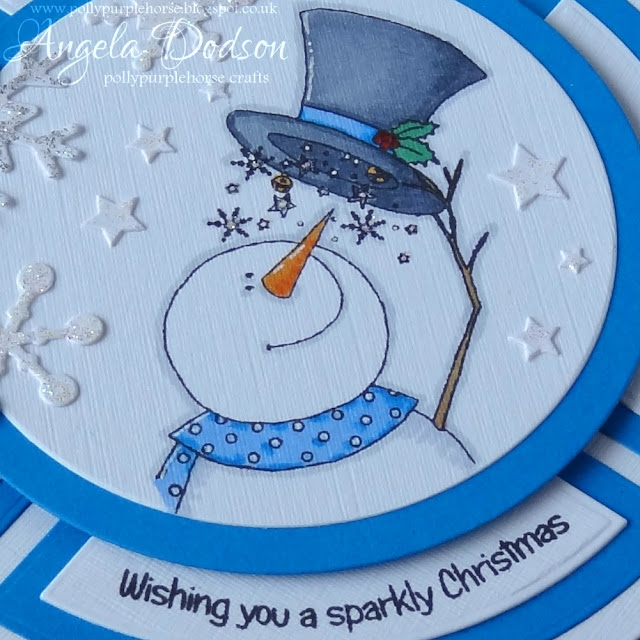
Using black ink to stamp the cute snowman image onto papermilldirect
White Linen card, I then coloured with a variety of First Edition
alcohol marker pens (all colour details below), extra details were added
with a white pen. When the image was dry I used a set of circle dies, a
smaller one to cut the image and a slighter larger one to mat it, again
using some of the clear drying glue to adhere. 3D foam pads were used
to adhere the snowman panel to the centre of the card front, giving a
little extra height and dimension.
To add some extra detail & sparkle to the design and to fit the
theme, I used snowflake & star dies and added different glitter
glues to each one, silver and crystal colours, also adding a tiny dab to
some of the snowflakes in the stamped image. I was quite pleased with
how the new dies set works and look forward to more experimenting with
them and I love the cute snowman stamp, it was easy to colour and having
the matching sentiment in the set was really useful. I do like
stamping and colouring onto textured card and the Papermilldirect Linen card gives such a great tactile finish.
White Linen Card – Papermilldirect
Ocean Blue Card – Papermilldirect
Clear Stamp - ‘Have a Sparkly Christmas’ – Little Claire Designs
Die Set - Modern Patchwork No. 1 – Crealies
Die Set – Circles Framelits #657551 – Sizzix
Die Set – Snowflake #2 – Cuttlebug / Provocraft
Ink Pad – Tuxedo Black - Memento
Alcohol Markers – First Edition
(Holly = 26 Jade, 16 Ruby, Hat = 02 Cool Grey, 03 Slate, Carrot Nose = 41 Satsuma, 42 Pumpkin, Hatband & Scarf = 21 Cornflower, 19 Baby Blue, Twig Arm = 49 Tan, Outline Shading = 01 Light Grey)
Glitter Glue – Crystal and Silver
White Pen – Pergamano
Adhesives – Clear Drying Cosmic Shimmer Glue, 3D Foam Pads
Challenges Entered:
Crafty Sentiments - Anything Goes Challenge - Link Here
Crafty Cardmakers and More - Challenge #149 Circular Cards - Link Here
Papermill Design Team:
if you have a moment, please do pop over and check out the other papermill teamies blogs and see what they got up to this week:


No comments:
Post a Comment