Saturday, 27 February 2016

Vintage Rose 'with Love' card - Moroccan Spice & Gold Foiling


Hello, welcome to another Blog post and time to share another of my Trimcraft DT makes with you.  I do love those vibrant warm colours in the First Edition Moroccan Spice papers and thought the orange would look great for a vintage style with some gold foiling using the First Edition Foiling products.  


I rolled a simple rose from the papers to accent the sentiment.  The edges of the papers have been distressed and inked with an orange ink to complement the papers and gold colours.

Step By Step:
  1. From the Moroccan Spice 8x8” paper pad cut green paper to measure 6 ¾” x 4 ¾” and orange textured paper to measure 6 3/8” x 4 3/8”.  Distress edges with scissors and then ink around with orange ink.  Mat orange paper onto green paper centrally using double sided tape to adhere.
    From the Moroccan Spice 6x6” paper pad cut green paper to measure 5” x 3” and green pattern paper to measure 4 ½” x 2 ½”.  Distress edges and ink as before, mat smaller piece onto larger piece with double sided tape.
  2. Using a 5 x7” Kraft card blank with the fold across the top, adhere larger mat centrally onto card front.  Add smaller mat at an angle.
  3. To create rose, cut a circle of orange double sided paper (Moroccan Spice) and cut into it to create a spiral, then roll up starting from outside edge.  Secure rose with glue at the bottom and press into place to dry.
  4. Using the FE Foliage die set, die cut 2 large leaves from the green paper, pass through your die cutter again with a rubber mat to emboss the veins.
    Add gold foiling to leaves and rose by applying the FE Foil Transfer Glue and leave to become tacky, then place the foil on top and press and rub firmly before lifting the foil. 
  5. To create the foiled sentiment, die cut ‘With Love’ (Modern Sentiments set) using the FE Foil Applicator Foam.  (I find it easier to peel the backing and adhere the foam to white card before die cutting).  Remove paper from die cut and place gold foil on top, pressing down as before to transfer the foil onto the sentiment.
  6. Cut an oval of orange card (I used the oval waste from the frame in the Belle & Boo die set) distress and ink edges of oval before adhering to panel on card front.  Glue foiled sentiment on top.
    Glue rose and 2 leaves to top left of panel, bending and shaping the leaves first before gluing in position.
  7. To finish I die cut a flourish from the FE Doily die set and cut it in half, inking in orange ink and then tucking 1 piece to top left of panel and 1 piece to bottom right, gluing in place before adding 2mall orange adhesive gems to flourishes and 1 larger adhesive pearl to centre of rose.(Dovecraft).


    Products Used:
    First Edition 8x8 FSC Paper Pad Moroccan Spice
    First Edition 6x6 FSC Paper Pad Moroccan Spice
    First Edition Dies - Foliage
    First Edition Dies - Sentiments Modern
    First Edition Dies - Doily
    First Edition Foil – Gold
    First Edition Foil – Foam
    First Edition Foil Glue
    Dovecraft Kraft 5"x7" Cards & Envelopes

    All products used are from +Trimcraft Ltd and this project also appears in my Trimcraft Design Team Gallery link here: http://www.trimcraft.co.uk/projects/121434/vintage-rose-card-with-first-edition-moroccan-spice-papers-and-gold-foiling


Wednesday, 24 February 2016

You make my Heart so very Happy


Hello I'm back to share another make with you, this one is a DT project for Trimcraft.  I’m in love with these gorgeous First Edition Love Story papers from +Trimcraft Ltd .  

The canvas and wood effect papers and a theme of love gave me the idea to create a little Birdhouse shaped card.  This could be a Valentines or Anniversary make or to send to someone ‘just because’.  

I created the card shape using my Cricut Explore but you could easily cut a simple house shape by drawing in pencil onto a card blank and cutting with scissors or craft knife and decorating as you wish.

Step By Step:
  1. I designed and cut the birdhouse and 2 birds on my Cricut Explore using Design Space subscription, I can share my DS link with you here: https://uk.cricut.com/design/#/canvas/36107737  Which will give you access to my design file so you can cut everything as I have done, all is sized ready for you to load the mats and just press ‘go’.
  2. Using Dovecraft A4 Kraft Card I cut 2 identical pieces to form the front and back of my card base. (Scoring a short way down the back piece and folding before adding glue above the score line creates the join, you may prefer to do this after the front papers are on ).
  3. I cut an extra front card piece from FE Love Story checked pattern canvas effect paper and adhered to Kraft card front.  Inking edges with red ink and then black ink to add definition.  I then cut the smaller front panel from Love Story Wood effect paper inking the edges as before and adhering to card front
  4. I cut 2 roof section parts from brown arrow patterned paper in the Love Story pad, inked with red and black inks as before and then added to card front using 3D foam pads to layer up both sections to create height.
  5. The heart sentiment ‘You Make my heart so very happy’ was cut out of the Love Story papers, inked around as before and then edges in Dovecraft ‘crystal’ glitter glue.  When dry it was glued to card front towards the top of the birdhouse.
  6. I cut 2 birds from heart patterned paper.  Each bird consists of 2 layers and I inked around all the parts using red ink and black ink as before, adding extra black to colour the beaks and legs. This time also outlining with Dovecraft glitter glue in ‘Crystal’ to add extra sparkle.  When dry I shaped the pieces in my fingers and layered up using 3D foam pads.  I added 1 bird (flying) to top of birdhouse allowing wings & beak to overlap, and the other bird (with legs) to bottom RH side of birdhouse allowing the tail to overlap.
  7. Using the FE Foliage Die set I cut 2 leafy fern pieces from floral pattern Love Story paper and die cut 3 small flowers using the FE Flowers die set.  Inked all pieces with red and black inks as before and shaping in my fingers to give some texture / movement before adhering to card front at bottom LH side.
  8. To finish I coloured 2 small clear gems with FE black marker for the birds eyes and added clear adhesive gems to centres of flowers, heart sentiment, and to decorate roof section of the birdhouse.
Products Used:
All materials are from +Trimcraft Ltd and this project also appears in my Trimcraft Design Team Gallery Link here:http://www.trimcraft.co.uk/projects/121410/you-make-my-heart-so-very-happy-first-edition-love-story-papers

Monday, 22 February 2016

Double Partial Die Cutting Technique - step by step


Hello it’s Monday and I'm back to share a new make and step-by-step tutorial with you.  This week the Papermilldirect Design Team are looking at the ‘Partial Die Cutting Technique’ and I thought it would be nice to try something I haven’t done before, which is a Double partial die cut, so we are learning together this week! But first news of this week's special offer - a small box of Spring themed card (Daffodil Yellow,Spring Green,Plain White) can be yours for just £6-60 that's 45% off!! Link HERE:


  1. To start off I cut a panel of +Papermilldirect White Linen card approx. 4.5” x 5.6” and drew a light pencil line across the front at approx. 3” down.  Using the 2nd smallest of the Torn Edge dies I positioned the die so that a portion was showing beneath the pencil line and held in place with washi tape as shown.
  2. Place the card & die onto one of your cutting plates and carefully line up the other cutting plate on top so that the edge of the top plate lines up with the pencil line, so that it will not cut through the section below the pencil mark.
  3. Run through your die cutter, remove the washi tape and you should now have a partial cut.  (You can erase the pencil line in the aperture if you wish, but leave the line either side to help with the next stage)
  1. Because I am going to be using the matching stamp for my next cut, I found it easier to stamp the image first.  So using the Pearlescent Lavender ink I stamped the 2nd largest butterfly from the stamp set, positioning it at an angle so that 1 wing will stamp below the pencil line but the butterfly will still fit into the aperture.
  2. Next line up the matching butterfly die, if using a die like mine that you cannot see through then it is easier to cut a mask from scrap paper and use that to line up.  Hold die in place with washi tape.  (If you are not using a stamp then skip the stamp step)
  3. Line up your cutting plates as before, positioning the top plate to line up with the pencil mark so that nothing below the mark will cut.
  1. Run through the die cutter and remove the washi tape and waste card. To remove the landlocked bits at the bottom then line up a ruler against the pencil marks and use a craft knife to remove the small bits.
  2. To create a coloured background, cut a piece of card (I'm using a scrap of PMD felt embossed but any texture will work) slightly larger than the aperture and apply Orange and Magenta pan pastels blending to create a slight Ombre effect.  (Use distress inks or a scrap of pattern paper if you prefer). 
  3. Cut a strip of white linen card approx. 1” wide and colour the same blending the orange and magenta.  (You can seal the pan pastels if you wish using a quick light spray of hairspray) Stamp the sentiment ‘You Make Me Happy’ centrally onto the strip using black Archival ink.  Using double sided tape attach sentiment strip across front panel below aperture cutout and trim edges flush.
  1. Create a card blank by scoring and folding an A4 sheet of Papermilldirect White Linen card and trimming down to give a 5” x 7” card blank.  Using Double sided tape attach the coloured panel to card front positioning so it t will show through the aperture panel. 
  2. Attach front panel using 3D foam pads, I used a double thickness to give more height and depth to the cut out.
  3. To finish add some enamel dots in lilac and pink to the butterfly body and around sentiment.
Have you experimented with the Partial Die-Cutting Technique, perhaps you’ve tried the double cut version too?  There are lots of possibilities for teaming your different dies to create interesting apertures and focal points not only in the centre of your cards but the inside folds and outside edges too.

Materials Used:
White Linen Card – Papermilldirect
White Felt Embossed Card – Papermilldirect
Torn Edge Nesting Dies – First Edition
Flight of Fancy Dies – Clearly Besotted
Flight of Fancy Stamps – Clearly Besotted
Pearlescent Lavender Brilliance Dewdrop ink, Black Archival Ink
Orange Pan Pastel, Magenta Pan Pastel
Double Sided Tape, 3D Foam Pads
Fun Fair Adhesive Enamel Dots

Wednesday, 17 February 2016

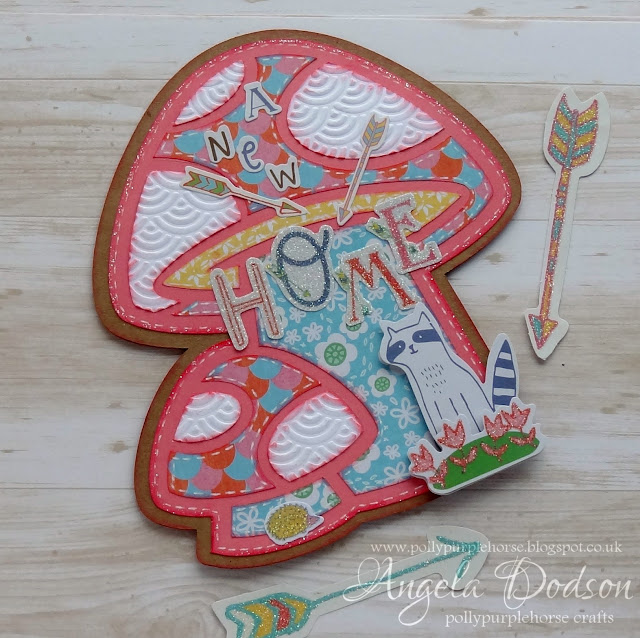
A New Home Card with Forest Friends

I do love the cute Forest Friends collection from Grace Taylor and thought it would be fun to create a Mushroom or toadstool shaped New Home Card.  


I finally got around to using the cute Raccoon character from the embellishment sticker pack, but he's such a sweetie I may need to add more to my stash. :D  I have included my Cricut Design Space link below if you wish to cut exactly as I have or you could draw a template and cut by hand as it's a simple shape :)

Step By Step:
  1. I cut this design on my Cricut Explore and can share my Design Space Project link here: https://uk.cricut.com/design/#/canvas/36100306
    if you would like to make one the same, it is already sized for you. (You could also cut a simple toadstool / mushroom shape by drawing in pencil onto a kraft card blank and cutting paper pieces for the spots)
  2. I cut the largest shape, the card base from Dovecraft A4 Kraft card and cut it twice to create a front and back for my card.  (The back panel can be added later by simply scoring across it about 2” down and adding tape above this section before attached to card front)
  3. Using the pink card from the Dovecraft coloured A4 card pack, I cut the large base panel.  I added faux stitching all around using a white pen.  Edges were inked with a red ink and then Dovecraft glitter glue in ‘crystal’ was applied to add some sparkle.
  4. I used various pattern papers from the Forest Friends 12x12 pad to cut the layered parts.  Yellow for the under cap and the blue for the stalk.  Faux stitching with a white pen was added to each paper piece and all cut edges inked with red ink
  5. The spots were cut from white card and then embossed using the Santoro Willow embossing folder as the pattern reflects the shape on one of the papers I’ve used.  I then ink around with red ink allowing extra ink to come over onto the edges of the embossing to highlight it.
  6. All the pattern pieces were then glued in place upon the pink card shape, it has some lines to help you line it up.
  7. I chose letters from the Grace Taylor Forest Friends sticker book to spell out ‘A New HOME’ and added them to the card front.  A couple of the arrows were also added to point to the word HOME, and a little hedgehog sticker was applied to the bottom of the smaller toadstool mushroom shape.
  8. To finish a cute Raccoon from the Embellishment Stickers (Forest Friends) was added to the bottom of the card at RH side, positioned to be standing in front of the mushroom / Toadstool.
Products Used:
Grace Taylor Forest Friends 100 Sheet Paper Pad GS2743

Grace Taylor Forest Friends Sticker Flip Book GS2745

Grace Taylor Forest Friends Grand Adhesions GS2750

Dovecraft A4 Kraft Card DCBS103

Dovecraft A4 Premium Coloured Card DCBS75

SANTORO®'s Willow Embossing Folder SNEF002

Cricut Explore Machine PC2002435


All materials are from +Trimcraft Ltd  and this project also appears in my Trimcraft Design Team Gallery, link here: http://www.trimcraft.co.uk/projects/121368/a-new-home-card-with-grace-taylor-forest-friends-collection

Monday, 15 February 2016

Just Because!!


Hello, I'm back again to share this week's Papermilldirect DT card make with you.  This one features a digital image that I have coloured with alcohol markers.  This image, from LC Designs, is called 'Digi Ducks in the Rain' and I felt it was quite apt for the current weather we have been having here lately and of course I couldn't resist those cute ducks having fun in between the sunshine and showers.  I would also like to enter this card in the following Challenges: 
'Party Animal' Challenge over at Daring Cardmakers, 
and The Eureka Stamps Challenge #180 -Feathers & Fur Challenge

I printed the image out onto Papermilldirect White Linen card and coloured with First Edition Marker Pens as follows: Primrose & Lemon for the ducks, Satsuma & Pumpkin for the beak,Neckerchiefs and wellingtons in Baby Blue, Sorbet, & lilac.  The grass is Pistachio and the puddle has a little baby blue blended out using the FE colourless blender pen. The coloured image was then outlined in Light Grey to help the image 'pop' a little from the background. I used a large speech bubble die to cut the ducks out. A white pergamano pen was used to add some extra detailing.

Using the First Edtion Weather die set I cut a sun, 2 clouds and some raindrops, all from Papermilldirect white linen card so that i could colour them to match the ducks.  The sun is Primrose & Lemon and the clouds and raindrops outlined with Baby Blue worked with lots of colourless blender.

For the background, I cut a panel of Papermilldirect White Linen cardstock approx. 4 3/4" wide by 6 3/4" high.  I chose a sentiment stamp 'Just Because' and stamped onto the lower part of the panel using a black archival ink.

I found a blue & white washi tape in my stash and attached a strip across the top and the bottom edges of the card panel.  The Speech bubble die was used again to cut an outer frame for the ducks from Papermilldirect New Lilac card and then attached to card panel just above stamped sentiment using double sided tape and cosmic shimmer glue.  The whole panel was then mounted using double sided tape onto a 5" x 7" cardblank that I made by simply scoring, folding & trimming an A4 sheet of Papermilldirect New Lilac card to coordinate with the speech bubble frame.

To finish the card, I glued the die cut sun and one of the clouds in place, overlapping the washi tape strip a little, and then added the other cloud on top using 3D foam pads to create a little height detail.

The raindrops were arranged so that a couple overlap onto the coloured image section, glueing them in place when happy with position.

I thought this was a fun image and could be coloured with other shades for the wellies to coordinate with other colours in the papermilldirect cardstock range, why not take advantage of the spring colours and make a selection of cards in different pastel or spring shades.  Don't forget to check out the Special Offers link: https://www.papermilldirect.co.uk/special-offers they are always popular so grab them whilst you can.

Challenges Entered:
Party Animal - put an animal on your card
http://daringcardmakers.blogspot.co.uk/2016/02/party-animal.html
Challenge #180 Feathers & Fur
 http://eurekastamps.blogspot.co.uk/2016/02/eureka-stamps-challenge-180-feathers-fur.html

Materials Used:
White Linen Card - Papermilldirect
New Lilac Card - Papermilldirect
'Digi Ducks in the Rain' Digital Image - LC Designs (Little Claires)
Alcohol Marker Pens - First Edition
Weather Dies & Speech Bubble Dies - First Edition
'Just Because' sentiment from 'Pretty Petals Plus' stanp set - Clearly Besotted
Black Archival Ink, Washi Tape, White Pergamano Pen, D/S tape, Glue, 3D foam pads


Saturday, 13 February 2016

Woof You!!

 Project image
I do love sausage doggies, dachshund doesn’t really seem a cute enough word for them.  Anyway I have this fun Dovecraft washi tape and the First Edition Animal themed die set and thought the lovely colours in the new Me to You ‘Sweet Shop’ papers would work well with them, so here’s my doggy themed Valentine card or maybe just a card to send to that special someone whatever the occasion?

Project image

Step by Step:
  1. Take a 6” x 6” square Kraft card blank and place with the fold across the top.  Add a length of the Dachshund printed wash tape across the bottom, smoothing down firmly and then trimming the sides flush with card.
  2. From the Sweet Shop 6x6 paper pack, cut a piece of green striped paper approx. 3 7/8”square.  Mat this onto  a die cut stamp shape cut from lemon paper (Sweet Shop) using the First Edition nesting postage stamp.  Adhere to card front using double sided tape.
  3. Using the First Edition Script alphabet die set, cut letters to spell ‘woof you’ from Dovecraft Chocolate glitter card.  Glue letters in place at top right of paper panel.
  4. Using the dachshund die from the FE Animal themed set, cut 1 from kraft card and add dark brown card to the back to show through the cut outs.  Add to card front using 3D foam pads to bottom of paper panel.
  5. Die cut balloons using the Belle & Boo die set from different pattern papers within the ‘Sweet Shop’ 6x6 pack.  I also cut one balloon from the chocolate glitter card. Glue a length of pink & white twine to back of each balloon then arrange balloons on card front using 3D foam pads to adhere.  Take the lengths of twine and take under the dogs head so they look to be held in its mouth, adding a dab of glue behind head to hold in place then trim twine ends to desired length 
     Project image


    All materials are from +Trimcraft Ltd  and this project also appears in my Trimcraft Design Team Gallery, link here: http://www.trimcraft.co.uk/projects/121361/woof-you-valentines-card-with-sweet-shop-papers-and-first-edition-dies
     
    .

Friday, 12 February 2016

Aurora's Dream ...with Moroccan Spice


I do love stamping and colouring the Santoro Willow characters and I thought they would work well with the new First Edition Moroccan Spice papers from +Trimcraft Ltd .  For this project I chose the character ‘Aurora’ and coloured her in bright blues and used corals for the flowers as these seemed to work so well with the papers.  I like Easel style cards and the way they pop up to display.

Step By Step:
Create an easel card base by scoring and folding the front of a Dovecraft 6x6” Kraft card blank.  Mat a piece of canvas effect ‘Moroccan Spice’ paper approx. 14cm onto a slightly larger square of blue card (I cut from a ‘True Blue’ card blank) and adhere to inside card using double sided tape.
Cut a panel of orange paper from the Moroccan Spice pad and mat onto blue card before adhering to card front panel.  Cut another panel of blue paper from the Moroccan Spice pad and mat onto blue card before adhering to the back panel of card front. 
Create a mat panel for the front of your ‘easel, cut Kraft card approx. 12.5cm square.  Cut pale patterned ‘Moroccan Spice’ paper to approx. 11.5cm square and mat onto a slightly larger square of blue card before adhering to the Kraft card square.
Using the FE Windows die set cut 1 long window and 1 shaped window from kraft card, add a double layer of Dovecraft vellum to the back using glue to adhere where it won’t be seen, and trim flush with window shapes.  Cut the shaped window again, this time form Moroccan Spice paper and use the waste squares as stained glass by gluing into the window shape.  I added a piece of the ‘gem effect’ paper as the centre pane of ‘glass’.  Arrange the window shapes onto the easel mat and glue in place.
Using black ink and the ‘Aurora’ character clear stamp, stamp image onto white card, also stamp a number of the flowers onto another piece of white card.  Colour images with First Edition Markers, shading and blending as required. ( I used Ivory for skin and a mix of Sienna, Copper, & Coral for hair,blues,reds,greens for dress and flowers, etc). Then outline using the 01 Light Grey marker and add extra highlights using a white pen. When finished cut out the character and individual flowers.
Die cut leaf stems from green Moroccan spice papers using the FE Foliage die set, (cut an extra stem and cut the individual leaves off to use with the stamped flowers) Arrange foliage at left of front panel, add stamped ‘Aurora’ character using 3D foam pads, and flowers and leaves using glue to create a scene in front of the windows.
Take a striped Moroccan Spice paper and cut a strip, attached across bottom of stamped scene using 3D foam pads, it will cover the bottom of the leaves, trim flush with front panel.
Create stopper for easel by matting a thin panel of pale paper to blue card, add a strip of the striped paper onto and then add a die cut loopy border from the FE Borders die set.  Attach this panel to card base using 3D foam pads to give height.
Using the FE Script Alphabet die set, cut letters to spell ‘DREAM’ and glue to card base.  Also add 3 stamped flowers and some leaves from the foliage dies, trimming to size before gluing in place at RH side of ‘dream’.  To finish, adhere a Diamante Charm (Mirabelle) and add Dovecraft adhesive pearls to easel stopper panel and 3 adhesive pearls to top left of front panel. 

Products Used:
 All materials from +Trimcraft Ltd  and the project can also be seen in the Trimcraft DT Gallery link here http://www.trimcraft.co.uk/projects/121282/aurora-s-dream-card-with-first-edition-moroccan-spice-papers-willow-and-fe-di


Thursday, 11 February 2016

Live Your Dreams ... with Moroccan Spice


Hello, today I have a bright vibrant card to share with you.  I am very lucky to get to work with the most gorgeous papers and this is my first make with the new First Edition 'Moroccan Spice' papers from +Trimcraft Ltd 

If like me you loved ‘Neroli’ then you are going to absolutely love these papers too as they have that very special ‘gem effect’ on some of the designs along with some fabulous patterns, textures and finishes.

I chose to highlight one of the ‘gem effect’ papers and didn’t want to cover up too much of the pretty pattern, and so made a simple 4 tile card design set off with FE Dies and a peacock feather to add the focal point.
 
 Step By Step:
  1. Take a sheet of green card from the Dovecraft Premium colour card pack, score and fold in half, then trim down to create a 15cm square card blank with fold across the top.
  2. Cut a sheet of ‘gem effect’ paper from the ‘Moroccan Spice’ 6x6 pad into 4 squares approx. 6cm each.  Mat each square onto a slightly larger square of Dovecraft black card and then arrange squares evenly and equally onto card front using double sided tape to adhere.
  3. Using First Edition ‘Foliage’ die set, cut 2 larger and 1 thinner fern / leaf from green coloured ‘Moroccan Spice’ paper.
    Using Santoro willow die set, cut 1 solid flower from blue ‘Moroccan Spice’ paper and 1 skeleton flower from orange ‘Moroccan Spice’ paper.

  4. Outline all the die cut elements with a Dovecraft Gold metallic marker pen. Add dots of Dovecraft 3D Pearl Effects in ‘Brights Blue’ to centre of orange flower and allow to dry.
  5. Assemble focal point by gently curving the foliage leaves and flowers before sticking down to card front, using 3D foam pads to raise some leaves and layer up the flowers.  Add a peacock feather and 2 leaf design stick pins (willow collection).
  6. Using the Santoro clear stamp set, stamp a sentiment of ‘Live Your Dreams’ using a blue ink onto a pale ‘Moroccan Spice’ paper, sprinkle stamping with clear embossing powder and then heat emboss.  Trim around sentiment and curve before adding to card front.
  7. To finish add some small Dovecraft blue and green adhesive gems to centre of orange flower, in amongst the 3D pearl effects.  Also add 3 small green gems to top right of card.


Products Used:

all materials from +Trimcraft Ltd  and the project can also be seen in the Trimcraft DT Gallery link here http://www.trimcraft.co.uk/projects/121269/live-your-dreams-card-with-first-edition-moroccan-spice-and-dies


Tuesday, 9 February 2016

Love is in the Air...

Hello, I have another make for you this week using Papermilldirect cardstocks.  This week the Design Team are looking at Free Printables and creating Valentines projects with them.  I found a set of printable mini notecards designed by The Tom Kat Studio and available for free from their website. The set I am using is the Printable Mini Notecards - Set #1
These printables are great for quick makes as they print out with 3 mini notecards per A4 sheet, simply download, print, colour, cut out and fold and they are ready to go, or if you have a little more time why not make them into a bigger design as I have done here.

I printed the design sheet off onto an A4 sheet of Papermilldirect Plain White card, there are 3 different designs on the sheet, I chose the Balloon design to work with.  I coloured the balloon using First Edition marker pens in shades of purple and pink, and the lettering in pink and yellow.

I used a light grey marker pen to outline the image and sentiment, then trimmed the image down to just under 3” square. A light grey marker pen was used to outline the cut edge before mounting the square onto a slightly larger square of Papermilldirect  Purple Grape Card.
Using a Sizzix embossing folder with a bubbles design I embossed Papermilldirect Plain White card and trimmed down to approx. 4” square.  I decided I quite liked the debossed side to work with the balloon image and matted it onto a slightly larger square of PMD Raspberry Pink card.

The card base was created by scoring and folding and A4 sheet of PMD Plain White card and then trimming down to create a 5.5” square card.  I added the embossed panel centrally to the card front using double sided tape and used 3D foam pads to adhere the balloon panel to create height.
To finish a touch of white gel pen adds a little highlight to the balloon.Choosing a simple image to work with makes colouring quicker and easier and teaming with a simple embossed panel adds extra interest. I decided to leave the card as more of a 'clean & simple' style but you could of course add extra embellishments or ribbons if you prefer.

Materials Used:
Plain White Card - Papermilldirect
Purple Grape Card - Papermilldirect
Raspberry Pink Card - Papermilldirect
Free Valentines Printables - http://www.thetomkatstudio.com/2013/01/freeprintablevalentinesforparenting
Craft Twin Markers - First Edition
Sizzix Embossing Folder
Double Sided Tape, 3D Foam Pads


Monday, 8 February 2016

Love Grows Here ...


Hello, today I'm sharing another make with the new and very pretty First Edition Love Story papers from +Trimcraft Ltd .  My cards often evolve by way of a phrase and this time in my mind I had the ‘Love Grows Here’ theme to play with.  It also gave me chance to try out the tree shape from the new First Edition Foliage die set and I added little hearts to 'grow' on the tree.

Here's my Step By Step:
  1. Cut a rectangle of peach card from the Dovecraft Premium Colour Card pack approx. 5 3/8” wide by 4 3/8” high. Cut a rectangle of floral patterned paper from the Love Story 6x6” pad approx. 6” wide by 4” high.  Ink around the edges of both with pink ink.
    Pierce holes around the edges of the floral rectangle paper and add faux stitching with a white pen. Mat floral paper onto peach card using double sided tape.
  2. Using the First Edition Border die cut 2 loopy borders from beige Love Story paper and attach across lower section of matted paper panel using glue along the centre section.  Adhere Dovecraft  ‘Love’ printed ribbon across the border slipping the ends under the border end sections and securing with tape at back of panel.
    Attach panel to card blank using double sided tape.  I have used a green scalloped edged 5” x 7” card from the Glad Tidings pack.

  3. Next cut 3 panels, 1 from green card (to match card blank) approx. 3 3/8” wide by 4 ¼” high, 1 from the peach card approx. 3 1/8” wide by 4” high, and 1 from the Love Story pale hexagon pattern paper approx. just under 3” wide by 3 7/8” high.  Pierce holes in pale panel and add faux stitching with white pen.  Ink around all 3 panels with pink ink.  Mat smallest panel centrally onto peach card panel, then adhere onto green panel at an angel (see photos).
  4. Using the Tree die from the FE Foliage die set, cut tree in green card and glue centrally onto panel.  Die cut hearts from pink Love Story paper using Santoro die set and glue 5 small ones direct to the tree, add 2 larger ones raised with 3D foam pads.  Die cut 2 heart borders from the Borders, Frames & Buckles set using 2 of the pink Love Story papers, trim them a little and glue across bottom of tree.

  5. Add the sentiment of ‘Love Grows Here’ to a rectangle of pale Love Story paper, ink edges with pink ink, and adhere to tree panel to look like a tab.  I used my Cricut Explore to write and cut the tab ( If you want to use my file already sized my Design Space Link is here: https://uk.cricut.com/design/#/canvas/35665234  )  but you could type and print out from your computer or handwrite wording if you prefer.  Cut a small piece of Dovecraft heart patterned ribbon, loop it and attach to tab.
    Position completed Tree panel to card front at an angle (see photos)
  6. Take 2 stick pins, a pink heart (Sweet Paris) and green leaf (Willow) and slide & secure into place just behind tree panel where it joins the ribbon border.  A dab of glue or tape just under the head of each pin and under the ribbon will help keep them in place.  Top pins with a little green ribbon bow (Sweet Paris).
    To finish add a small adhesive pearl to ribbon bow and 3 small pearls to top right of tree panel.


Products Used:

Santoro Pearls SNGE003


All materials from +Trimcraft Ltd  and the project can also be seen in the Trimcraft DT Gallery link herehttp://www.trimcraft.co.uk/projects/121223/love-grows-here-card-with-first-edition-love-story-and-dies