Sunday, 17 January 2016

Jar of Hearts


Hello Today I have a bright card to share with you.  When I first saw the First Edition Pots & Vases die set I thought it would be fun to make a ‘jar of hearts’  but then I got distracted with other crafty ideas.  Recently, whilst looking through the new Grace Taylor paper pads, the idea popped back in my head, thanks to the heart patterned papers.

 Step by Step Tutorial:
  1. Cut a 5 ¼” square of heart patterned paper from the Grace Taylor Sherbet Sky pad, then mat onto a slightly larger square of Dovecraft Kraft card using double sided tape to adhere. 
    Cut  3 ¼“ square of grid patterned paper from the Sherbet Sky pad and again mat onto a slightly larger square of Kraft card using d/s tape.  Adhere smaller mat centrally onto larger mat using d/s tape. 
  2. Take bright patterned Dovecraft washi tape, sticking across the bottom of the smaller mat and taking it round to the back of the larger mat so the ends are neatly stuck at the back, I used 2 lengths of washi tape to create a wider strip.  Take a length of Dovecraft ‘With Love’ sentiment ribbon and use permafix tape to attach across the washi tape stripe, take ends to the back of panel and secure.  Cut a piece of washi tape and angle the ends before sticking across the top LH corner of the smaller mat.
  3. Take a 6 x 6” bright green card blank from the Bright Spark pack and position with fold along the top, attach layered paper mat panel centrally to card front using D/S tape.
  4. Cut jar shape using the FE Pots & Vases die set.  I cut one from a pale blue section of paper in the Sherbet Sky pad.  I then added a little extra blue paper behind the cut outs and then cut the jar again from white card and glued the paper jar to the white jar to create a sturdier piece.
  5. Cut different sized small hearts using the heart dies from the Santoro die set and the pink geometric paper from the Sherbet Sky pad.  Glue some of the hearts so they look to be inside the jar.  The attach jar to card front using 3D foam pads, position jar so it looks to be sitting on the washi tape / ribbon border.
  6. Next using the Modern Sentiments die set, cut the words ‘Love’ ‘You’ using spare card to match the card blank, attach the words using glue and position at angles to look like they are coming out of the jar.  Arrange the rest of the die cut hearts around the jar using glue, except one larger heart attached with a small 3D foam pad to bottom left of jar and a larger heart attached with 3D foam pad to ribbon trim at RH side.
  7. To finish add 3 small clear adhesive gems to the heart on the ribbon and a clear gem to the ‘o’s in Love You.
 Materials List: 
  • 6 x6" Bright Spark Card Blank - Dovecraft
  • Grace Taylor 'Sherbet Sky' 12x12 paper pad
  • First Edition 'Sentiments Modern' die set
  • First Edition 'Pots & Jars' die set
  • Santoro Willow Die Set - Trimcraft
  • Washi Tape - Dovecraft
  • Sentiment Ribbon - Dovecraft
  • 6mm Double Sided Tape - Dovecraft
  • small 3D Foam Squares - Dovecraft
all materials from +Trimcraft Ltd  and the project can also be seen in the Trimcraft DT Gallery link here: http://www.trimcraft.co.uk/projects/121098/jar-of-hearts-card-with-grace-taylor-sherbet-sky-first-edition-dies

Tuesday, 12 January 2016

Hello!!

Hello!!  and welcome to another Blog post!!  Today I'd like to share this simple modern style card with you.

I do love using my First Edition die sets and there has been some really great additions to the range lately (and more on their way). I really like the Modern Sentiments set, the hello speech bubble is so ‘on trend’ right now and whilst checking out the new Grace Taylor papers I spotted the perfect paper to match the die, so here’s another card that ‘just had to be done’.

The chalkboard style paper works well for a monochrome colour scheme, but I felt it really came alive with the ‘pop’ of red from the glitter card and foiling.  It’s a simple make but a modern and fun way to say hello, add a few hearts and it could be a Valentines card too.


Step by Step Tutorial:
  1. Cut 5 ¾ “square of Chalkboard Speech patterned paper from the Grace Taylor Sherbet Sky pack.  Adhere to 6” x 6” square card front using double sided tape. (I like the fold along the top).
  2. Apply strips of double sided tape full length across the card front, 1 across the top and 2 across the bottom.  Trim flush with card edges. Remove red backing from the tape one at a time, and then apply FE Red Foil and press onto the sticky tape and rub with fingers smoothing the foil across the whole strip, remove foil sheet to reveal a red foiled stripe.  Do the other tape strips the same, one at a time so it keeps the sticky fresh and ready for foiling. 
  3. Take the ‘Hello’ speech bubble die from the FE Modern Sentiments set and cut from white card.  Glue die cut shape to Dovecraft red glitter card and press down to ensure its stuck.  When dry trim around the die cut leaving a small border showing.  Attach to card front using 3D foam pads.
  4. To finish add a few red and black sequins (Sweet Paris) to the card front using glue to adhere.  I used a combination of small and large sequins to add extra interest.
Materials List: 
  • 6 x6" White Card Blank - Dovecraft
  • Grace Taylor 'Sherbet Sky' 12x12 paper pad
  • First Edition 'Sentiments Modern' die set
  • A4 Glitter Card Ruby (Red) - Dovecraft
  • First Edition Foil in Red
  • 6mm Permafix Tape - Dovecraft
  • 6mm Double Sided Tape - Dovecraft
  • small 3D Foam Squares - Dovecraft
all materials from +Trimcraft Ltd  and the project can also be seen in the Trimcraft DT Gallery link here: http://www.trimcraft.co.uk/projects/121025/hello-card-with-grace-taylor-sherbet-sky-first-edition-foiling
 

Friday, 8 January 2016

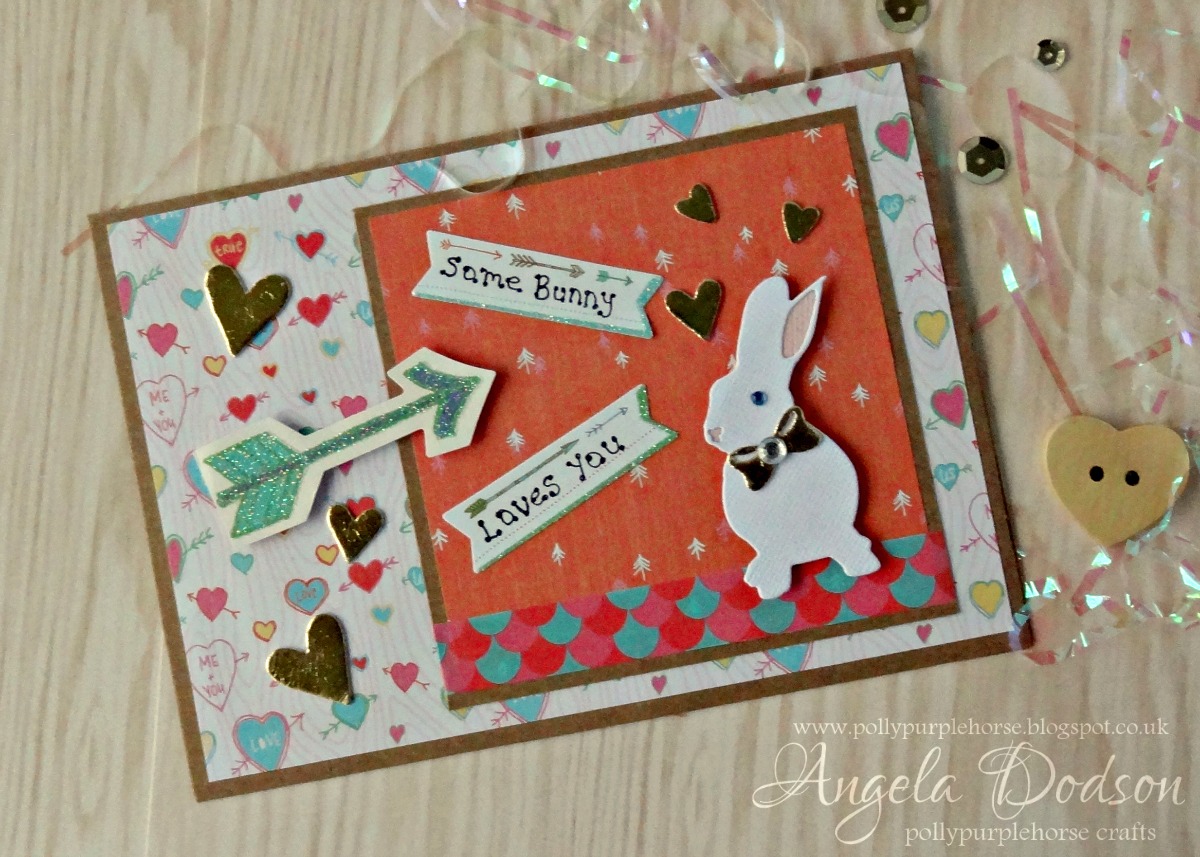
Some Bunny Loves You!!


How cute is the new Grace Taylor Forest Friends collection from +Trimcraft Ltd , I couldn't resist teaming them with the cute bunny from the new First Edition Animal Die set to create a Valentines card.   I also had fun playing with the Gold Foiling and adhesive foam sheets.  (If you've not tried foiling then give it a go, you can still get great results if you haven't got the applicator machine, all my foiling is done with the adhesive foam on this project)

The Forest Friends collection is perfect for card making as well as scrap booking as it has lots of lovely embellishments such as the fun sticker book , shaped paper cuts and washi tape.
 
 
Thank you for popping by and I hope you will join me again as I have another card to share with you later :)

Thursday, 7 January 2016

Stacking Word Blocks Project with Deco Mache and Cricut Explore


Hello and welcome to another Blog Post to start the New Year. Although I love cardmaking I do also like to craft in other ways, so today I'd like to share this project with you.

Each year I like to create a handmade gift for my parents.  I’ve seen stacking word blocks before with individual letters and Christmas words on them, and thought it would be nice to create blocks with a verse for Grandparents.
I started by preparing 4 MDF blocks with white acrylic paint and then applied 3 different Deco Mache papers to create my base blocks.

I played around with a verse / phrase and adapted it to fit the blocks.  I created the wording in Design Space, so I could cut it out on my Cricut Explore.

If you'd like to find out more, including details of the materials used and a step-by-step Tutorial guide, then please pop over to my Trimcraft Gallery here: http://www.trimcraft.co.uk/projects/121004/stacking-word-blocks-with-santoro-deco-mache-cricut-explore

I really enjoyed making this project and I'm thinking it would also be ideal for a Mother's Day gift too :)


Monday, 4 January 2016

Thank You Card step-by-step Tutorial

Hello and Happy New Year!! I'm back after the festive break with my first PMD Design Team blog post for 2016. It's that time of year when we may be sending 'Thank You' cards to family and friends, so using this week's special offer 'Mustard Yellow' cardstock from Papermilldirect, I created this little ‘Thank You’ card design as follows:
 Score and fold a sheet of A4 PMD Black card in half then trim down to create a square card blank.  I cut mine to measure approx. 5 ¾”.
Cut a square of PMD Mustard Yellow card to measure approx. 5 ½” square and emboss using the ‘distress’ effect embossing folder through your die cutter.
 Position black card blank in ‘tent’ position (with fold along the top) Adhere the embossed panel centrally onto card front using double sided tape.
Cut 2 strips of pattern paper approx.  1 ¼” deep by just over 5” wide. Mat the pattern papers onto PMD black card to leave a small equal border showing all around on both strips.
 Using a red-brown ink and the sentiment stamp, stamp ‘Thank You’ onto PMD Mustard Yellow card.  When ink is dry carefully position a frame die over it and run through your die cutter (tip: I use a little low tack washi tape to hold dies in place). 
Cut the same frame die again using PMD black card, you will see that there are 2 parts to each die cut frame set, use the thin black outer piece to frame the stamped piece, use a little strip of card and / or tape on the back to hold them in place.
Cut a ¾ “deep strip of PMD black card to fit across the mustard embossed panel.  (I was using up scraps so mine is shown as 2 pieces).  (Optional) Spray with gold ink and leave to dry. (you can mix your own spray using a gold ink and water into a mister bottle and giving it a shake before using)
Assemble card as follows:  add 3D foam pads or tape to back of paper pattern panels and position bottom one first, then add top panel so that it is equally spaced and lines up with bottom panel.
Add 3D foam pads to black gold sprayed card strip and position across the centre of the card between the patterned panels.  Add sentiment to centre using 3D foam to give height.
To finish add black sequins to right of sentiment.  I used 2 small and 1 large black sequin and glued in place using cosmic shimmer clear drying glue.
This is a simple card layout and of course you could add different sentiments to the centre to suit other occasions.  It also makes use of any pretty paper scraps you may have laying around.  The pretty bird paper strips were left over from other projects and way too pretty to discard, they worked well with the PMD Mustard Yellow and Black cardstocks and the addition of height and embossed texture added to the effect. 
 
Materials Used:
Mustard Yellow Offer Card – PMD
Black Card – PMD
Distress Embossing Folder – Textures by Crafters Companion
Botanical Notes 6x6 paper pad – First Edition
Borders, Frames & Buckle Die Set – First Edition
Thank You sentiment stamp – Oak House Studio
Ink Pad – Oak House Studio
Spray Ink – Oak House Studio
Black sequins
Double Sided Tape, 3D Foam Pads (or Tape) Cosmic Shimmer clear drying glue

Papermill Design Team:
if you have a moment, please do pop over and check out the other papermill teamies blogs and see what they got up to this week: 


Thursday, 17 December 2015

Rockin' Robin Stamped & Coloured Christmas Gift Tag


I love these cute Rockin’ Robin stamps and used them to create a little gift tag.  The tag shape is a bauble design cut on my Cricut Explore (my DS link below) but it’s a simple shape and can easily be drawn with a pencil onto your card if you prefer.  You will have 3 layers to the bauble, 1 blue, 1 red and 1 white hammered card.

I cut the base shape from PMD Sky Blue card and glued the 2nd layer cut from PMD Post Box Red card directly on top.  I applied glue to the top ‘cap of the bauble and sprinkled with glitter, shaking off the excess.  I did the same to the red card part, but only applying glue and glitter to the outside edges as the main part will be covered by the stamped panel.

Using Memento inks, stamp one of the robin characters onto smooth white card, stamp the sentiment, little Santa hat and 2 lots of the holly leaves.  If you have the matching die set, use that to cut the stamped images out.  If you don’t have the die set then cut around each image using scissors or craft knife leaving a small white border.  Die cut, or cut by hand, a branch shape from PMD Mocha Brown card.

Work out where you want to position your images on the white hammered card piece, then stamp the music notes in brown ink at right hand side.  Glue the branch towards bottom of white hammered card shape.  Add Sentiment, Robin and Santa hat and holly leaves using 3D foam pads.

When image panel is complete, add 3D foam to the back and adhere to the layered bauble tag base.  To finish, tie lengths of sheer white and red glittery ribbon through the hole at the top, making a bow with the white ribbon.


Materials Used:PMD  White Smooth
PMD White Hammered
PMD Post Box Red Card
PMD Sky Blue Card
PMD Mocha Brown
Rockin’ Robin Clear Stamp Set – Clearly Besotted
Rockin’ Robin Die Set – Clearly Besotted
Memento Dewdrop Ink pads in shades of brown, red & green – Tsukineko
Nuvo Pure Sheen Glitter – Diamond – Tonic Studios
Nuvo Glue Pen – Tonic Studios
White sheer ribbon, Red sparkly ribbon from stash
Design Space Link for the Tag Shape - https://uk.cricut.com/design/#/canvas/33277895

Papermill Design Team:
if you have a moment, please do pop over and check out the other papermill teamies blogs and see what they got up to this week: 

Thursday, 3 December 2015

Christmas Snowflake Gift bag with Papermilldirect


Hello, firstly apologies for my lack of posts over the last couple of weeks, I've not been feeling 100% but I'm back in blogland and trying to catch up, so first up here's a little gift bag, one of my Design Team makes for Papermill, it’s a simple make and easily adapted to use any ribbons, dies or colour-schemes you have in mind.  I’ve chosen the Papermilldirect Ultra White Pearlised paper for this gift bag as the weight is ideal, strong enough to hold its scores (and treats of of course) and yet easy to pinch in for the sides. The pretty shimmery finish is perfect for festive makes adding a touch of luxury to your gift giving.  These bags are easy and quick to make so they are perfect for batch making.  I have used folds and ribbon to seal the bags, simply undo the ribbon at the back to release the folded section of the bag.  You could also seal the back with a little festive sticker or label if you prefer.
To create the Gift Bag: Take a sheet of A4 Ultra White Pearlised paper and trim to measure 21cm x 28cm.
Using a scoreboard position paper with long side across the top and score down at 6m intervals to give 4 score lines and an extra 2.5cm section at the end (this will be a joining tab later)
Now turn paper so short side is across the top and score a line at 6cm down.  This will give a row of squares.
Use scissors or craft knife to cut each score line on the squares just up to the 6cm score line to give 4 equal squares and 1 smaller rectangle.  Cut away the smaller rectangle completely.
Crease each score line of the whole sheet and form the bottom squares into tabs as you would if making a box.  I used double sided tape to adhere each flap on top of another.  When gift box bottom is completed add tape or glue to the smaller side panel and adhere this panel in place behind the next panel to enclose the sides.  Then pinch in the sides to create the gift bag shape.
Pop your gifts or treats into the bag and squeeze the top together, turn over the top once or twice to the back and you can add a sticky label at the back to seal it if desired or seal with the ribbon trim as I have done here.

For the ribbon trim, take a length of Christmas ribbon (my sentiment ribbon reads ‘Do Not Open Until Dec 25th).  Add strong doubles sided tape to the back and apply ribbon around the top of the bag with joint at the back.  Add another length of ribbon to go up the front of the back (parcel style) again using strong double sided tape to attach.  Take another length of ribbon and trim ends, form a loop and attach to top right of ribbon band.
Die-cut 3 small snowflakes and glue flat to the gift bag at the bottom to add extra interest and texture. 
To finish, Die cut and layer snowflakes as desired from PMD Ultra White Pearlised Paper and PMD Post Box Red Card.  Use 3D foam pads to create dimension when layering.  Add a clear sparkly adhesive gem in the centre to top off the snowflake.
Materials Used:
Ultra White Pearlised Paper – Papermilldirect
Post Box Red Card - Papermilldirect
Spellbinders Shapeabilities Create a Flake three #S4-340
Cuttlebug Snowflake #2 – Provocraft
Adhesives: Double Sided Tape, 3D foam pads, glue
Xmas Ribbon, Sparkly adhesive gem

Papermill Design Team:
if you have a moment, please do pop over and check out the other papermill teamies blogs and see what they got up to this week: