Thursday, 17 March 2016

Happy St Patrick's Day!!


Waving Hello and wishing you all a very happy St Patrick's Day with this easy card make.   I’ve designed this one so that it can also be used as a simple ‘Good Luck’ card as it bears only the word ‘Lucky’.  If you look carefully you will see it has 6 regular 3 leaf clovers and a special ‘Lucky’ 4 leaf clover to give a magic number totalling 7.  So it’s a Lucky 7 card too, so that’s plenty of Good Luck to send to a friend.

 Step By Step:
  1. I took a Dovecraft 6x6 white card blank to use as my base card with the fold running along the top.  From the 6x6 My Guy paper pad I cut a square of triangle geo patterned paper approx. 5 5/8” square and adhered to card base using double sided tape.
  2. To create the mat panel, I cut Dovecraft White Laid card to measure approx. 4 7/8” square and matted it onto a square of First Edition textured cardstock in green that measured 5 1/8”, to give a small border all around.
  3. I cut the clover shapes using my Cricut Explore (My DS link is here if you wish to use it: https://uk.cricut.com/design/#/canvas/37629120 )  but these are simple shapes and easy to draw a 3 leaf and a 4 leaf in pencil onto card and use that as your template to draw around. (The leaves look a little like heart shapes so perhaps use a small heart to help you). I cut the 3 leaf clovers from My Guy papers, 2 in orange, 2 in polka dot, and 2 in the black, grey, yellow pattern papers from the pad. 
  4. Using a Light Grey First Edition marker pen outline around the inside edge of the leaves to give a subtle definition. Then glue 3 three leaf clovers across the top of the white panel and 3 across the bottom of the white panel.
  5. Using the FE Alphabet set, diecut letters to spell ‘LUCKY’ from black card and glue across centre of white panel, leaving space at right for a clover.
  6. Cut the 4 leaf clover from FE textured card in green.  Using Dovecraft glitter glue in Gold, outline the 4 leaf clover and also outline around the green card panel.  When glitter glue is dry mount main panel to card front at an angle using 3D foam pads.
  7. To finish, add a green adhesive gem to 4 leaf clover and attach to card front using a 3D foam pad to give height, so it looks like you can just pluck the clover from the card.

    Products Used:
    Simply Creative FSC Paper Pad 6x6 My Guy
    Dovecraft White 6"x6" cards & envelopes
    First Edition Premium Textured Cardstock – 12x12 Papers
    Dovecraft A4 White Laid Card
    First Edition Dies - Varsity Alphabet
    First Edition Twin Markers - Greys
    Dovecraft Christmas Basics Glitter Glues - Gold and Silver
    Dovecraft Christmas Basics Gems - Reds and Greens

    All products are from +Trimcraft Ltd  and this project also appears in my Trimcraft DT Gallery link here: http://www.trimcraft.co.uk/projects/121715/lucky-clover-or-st-patricks-day-card-with-simply-creative-my-guy-papers


Thursday, 10 March 2016

Mini Easter Cards - Simple Batch Making


Hello, I'm back to share a little Easter card making idea with you.  This week I'm using the ever popular White Linen effect cardstock,  using a textured card such as this always lends an elegant and interesting finish to your designs. 

I decided to make some mini Easter Cards using the white linen, some dies, and adding just a small piece of patterned paper and a greeting.  For this design I was able to get 2 cards from 1 A4 sheet of White Linen by cutting it down to create two 4x4 cards with the offcut being used to cut the 2 panels for the front.
If you’ve made Easter cards before then you are likely to have an egg or oval set of dies to cut the egg shape.  I have also used a fancy square die for the raised panel but you could use any die you have or just cut a plain square if your prefer.  This design allows you to easily batch make by cutting all your top panels in one batch, preparing your card blanks in advance and just having a stash of small squares of pattern paper from leftovers or scraps.

Step by Step:
I started by cutting my A4 sheets of White Linen card to measure 8 x 16 each (setting those pieces aside for card blanks later).  I used the waste to die-cut my panels using a shaped die just over 3” square.  I stamped a small greeting of ‘Happy Easter’ using black ink directly across the bottom of the die cut shape.  (You could use peel offs or handwrite if you prefer).


Taking a small (2” high) egg or oval shaped die, position centrally and just above sentiment, use a small piece of washi tape to hold in place to die cut. Remove the cut out egg shape and washi tape (save cut out for other makes) to reveal egg shaped aperture. 
Next take scraps of pattern paper and cut into squares to fit behind the aperture.
Prepare your card blanks by cutting the 8x16 pieces in 2, then score and fold to create 4x4 card blanks with fold to side.
 
Glue the pattern paper squares to card front for quickness (you can use d/s tape if you prefer).
Add 3D foam pads to back of aperture panels and position panels centrally over patterned papers.  You now have a batch of handmade, hand stamped Modern Easter cards.
This is a great way to use up your scraps of pretty paper or perhaps you have some inked or stamped master-board pieces to use up?  You can make these mini cards in larger sizes if you prefer or why not embellish with sequins or bows

Materials Used:
White Linen Card – Special Offer - Papermilldirect
Nellies Multi Frames #MFD012 Square
Xcut Dielicious Nesting Dies - Easter Eggs
Jet Black Ranger Archival Ink Pad
Sweet Little Sentiments stamp set - Clearly Besotted
Cosmic Shimmer Glue, 3D Foam Pads
Scraps of patterned paper


Wednesday, 2 March 2016

Mini Butterfly Wreath with Floral Muse Collection

Hello, today I'm sharing one of my +Trimcraft Ltd DT makes with you.  The Dovecraft Floral Muse collection is sooooo pretty I didn’t know where to start first!!  It’s been a little while since I made a hanging wreath and I had originally intended to make this to go onto a card front but I really liked it as a strand alone (or rather hanging) wreath and with the acetate strip it allowed the sentiment to ‘float’.

Step By Step:
    Make a little cardboard wreath shape (or use a ready-made one if you prefer).  A simple wreath shape can be cut from circles, the outer size for mine is approx. 5” dia. The inner circle approx. 3.5” dia. 
    Add glue to wreath shape and place down onto grey trellis pattern paper from the Floral Muse 6x6 pack.  When dry cut out, you may find a craft knife easier for the inner circle.  Sand the cut edges (I use a nail file) and then ink all around edges inside and out with a light brown ink.
    Using the distressed postage style text stamp form the Floral Muse clear stamp set, stamp randomly all over the wreath using a brown ink.
    Pierce holes into the wreath, 2 at the top for hanging ribbon and 6 evenly spaced around the wreath. Cut lengths of pink organza ribbon (Floral Muse) 6 smaller lengths and 1 larger length for hanging.  Using the same stamp and brown ink stamp onto the ribbon randomly.  When dry, tie each ribbon through holes and trim, then add the longer hanging ribbon securing knots on back with dab of glue.
    Using the First Edition Foliage die set and green card from the FE Textured card pad, die cut 4 leafy ferns.  Stamp randomly using the same text stamp and brown ink as before. Ink edges with light brown ink.
    Take 2 papers from the Floral Muse 6x6 and 1 piece of pink card from the FE textured card pad and cut 3 circles.  Using the same text stamp and brown ink as before, stamp randomly all over the front and back of each circle.  The cut into the circles to create spirals.  Ink cut edges with light brown ink and then rolls spirals to create roses, securing with glue at the bottom.
    Arrange die cut leaves and roses on wreath and when happy with position, glue into place.
    For Sentiment, use brown ink to stamp ‘Made with Love’ onto a pattern paper from the Floral Muse 6x6 pack and cut out.  Glue to a strip of Dovecraft Acetate and then glue acetate to back of wreath at ends so that sentiment is positioned in centre, trim acetate.
    Next stamp 4 butterflies from the Floral Muse clear stamps with brown ink, stamp 2 onto floral muse paper and 2 onto blue textured card from the FE pad.  Cut out and ink edges, bend wings and then arrange onto wreath and glue in place along their bodies only.
    Using the FE Butterflies die set, die cut 2 smaller butterflies from Floral Muse paper, over-stamp with text stamp and ink around with light brown ink.  Bend wings as before and add 1 butterfly to top of sentiment, the smaller one to the rose’s arrangement.
    To finish add Dovecraft 3D pearls effects in Pastel Pink colour to the centres of the roses

Products Used:
Dovecraft Floral Muse 6x6 Paper Pack (FSC)
Dovecraft Floral Muse Clear Stamps - Sentiments
Dovecraft Floral Muse Clear Stamps - Butterfly
First Edition Dies - Butterflies
First Edition Dies - Foliage
Dovecraft A4 Acetate Sheets
Dovecraft Pearl Effects Box – Pastels
First Edition Premium Textured Cardstock – 12x12 Papers

All Products are from +Trimcraft Ltd  and this project also appears in my Trimcraft DT Gallery link here: http://www.trimcraft.co.uk/projects/121439/mini-butterfly-wreath-with-dovecraft-floral-muse-collection


Tuesday, 1 March 2016

Happy Mothers Day Floral Wreath Card


Hello I'm back here to share a Mother’s Day card with you.  This week I’m using a variety of coloured cardstocks from Papermilldirect’s lovely colours range, and teaming it with ‘Coniston Blue’ which is this week’s  +Papermilldirect Special Offer card.  If you're quick you can grab a small box for just £4-40!!  This is for 75-80 A4 sheets of premium quality 300gsm, a bargain!!

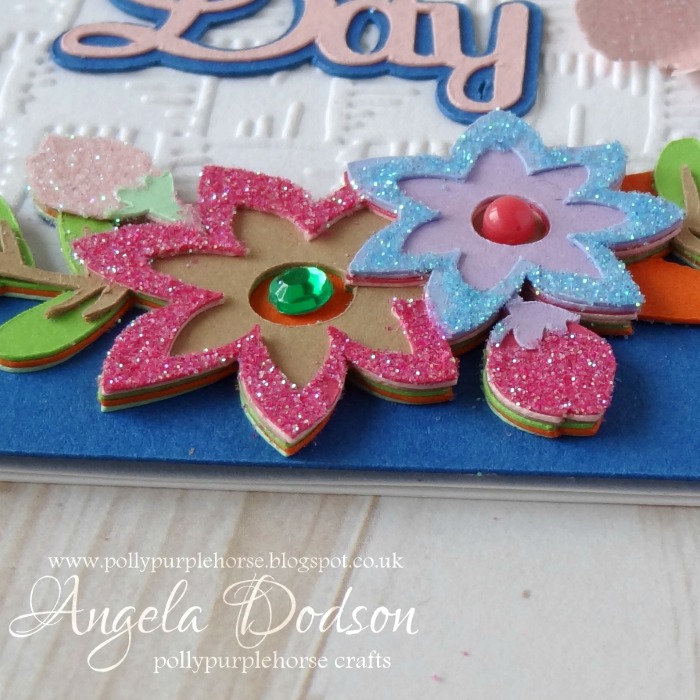
I cut this layered floral design on my Cricut Explore using images free from within the Design Space subscription. (I know they've changed the name to Access now :D ) If you would like to cut it exactly as I have, the link to my DS file is here: https://uk.cricut.com/design/#/canvas/37189424   I have sized it to fit a 6x6 card but you can of course adjust the size to suit your requirements.


If you don’t have a Cricut then why not use the coloured cardstocks as inspiration to die cut or punch a variety of flower shapes and leaves to form a wreath shape onto a card front.  I am using the ‘Coniston Blue’ as the backdrop and shadow for my ‘Happy Mother’s Day’ sentiment, as it is the perfect shade of blue to set off those lovely bright colours.
The flowers and leaves in my design are very dimensional and this is simply by layering up the shapes and gluing them on top of each other, using a wet clear drying glue such as Cosmic Shimmer allows some ‘wriggle time’ to line them up and not leave any glue marks.


For the Plain White Card panel I have embossed it with a Basket Weave effect embossing folder through my Big Shot to add some extra detail and texture, but it could also be left plain.  The card blank is also PMD Plain White card.
To add some extra sparkle I applied some of the Nuvo glitters by first using the Nuvo glue pen on the area to glitter and then sprinkling the glitter onto it from the bottle, when dry you can gently tap the excess off and pop it back into the bottle.   (I used a small clean paintbrush to gently brush away any stray glitter afterwards)


You can add different adhesive gems, pearls or enamel dots to the centres of the flowers to make them ‘pop’ and / or add some die cut butterflies as I have done here to accent the sentiment.
Although I designed this one as a greeting card, it would work well mounted in a little box frame too, perhaps as a Mother’s Day Gift?  You could even use different sentiments in the centre or perhaps a photograph to make it an extra special gift.


Materials Used:
Papermilldirect - Coniston Blue ‘offer card’
Papermilldirect - Plain White card
Papermilldirect Coloured card - Pale Turquoise, Marine Blue, Apple Green, Spring Green, Baby Pink, Raspberry Pink, New Lilac, Buff, Orange
Crafters Companion – Basket Weave Embossing Folder
Nuvo Glue Pen – Tonic Studios
Nuvo Pure Sheen Glitter – Candy Pink, Aqua, & Diamond – Tonic Studios
Adhesive gems, pearls, enamel dots
Double Sided Tape, Cosmic Shimmer Acrylic Glue


Saturday, 27 February 2016

Vintage Rose 'with Love' card - Moroccan Spice & Gold Foiling


Hello, welcome to another Blog post and time to share another of my Trimcraft DT makes with you.  I do love those vibrant warm colours in the First Edition Moroccan Spice papers and thought the orange would look great for a vintage style with some gold foiling using the First Edition Foiling products.  


I rolled a simple rose from the papers to accent the sentiment.  The edges of the papers have been distressed and inked with an orange ink to complement the papers and gold colours.

Step By Step:
  1. From the Moroccan Spice 8x8” paper pad cut green paper to measure 6 ¾” x 4 ¾” and orange textured paper to measure 6 3/8” x 4 3/8”.  Distress edges with scissors and then ink around with orange ink.  Mat orange paper onto green paper centrally using double sided tape to adhere.
    From the Moroccan Spice 6x6” paper pad cut green paper to measure 5” x 3” and green pattern paper to measure 4 ½” x 2 ½”.  Distress edges and ink as before, mat smaller piece onto larger piece with double sided tape.
  2. Using a 5 x7” Kraft card blank with the fold across the top, adhere larger mat centrally onto card front.  Add smaller mat at an angle.
  3. To create rose, cut a circle of orange double sided paper (Moroccan Spice) and cut into it to create a spiral, then roll up starting from outside edge.  Secure rose with glue at the bottom and press into place to dry.
  4. Using the FE Foliage die set, die cut 2 large leaves from the green paper, pass through your die cutter again with a rubber mat to emboss the veins.
    Add gold foiling to leaves and rose by applying the FE Foil Transfer Glue and leave to become tacky, then place the foil on top and press and rub firmly before lifting the foil. 
  5. To create the foiled sentiment, die cut ‘With Love’ (Modern Sentiments set) using the FE Foil Applicator Foam.  (I find it easier to peel the backing and adhere the foam to white card before die cutting).  Remove paper from die cut and place gold foil on top, pressing down as before to transfer the foil onto the sentiment.
  6. Cut an oval of orange card (I used the oval waste from the frame in the Belle & Boo die set) distress and ink edges of oval before adhering to panel on card front.  Glue foiled sentiment on top.
    Glue rose and 2 leaves to top left of panel, bending and shaping the leaves first before gluing in position.
  7. To finish I die cut a flourish from the FE Doily die set and cut it in half, inking in orange ink and then tucking 1 piece to top left of panel and 1 piece to bottom right, gluing in place before adding 2mall orange adhesive gems to flourishes and 1 larger adhesive pearl to centre of rose.(Dovecraft).


    Products Used:
    First Edition 8x8 FSC Paper Pad Moroccan Spice
    First Edition 6x6 FSC Paper Pad Moroccan Spice
    First Edition Dies - Foliage
    First Edition Dies - Sentiments Modern
    First Edition Dies - Doily
    First Edition Foil – Gold
    First Edition Foil – Foam
    First Edition Foil Glue
    Dovecraft Kraft 5"x7" Cards & Envelopes

    All products used are from +Trimcraft Ltd and this project also appears in my Trimcraft Design Team Gallery link here: http://www.trimcraft.co.uk/projects/121434/vintage-rose-card-with-first-edition-moroccan-spice-papers-and-gold-foiling


Wednesday, 24 February 2016

You make my Heart so very Happy


Hello I'm back to share another make with you, this one is a DT project for Trimcraft.  I’m in love with these gorgeous First Edition Love Story papers from +Trimcraft Ltd .  

The canvas and wood effect papers and a theme of love gave me the idea to create a little Birdhouse shaped card.  This could be a Valentines or Anniversary make or to send to someone ‘just because’.  

I created the card shape using my Cricut Explore but you could easily cut a simple house shape by drawing in pencil onto a card blank and cutting with scissors or craft knife and decorating as you wish.

Step By Step:
  1. I designed and cut the birdhouse and 2 birds on my Cricut Explore using Design Space subscription, I can share my DS link with you here: https://uk.cricut.com/design/#/canvas/36107737  Which will give you access to my design file so you can cut everything as I have done, all is sized ready for you to load the mats and just press ‘go’.
  2. Using Dovecraft A4 Kraft Card I cut 2 identical pieces to form the front and back of my card base. (Scoring a short way down the back piece and folding before adding glue above the score line creates the join, you may prefer to do this after the front papers are on ).
  3. I cut an extra front card piece from FE Love Story checked pattern canvas effect paper and adhered to Kraft card front.  Inking edges with red ink and then black ink to add definition.  I then cut the smaller front panel from Love Story Wood effect paper inking the edges as before and adhering to card front
  4. I cut 2 roof section parts from brown arrow patterned paper in the Love Story pad, inked with red and black inks as before and then added to card front using 3D foam pads to layer up both sections to create height.
  5. The heart sentiment ‘You Make my heart so very happy’ was cut out of the Love Story papers, inked around as before and then edges in Dovecraft ‘crystal’ glitter glue.  When dry it was glued to card front towards the top of the birdhouse.
  6. I cut 2 birds from heart patterned paper.  Each bird consists of 2 layers and I inked around all the parts using red ink and black ink as before, adding extra black to colour the beaks and legs. This time also outlining with Dovecraft glitter glue in ‘Crystal’ to add extra sparkle.  When dry I shaped the pieces in my fingers and layered up using 3D foam pads.  I added 1 bird (flying) to top of birdhouse allowing wings & beak to overlap, and the other bird (with legs) to bottom RH side of birdhouse allowing the tail to overlap.
  7. Using the FE Foliage Die set I cut 2 leafy fern pieces from floral pattern Love Story paper and die cut 3 small flowers using the FE Flowers die set.  Inked all pieces with red and black inks as before and shaping in my fingers to give some texture / movement before adhering to card front at bottom LH side.
  8. To finish I coloured 2 small clear gems with FE black marker for the birds eyes and added clear adhesive gems to centres of flowers, heart sentiment, and to decorate roof section of the birdhouse.
Products Used:
All materials are from +Trimcraft Ltd and this project also appears in my Trimcraft Design Team Gallery Link here:http://www.trimcraft.co.uk/projects/121410/you-make-my-heart-so-very-happy-first-edition-love-story-papers

Monday, 22 February 2016

Double Partial Die Cutting Technique - step by step


Hello it’s Monday and I'm back to share a new make and step-by-step tutorial with you.  This week the Papermilldirect Design Team are looking at the ‘Partial Die Cutting Technique’ and I thought it would be nice to try something I haven’t done before, which is a Double partial die cut, so we are learning together this week! But first news of this week's special offer - a small box of Spring themed card (Daffodil Yellow,Spring Green,Plain White) can be yours for just £6-60 that's 45% off!! Link HERE:


  1. To start off I cut a panel of +Papermilldirect White Linen card approx. 4.5” x 5.6” and drew a light pencil line across the front at approx. 3” down.  Using the 2nd smallest of the Torn Edge dies I positioned the die so that a portion was showing beneath the pencil line and held in place with washi tape as shown.
  2. Place the card & die onto one of your cutting plates and carefully line up the other cutting plate on top so that the edge of the top plate lines up with the pencil line, so that it will not cut through the section below the pencil mark.
  3. Run through your die cutter, remove the washi tape and you should now have a partial cut.  (You can erase the pencil line in the aperture if you wish, but leave the line either side to help with the next stage)
  1. Because I am going to be using the matching stamp for my next cut, I found it easier to stamp the image first.  So using the Pearlescent Lavender ink I stamped the 2nd largest butterfly from the stamp set, positioning it at an angle so that 1 wing will stamp below the pencil line but the butterfly will still fit into the aperture.
  2. Next line up the matching butterfly die, if using a die like mine that you cannot see through then it is easier to cut a mask from scrap paper and use that to line up.  Hold die in place with washi tape.  (If you are not using a stamp then skip the stamp step)
  3. Line up your cutting plates as before, positioning the top plate to line up with the pencil mark so that nothing below the mark will cut.
  1. Run through the die cutter and remove the washi tape and waste card. To remove the landlocked bits at the bottom then line up a ruler against the pencil marks and use a craft knife to remove the small bits.
  2. To create a coloured background, cut a piece of card (I'm using a scrap of PMD felt embossed but any texture will work) slightly larger than the aperture and apply Orange and Magenta pan pastels blending to create a slight Ombre effect.  (Use distress inks or a scrap of pattern paper if you prefer). 
  3. Cut a strip of white linen card approx. 1” wide and colour the same blending the orange and magenta.  (You can seal the pan pastels if you wish using a quick light spray of hairspray) Stamp the sentiment ‘You Make Me Happy’ centrally onto the strip using black Archival ink.  Using double sided tape attach sentiment strip across front panel below aperture cutout and trim edges flush.
  1. Create a card blank by scoring and folding an A4 sheet of Papermilldirect White Linen card and trimming down to give a 5” x 7” card blank.  Using Double sided tape attach the coloured panel to card front positioning so it t will show through the aperture panel. 
  2. Attach front panel using 3D foam pads, I used a double thickness to give more height and depth to the cut out.
  3. To finish add some enamel dots in lilac and pink to the butterfly body and around sentiment.
Have you experimented with the Partial Die-Cutting Technique, perhaps you’ve tried the double cut version too?  There are lots of possibilities for teaming your different dies to create interesting apertures and focal points not only in the centre of your cards but the inside folds and outside edges too.

Materials Used:
White Linen Card – Papermilldirect
White Felt Embossed Card – Papermilldirect
Torn Edge Nesting Dies – First Edition
Flight of Fancy Dies – Clearly Besotted
Flight of Fancy Stamps – Clearly Besotted
Pearlescent Lavender Brilliance Dewdrop ink, Black Archival Ink
Orange Pan Pastel, Magenta Pan Pastel
Double Sided Tape, 3D Foam Pads
Fun Fair Adhesive Enamel Dots