Friday, 25 March 2016

Easter Treats card


Hello!! Today I’m sharing an Easter card created with the pretty Flower Girl papers within the Simply Creative range from +Trimcraft Ltd .  No Easter is complete without a chocolate bunny amongst all those pretty eggs and so I have used the cute Bunny from the First Edition Animal die set for my chocolate bunny character.

 Step By Step:
  1. Using a Dovecraft 6x6 white square card blank with fold across the top, cover front with the checked paper from the Flower Girl 6x6 pad. Outline the paper with Dovecraft glitter glue in ‘Crystal’.
  2. From white card, cut a large egg or oval shape to fit the front of the card height wise and cover with the flower strip paper from the pad.  (Draw a simple shape or use a template, there is a downloadable Trimcraft pattern on the home page which you can resize for the egg shapes). 
  3. Outline egg with glitter glue and allow to dry.  Attach a small doily from the La De Dah range to the centre of the egg using a dab of glue or tape in the centre. 
  4. Take the sentiment set (2 pieces) from the Me To You Easter decoupage pad and adhere the bottom layer centrally onto doily. Take Dovecraft pink gingham ribbon and adhere across the panel, securing ends on the back with tape.  Using 3D foam pads attach the top part of the sentiment ‘Easter Treats’ on top of the ribbon and outline with glitter glue.  Add a length of gingham ribbon across top of egg securing ends on reverse. Take another piece of ribbon and tie a bow, trim ends and then glue in place at top right of top ribbon.
  5. Using the FE Animal themed set, cut bunny from FE Textured card in brown.  Add a tiny piece of pink to back the nose and pop some glitter glue on top.  Add chocolate bunny to card front using a double height of 3D foam pads.
  6. Cut a medium sized egg shape from Flower Girl lilac striped paper, outline with glitter glue and add Dovecraft white ric rac across centre using glue to adhere.  Use 3D foam pads to adhere egg to bottom left opposite bunny.
  7. Cut 5 small egg shapes from different pattern papers within the Flower Girl 6x6 pad, again outline with glitter glue in ‘crystal’ and attach to card front at angles using 3D foam pads.
    To finish add a little clear adhesive gem to bunny’s eye and a pink bow from Floral Muse to decorate.

Products Used:
Simply Creative FSC Paper Pad 6x6 Flower Girl
Dovecraft White 6"x6" cards & envelopes
La De Dah Die cut Doily Shapes
Glitter Glue Box - Pastels
First Edition Dies - Animal
Dovecraft Ribbon Box With Love
Dovecraft Floral Muse Mini Ribbon Bows
First Edition Premium Textured Cardstock – 12x12 Papers


Monday, 21 March 2016

Happy, Happy, Happy...


Hello, today I'd like to share this easy card make with you.  I really like this silhouette of a girl with butterflies in her hair which is a digi stamp image from LC Designs (all links at end of post)  so it’s an easy print out to give a perfect image every time.  I have teamed it with some of my favourite Papermilldirect coloured cardstocks to create this simple card that would also work as a display piece too.  This is my first time working with this image and I am also entering this card into the Little Claire Challenge #67 - Anything Goes! , the House of Cards March Challenge: Silhouette and the Ribbon Girl Any Image Challenge
I started by scoring and folding an A4 sheet of PMD white linen card in half and then trimming down to create a regular 5” x 7” card base.
I printed off the digi image onto PMD white linen card too, the linen texture adds a lovely canvas style to digi stamps.  My printed image panel measures approx. 3 ½” wide x 2 ¾” high and I matted it onto a slightly larger piece of PMD black card to give a small border to frame it.
Using a dots patterned folder I embossed a piece of PMD Raspberry Pink card approx. 4 ½” wide x 3 ¾” high and adhered to top of the card base using double sided tape.
 
Mounting the matted digi image panel on top of the embossed panel using 3D foam pads to give a little height.

Using the ‘happy’ die I cut the word 3 times: 1 from PMD black card, 1 from PMD purple grape and 1 from PMD raspberry pink. Gluing the words into position under the image at the right hand side, graduating the colours, black at the top, then purple, then pink at the bottom.
I cut 2 larger butterfly shapes from the FE Butterfly die set, 1 from PMD new lilac and 1 from PMD raspberry pink.  I also cut some tiny butterflies for any extra embellishment.
Using clear drying glue I glued the pink butterfly flat to the card front, to left of happy words.  The lilac butterfly was layered on top with just glue along the body part so the wings could be bent up to give dimension.
I decided to just add one of the tiny card butterflies to the image panel, I chose the purple butterfly and added glue just to the body part so the wings could be bent up.  I wanted the girl image to look as though she was following the  butterfly!  A little detail sparkle was added to the tiny butterfly and to the body of the larger butterfly to highlight them.

I chose to use the ‘happy’ word 3 times as I really liked how it looked stacked up, but you could of course use ‘happy’ and ‘birthday’ or add ‘birthday’ to the inside if you wish to make as a birthday card.  I’ve kept the design simple as it worked well with the black & white image but can easily be further embellished with pearls, gems, extra butterflies, etc.

Challenges Entered:
Materials Used:
White Linen Card - Papermilldirect
Black, Raspberry Pink, Purple Grape, New Lilac coloured card - Papermilldirect
Meadow Girl digi image - LC Designs (Little Claires)
Swiss Dots embossing folder - Cuttlebug (Provocraft)
Butterfly die set - First Edition
Happy word die - Clearly Besotted
White Shimmer Detail Sparkle - Imagination Crafts
Cosmic Shimmer clear drying glue, Double Sided tape, 3D foam pads


Friday, 18 March 2016

Easter Chick Gift Box


Hello, Easter is approaching fast and the Papermilldirect DT are working on Easter Projects.   This week I’ve chosen to work with a pattern that is suitable for all crafters to use.  This file includes PDF versions of the patterns so that you can print out a template and cut by hand if you prefer (Cutting files in different formats are also included for those with cutting machines).  The file set is called ‘Trio of Chicks’ (all links at end of post) and has a card, tag and matching box and of course works beautifully with the Papermilldirect cards whether you are machine cutting or using scissors.

I cut the 2 main box pieces and 2 egg shell tops from Papermilldirect White Linen card to give a lovely texture to the egg.  The chick has been cut from Papermilldirect coloured cardstocks in Daffodil Yellow and Mandarin Orange, with black card for the eyes (or use googly eyes if you prefer).
The egg themed box is really easy to assemble, score along the fold lines and attach the 2 pieces together at the tabs using double sided tape or glue.

You can leave the chick as plain card or add some texture as I have done here by using embossing folders for the chick’s body, wings and feet.  Applying distress inks really helps to define the shapes and highlight the embossing too.

The egg shell tops are glued in place to the top of the chicks head, use one for the front and one for the back, lining them up at a jaunty angle.  Use 3D foam pads to attach the chick body inside the box, being careful to only apply foam at the bottom section, so it won’t show over the box.  Add the beak using 3D foam pads.
Next attach the orange feet to the front of the box, again using 3D foam pads to give depth, so they look to be coming out from the egg.  Attach the wings in place on the chick’s body and add the eyes to complete the face.  I decided to use googly eyes to add extra character.


Your little Easter gift box is now ready to be filled with Easter treats.  I added some coloured tissue papers to nestle some chocolate eggs upon. I think this would make a lovely project to make with your children too, especially as the shapes are easy to cut out with scissors and it's easy to assemble, they could have lots of fun decorating and filling them with treats.

Materials List:
White Linen Card – Papermilldirect
Daffodill Yellow Card – Papermilldirect
Mandarin Orange Card – Papemilldirect
Black Card - Papermilldirect
Trio of Chicks – cutting files incl. PDF – My Scrap Chick
Embossing Folders - Swirls, & Dots - Cuttlebug
Distress Inks - Spiced Marmalade, Tea Dye, Black Soot
Googly Eyes, Coloured Tissue, Chocolate Eggs
Double Sided Tape, Cosmic Shimmer Clear Glue, 3D foam pads


Thursday, 17 March 2016

Happy St Patrick's Day!!


Waving Hello and wishing you all a very happy St Patrick's Day with this easy card make.   I’ve designed this one so that it can also be used as a simple ‘Good Luck’ card as it bears only the word ‘Lucky’.  If you look carefully you will see it has 6 regular 3 leaf clovers and a special ‘Lucky’ 4 leaf clover to give a magic number totalling 7.  So it’s a Lucky 7 card too, so that’s plenty of Good Luck to send to a friend.

 Step By Step:
  1. I took a Dovecraft 6x6 white card blank to use as my base card with the fold running along the top.  From the 6x6 My Guy paper pad I cut a square of triangle geo patterned paper approx. 5 5/8” square and adhered to card base using double sided tape.
  2. To create the mat panel, I cut Dovecraft White Laid card to measure approx. 4 7/8” square and matted it onto a square of First Edition textured cardstock in green that measured 5 1/8”, to give a small border all around.
  3. I cut the clover shapes using my Cricut Explore (My DS link is here if you wish to use it: https://uk.cricut.com/design/#/canvas/37629120 )  but these are simple shapes and easy to draw a 3 leaf and a 4 leaf in pencil onto card and use that as your template to draw around. (The leaves look a little like heart shapes so perhaps use a small heart to help you). I cut the 3 leaf clovers from My Guy papers, 2 in orange, 2 in polka dot, and 2 in the black, grey, yellow pattern papers from the pad. 
  4. Using a Light Grey First Edition marker pen outline around the inside edge of the leaves to give a subtle definition. Then glue 3 three leaf clovers across the top of the white panel and 3 across the bottom of the white panel.
  5. Using the FE Alphabet set, diecut letters to spell ‘LUCKY’ from black card and glue across centre of white panel, leaving space at right for a clover.
  6. Cut the 4 leaf clover from FE textured card in green.  Using Dovecraft glitter glue in Gold, outline the 4 leaf clover and also outline around the green card panel.  When glitter glue is dry mount main panel to card front at an angle using 3D foam pads.
  7. To finish, add a green adhesive gem to 4 leaf clover and attach to card front using a 3D foam pad to give height, so it looks like you can just pluck the clover from the card.

    Products Used:
    Simply Creative FSC Paper Pad 6x6 My Guy
    Dovecraft White 6"x6" cards & envelopes
    First Edition Premium Textured Cardstock – 12x12 Papers
    Dovecraft A4 White Laid Card
    First Edition Dies - Varsity Alphabet
    First Edition Twin Markers - Greys
    Dovecraft Christmas Basics Glitter Glues - Gold and Silver
    Dovecraft Christmas Basics Gems - Reds and Greens

    All products are from +Trimcraft Ltd  and this project also appears in my Trimcraft DT Gallery link here: http://www.trimcraft.co.uk/projects/121715/lucky-clover-or-st-patricks-day-card-with-simply-creative-my-guy-papers


Thursday, 10 March 2016

Mini Easter Cards - Simple Batch Making


Hello, I'm back to share a little Easter card making idea with you.  This week I'm using the ever popular White Linen effect cardstock,  using a textured card such as this always lends an elegant and interesting finish to your designs. 

I decided to make some mini Easter Cards using the white linen, some dies, and adding just a small piece of patterned paper and a greeting.  For this design I was able to get 2 cards from 1 A4 sheet of White Linen by cutting it down to create two 4x4 cards with the offcut being used to cut the 2 panels for the front.
If you’ve made Easter cards before then you are likely to have an egg or oval set of dies to cut the egg shape.  I have also used a fancy square die for the raised panel but you could use any die you have or just cut a plain square if your prefer.  This design allows you to easily batch make by cutting all your top panels in one batch, preparing your card blanks in advance and just having a stash of small squares of pattern paper from leftovers or scraps.

Step by Step:
I started by cutting my A4 sheets of White Linen card to measure 8 x 16 each (setting those pieces aside for card blanks later).  I used the waste to die-cut my panels using a shaped die just over 3” square.  I stamped a small greeting of ‘Happy Easter’ using black ink directly across the bottom of the die cut shape.  (You could use peel offs or handwrite if you prefer).


Taking a small (2” high) egg or oval shaped die, position centrally and just above sentiment, use a small piece of washi tape to hold in place to die cut. Remove the cut out egg shape and washi tape (save cut out for other makes) to reveal egg shaped aperture. 
Next take scraps of pattern paper and cut into squares to fit behind the aperture.
Prepare your card blanks by cutting the 8x16 pieces in 2, then score and fold to create 4x4 card blanks with fold to side.
 
Glue the pattern paper squares to card front for quickness (you can use d/s tape if you prefer).
Add 3D foam pads to back of aperture panels and position panels centrally over patterned papers.  You now have a batch of handmade, hand stamped Modern Easter cards.
This is a great way to use up your scraps of pretty paper or perhaps you have some inked or stamped master-board pieces to use up?  You can make these mini cards in larger sizes if you prefer or why not embellish with sequins or bows

Materials Used:
White Linen Card – Special Offer - Papermilldirect
Nellies Multi Frames #MFD012 Square
Xcut Dielicious Nesting Dies - Easter Eggs
Jet Black Ranger Archival Ink Pad
Sweet Little Sentiments stamp set - Clearly Besotted
Cosmic Shimmer Glue, 3D Foam Pads
Scraps of patterned paper


Wednesday, 2 March 2016

Mini Butterfly Wreath with Floral Muse Collection

Hello, today I'm sharing one of my +Trimcraft Ltd DT makes with you.  The Dovecraft Floral Muse collection is sooooo pretty I didn’t know where to start first!!  It’s been a little while since I made a hanging wreath and I had originally intended to make this to go onto a card front but I really liked it as a strand alone (or rather hanging) wreath and with the acetate strip it allowed the sentiment to ‘float’.

Step By Step:
    Make a little cardboard wreath shape (or use a ready-made one if you prefer).  A simple wreath shape can be cut from circles, the outer size for mine is approx. 5” dia. The inner circle approx. 3.5” dia. 
    Add glue to wreath shape and place down onto grey trellis pattern paper from the Floral Muse 6x6 pack.  When dry cut out, you may find a craft knife easier for the inner circle.  Sand the cut edges (I use a nail file) and then ink all around edges inside and out with a light brown ink.
    Using the distressed postage style text stamp form the Floral Muse clear stamp set, stamp randomly all over the wreath using a brown ink.
    Pierce holes into the wreath, 2 at the top for hanging ribbon and 6 evenly spaced around the wreath. Cut lengths of pink organza ribbon (Floral Muse) 6 smaller lengths and 1 larger length for hanging.  Using the same stamp and brown ink stamp onto the ribbon randomly.  When dry, tie each ribbon through holes and trim, then add the longer hanging ribbon securing knots on back with dab of glue.
    Using the First Edition Foliage die set and green card from the FE Textured card pad, die cut 4 leafy ferns.  Stamp randomly using the same text stamp and brown ink as before. Ink edges with light brown ink.
    Take 2 papers from the Floral Muse 6x6 and 1 piece of pink card from the FE textured card pad and cut 3 circles.  Using the same text stamp and brown ink as before, stamp randomly all over the front and back of each circle.  The cut into the circles to create spirals.  Ink cut edges with light brown ink and then rolls spirals to create roses, securing with glue at the bottom.
    Arrange die cut leaves and roses on wreath and when happy with position, glue into place.
    For Sentiment, use brown ink to stamp ‘Made with Love’ onto a pattern paper from the Floral Muse 6x6 pack and cut out.  Glue to a strip of Dovecraft Acetate and then glue acetate to back of wreath at ends so that sentiment is positioned in centre, trim acetate.
    Next stamp 4 butterflies from the Floral Muse clear stamps with brown ink, stamp 2 onto floral muse paper and 2 onto blue textured card from the FE pad.  Cut out and ink edges, bend wings and then arrange onto wreath and glue in place along their bodies only.
    Using the FE Butterflies die set, die cut 2 smaller butterflies from Floral Muse paper, over-stamp with text stamp and ink around with light brown ink.  Bend wings as before and add 1 butterfly to top of sentiment, the smaller one to the rose’s arrangement.
    To finish add Dovecraft 3D pearls effects in Pastel Pink colour to the centres of the roses

Products Used:
Dovecraft Floral Muse 6x6 Paper Pack (FSC)
Dovecraft Floral Muse Clear Stamps - Sentiments
Dovecraft Floral Muse Clear Stamps - Butterfly
First Edition Dies - Butterflies
First Edition Dies - Foliage
Dovecraft A4 Acetate Sheets
Dovecraft Pearl Effects Box – Pastels
First Edition Premium Textured Cardstock – 12x12 Papers

All Products are from +Trimcraft Ltd  and this project also appears in my Trimcraft DT Gallery link here: http://www.trimcraft.co.uk/projects/121439/mini-butterfly-wreath-with-dovecraft-floral-muse-collection


Tuesday, 1 March 2016

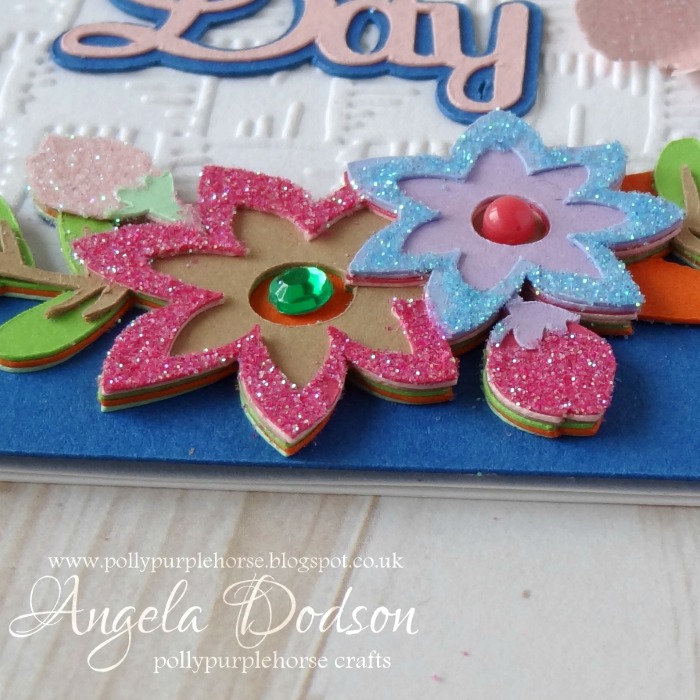
Happy Mothers Day Floral Wreath Card


Hello I'm back here to share a Mother’s Day card with you.  This week I’m using a variety of coloured cardstocks from Papermilldirect’s lovely colours range, and teaming it with ‘Coniston Blue’ which is this week’s  +Papermilldirect Special Offer card.  If you're quick you can grab a small box for just £4-40!!  This is for 75-80 A4 sheets of premium quality 300gsm, a bargain!!

I cut this layered floral design on my Cricut Explore using images free from within the Design Space subscription. (I know they've changed the name to Access now :D ) If you would like to cut it exactly as I have, the link to my DS file is here: https://uk.cricut.com/design/#/canvas/37189424   I have sized it to fit a 6x6 card but you can of course adjust the size to suit your requirements.


If you don’t have a Cricut then why not use the coloured cardstocks as inspiration to die cut or punch a variety of flower shapes and leaves to form a wreath shape onto a card front.  I am using the ‘Coniston Blue’ as the backdrop and shadow for my ‘Happy Mother’s Day’ sentiment, as it is the perfect shade of blue to set off those lovely bright colours.
The flowers and leaves in my design are very dimensional and this is simply by layering up the shapes and gluing them on top of each other, using a wet clear drying glue such as Cosmic Shimmer allows some ‘wriggle time’ to line them up and not leave any glue marks.


For the Plain White Card panel I have embossed it with a Basket Weave effect embossing folder through my Big Shot to add some extra detail and texture, but it could also be left plain.  The card blank is also PMD Plain White card.
To add some extra sparkle I applied some of the Nuvo glitters by first using the Nuvo glue pen on the area to glitter and then sprinkling the glitter onto it from the bottle, when dry you can gently tap the excess off and pop it back into the bottle.   (I used a small clean paintbrush to gently brush away any stray glitter afterwards)


You can add different adhesive gems, pearls or enamel dots to the centres of the flowers to make them ‘pop’ and / or add some die cut butterflies as I have done here to accent the sentiment.
Although I designed this one as a greeting card, it would work well mounted in a little box frame too, perhaps as a Mother’s Day Gift?  You could even use different sentiments in the centre or perhaps a photograph to make it an extra special gift.


Materials Used:
Papermilldirect - Coniston Blue ‘offer card’
Papermilldirect - Plain White card
Papermilldirect Coloured card - Pale Turquoise, Marine Blue, Apple Green, Spring Green, Baby Pink, Raspberry Pink, New Lilac, Buff, Orange
Crafters Companion – Basket Weave Embossing Folder
Nuvo Glue Pen – Tonic Studios
Nuvo Pure Sheen Glitter – Candy Pink, Aqua, & Diamond – Tonic Studios
Adhesive gems, pearls, enamel dots
Double Sided Tape, Cosmic Shimmer Acrylic Glue