Thursday, 28 July 2016

Happy Days 3D Sandcastle Easel Card - Belle and Boo - Trimcraft DT


Hello, Today I'm sharing this DT Project I created for +Trimcraft Ltd .  Living at the seaside, I was very drawn to the gorgeous Belle & Boo II Ice-cream stamp set, cute nostalgic images of characters and shells teamed with fun Ice Cream stamps too.  Immediately I thought of childhood playing on the sand, using Kraft card to inspire a sandcastle theme.  Using an easel card shape allowed me to create a larger than life sandcastle as the backdrop for Belle & Boo.  I thought the striped ribbon reminded me of the sea and the dotty papers of sand. Using acetate to attach the characters gave a more 3D depth to the scene and also they wobble when touched giving an extra interactive element.  I absolutely adore this stamp set and looking at this card reminds me of childhood.

 Step By Step:
  1. Take a 5 x7” Kraft card blank, score & fold the front to create an easel card.  Cover inside base and top half of easel card with blue pattern paper from the 6x6 pack, ink edges with light brown ink before adhering to card base using d/s tape.
  2. Create a stopper for your card by cutting kraft card 14cm x 5cm and add a panel of dotty paper (ink edges).  Add stopper platform to bottom of card base using 3D foam pads to raise it up a little. Add ‘Happy Days’ die-cut sentiment from the decoupage pad using 3D foam pads.
  3. I cut the sandcastle shape on my Cricut Explore (My Design Space link is here:  https://uk.cricut.com/design/#/canvas/39524858 if you wish to cut it exactly as mine).
    However you could easily draw a very simple castle shape onto Kraft card and cut out.  My sandcastle is layered with Belle & Boo paper from the 8x8 pack added with 3D foam pads to give depth.  Inking around all the cut edges of the Kraft card and papers with a light brown ink.  Add sandcastle to easel card using combination of d/s tape and glue.
  4. Stamp a variety of shells and starfish from the Ice-cream stamp set using black ink and colour with First Edition Markers.  Add extra highlights with a white pen.  Edge with lightest grey marker and cut out.

    Stamp, colour, and cut out 3 large ice-creams in the same way.
    Stamp Boo the bunny, colour and cut out but leave a section at the bottom uncut.
    Stamp Belle and colour everything but her dress, stamp her again onto the lilac paper from the 6x6 pack, cut the dress parts only out of the lilac paper and paper piece onto the main Belle image. Add extra highlight with a white pen and then cut out same way as for the bunny, leaving an uncut portion at the bottom.
  5. Cut 2 thin strips of Dovecraft acetate to fit behind the characters and make 2 bends in each strip, the space between the bends will determine how far from the card the character will stand away (just over 1cm worked well for me)  Glue an acetate strip to back of each character and then trim if required.  Cover bottom uncut areas of stamped images with dotty pattern paper to resemble sand, shape with scissors and ink around.  Position characters in front of sandcastle and glue other ends to card front, you may need to trim to size before gluing.
  6. Take 2 lengths of blue & white striped ribbon to fit width of card, fishtail the ends and adhere 1 length just under sandcastle where it will also cover where acetate is fixed to card.  Adhere other ribbon length across base of card below the stopper platform.
  7. Take the stamped & coloured shells & starfish and add along the ribbon ‘sea’ behind belle & boo using 3D foam pads.  Glue a small starfish to top of ‘castle’ and glue some shells and a starfish to the stopper platform.
    Add the 3 stamped and coloured ice-creams at jaunty angles across the base ribbon using 3D foam pads and glue.
  8. To finish add blue & white twine across sandcastle, add a little twine bow to each end, then cut little bunting triangles from different pattern papers in the Belle & Boo 6x6 pack, add along the twine using 3D foam pads to create a bunting effect.

Products Used
Belle and Boo II - Clear Stamp – Ice cream
Belle and Boo II 6 x 6 Paper Pack
Belle and Boo II - 8 x 8 FSC Paper Pack
Belle and Boo II - 8 x 8 FSC Decoupage Pad  
Belle and Boo II Half Ribbon Box  
Dovecraft Kraft 5"x7" Cards & Envelopes  
Dovecraft Back to Basics - Blue Skies Twine
Dovecraft A4 Acetate Sheets
Cricut Explore Machine
First Edition Twin Marker - Blender
First Edition Twin Markers - Greys
First Edition Twin Markers - Skin Tones
First Edition Twin Markers - Purples
First Edition Twin Markers - Pinks
First Edition Twin Markers - Browns
First Edition Twin Markers - Yellows


Tuesday, 26 July 2016

You Colour My World - Guest Blogging with Oak House Studio


Hello, I'm back again to share a simple card design step by step created with Oak House Studio products. I was invited to Guest Blog for OHS and this is my 3rd project.  
As the theme this month is Rainbow Colours I thought I would make use of those fabulous Triple Ink pads, there are enough to cover the whole rainbow.  I started by stamping circles onto white card, using the lightest 2 colours in each of the triple colour ink pads.  (The circle stamp I have used is from the Flowers & Circles stamp set but I notice that a brand new set of Circle College stamps has just appeared in the Oak House Studio Shop, perfect timing!!)  I stamped a butterfly onto each circle using the darkest shade from each of the 5 triple ink pads so that each circle was colour coordinated and when dry I used a circle die to cut out which also left a little white border all around.

 The card base is simply an A4 sheet of Papermilldirect White Linen card, one of my favourite card textures, scored, folded and trimmed to approx. 7” x 5” card base.  I chose the sentiment stamp ‘You Colour my world’ stamping the words in black Memento ink along the bottom of the card base, apart from the word ‘Colour’ which was fun to stamp using the triple inkpads to give a rainbow effect to the word.

To coordinate with the black ink and add definition to the circles I cut an extra panel of white linen card approx. 3” x 7” and matted onto black card to give a small black border top and bottom, adding to card front using d/s tape and trimming edges flush with card.

To create extra interest with a raised effect I added 3D foam pads to the back of each circle.
Position circles onto card front panel with butterflies in different positions and circles overlapping slightly, when happy with positioning remove backing from foam pads and press into place. I found it easier to stick down the first circle and the last one before adding the others.

 I’ve tried to keep this card CAS (clean & simple) with lots of white space and confining the colour to circles, it can easily be adapted using other stamps such as flowers in place of the butterflies or by using some of the other sentiments in the stamp set. 
Products used:
Colour Chemistry Triple Inkpads (fruity reds, sunshine yellows, meadow greens, sky blues, berry purples)
Black memento ink
d/s tape, 3D foam pads


Friday, 22 July 2016

Enjoying the Possibilities - Guest Blogging with Oak House Studio

 
Hello again, I have been Guest Blogging over at Oak House Studio this month and have my 2nd project to share with you. I’ve been thinking about Lynnda’s recent post, about her stamps being not just images, but being possibilities.  I looked at the stamps and realised that they are indeed possibilities, possibilities to be creative however you wish.  

So with this newly realised freedom the Dress Form stamp evolved into an imaginative and colourful dress, with butterfly sleeves and a daisy vellum ruffle hem, using lots of different colours for this week’s theme of ‘rainbows’.  
I started by painting a 5” x 7” canvas with Gesso to prime it before applying Colour Chemistry inks in Citrus Lemon, Jubilee Blue and Pumpkin.  Stamping circles and triangles with the Triple Sky Blues inkpad and adding extra highlights by stamping with white acrylic paint and using a baby wipe to blend and distress in places.  


The dress Form and butterfly were stamped in Versamark onto hammered card and then heat embossed using the OHS Gold detail embossing powder.  I used a paintbrush to water colour the dress form using Paris Pink and French Lavender Colour Chemistry inks, with Peacock Green and French Lavender for the butterfly.  I also stamped small circle details to the dress form using Triple Sky Blues inkpad and used a white gel pen to add dots and highlights.
For the ruffle skirt I stamped one of the large Double Daisy stamps onto plain white vellum and heat embossed with the gold detail powder, using a paintbrush to watercolour the petals with orange colour chemistry.  Dress was assembled with glue by cutting butterfly in half and attaching each wing to each shoulder of body form, and the daisy vellum was cut out and added to bottom to create a ruffle skirt.   I shaped the completed dress in my fingers, added a pale pink organza ribbon and heart shaped pin before adding some foam pads behind the body to shape it before attaching to the canvas with glue.
 The ‘Creativity Never Goes Out of Style’ sentiment stamp was stamped onto hammered card, that I’d previously water coloured and over stamped. I  heat embossed with gold and cut it into 3 parts. Inked around edges with blue ink from the Triple Sky Blues and then glued into position onto the canvas.
I had so much fun making this project and felt the sentiment was very apt, the Oak House Studio inks and stamps were a joy to use as always, and I even discovered a new favourite embossing powder along the way.  Lots of future possibilities indeed.  

If you enjoy stamping and playing with inks, or if you fancy having a dabble for the first time, then don't forget to head on over to the Oak House Studio blog where you will find lots of inspiring projects and makes.


Sunday, 17 July 2016

Stampbord Butterfly Card - Guest Blogging with Oak House Studio


Hello, I'm back again with a new post after my little break from blogging. I was so thrilled to be asked by Lynnda at Oak House Studio to contribute to her blog as I do love Oak House Studio products, especially the stamps and Inks.  The theme this month is colours – rainbows and there are certainly plenty of gorgeous vibrant colours to choose from in the Colour Chemistry inks range.  To challenge myself, I thought I would try Stampbord, I’ve seen it, read about it but never tried it before, so today’s project is my very first play. (I would also like to enter this card into the July Make It Take it Challenge over at Craft Stamper Magazine, which is an 'Anything Goes' theme this month)


I started by adding a colour wash of Paris Pink to the surface of the stampbord, then I used a wet brush to flick and tap French Lavender and Pumpkin inks randomly onto the surface, and dragged lines from some of the splashes using a ‘pokey’ tool.


I stamped a butterfly and heat embossed with the fabulous Silver detail powder.  Added extra colour using a paint brush loaded with French lavender ink.   Using the Triple Berry Purples inkpad to stamp ‘Dream’ under the butterfly and some random dottiness with a white pen and the stampbord panel was finished.


 I used both Peacock Green and Jubilee Blue inks to create a colour wash background panel, flicked with water and then used a paper towel to dab and lift colour in places, adding extra texture by stamping with the little dotty textures stamp.  Texture Element stamps were used on 2 corners to ‘frame’ the panel, the Triple Berry Purples inkpad for this and also added ‘Follow Your’ to top corner.  I used a white pen again to highlight some of the stamping in the corner elements. 


To assemble the card, I created a card blank by scoring & folding white leather card, I mounted the background panel onto black card and then to card front.  The stampbord panel has also been matted onto black card before attaching to the card front.  To finish I added a few bright sequins. I love the colours in this card, the way the Peacock Green really makes the Paris Pink ‘pop’, it’s a combination that I find very uplifting.  I think what I really like about Oak House Studio products is that you don’t have to be the world’s best stamper to achieve results you can be happy with, the products are such a great quality that you don’t need the expensive stamping tools to achieve a good stamped impression, the inkpads are juicy and rich and the Colour Chemistry inks give fabulous results. 


Here is what I used:  
From Oakhouse Studio www.oakhousestudio.com
Charming Butterfly
Texture Element Stamps
Textures from updated Double Daisy stamp set
Peacock Green, Jubilee Blue, Paris Pink, French Lavender, Pumpkin
Triple Berry Purples Inkpad
Silver Detail embossing powder
Stampbord
Black Card
White Card
White Leather Embossed Card

Plus:
d/s tape,glue,sequins

Challenges Entered:
July Make It Take it Challenge 'Anything Goes' at Craft Stamper Magazine


Thursday, 16 June 2016

Cute Happy Birthday Card - Step By Step Tutorial


Hello, gosh I just realised how far I am behind with my blogging!!  My first catch-up is to share a simple step-by-step Tutorial for my +Papermilldirect  DT, we were working on the theme of Free Printables or Downloads and I have a cute little birthday chick card to share with you.  The image used is from a set of 4 free download digi images available from Simply Cards & Papercraft magazine (Link at end of post).

Step By Step:

Download and print off your chosen image form the set of 4  (I have chosen the chick with birthday cake) I like to print onto Papermilldirect White Linen cardstock as I love the effect. Use your chosen medium to colour the image, I have used my favourite First Edition craft marker pens and as this is a simple design you can simply block colour for ease or get more detailed with shading if you wish.

Cut out image using a circular nesting die and cut a slightly larger shape from PMD Marine Blue coloured card. Mat image onto blue shape using glue. I have added extra interest by cutting the coloured layer using a scalloped circle die, but you can use a plain circle if your prefer and of course if you don't have a die cutting machine then just cut image into a square panel.

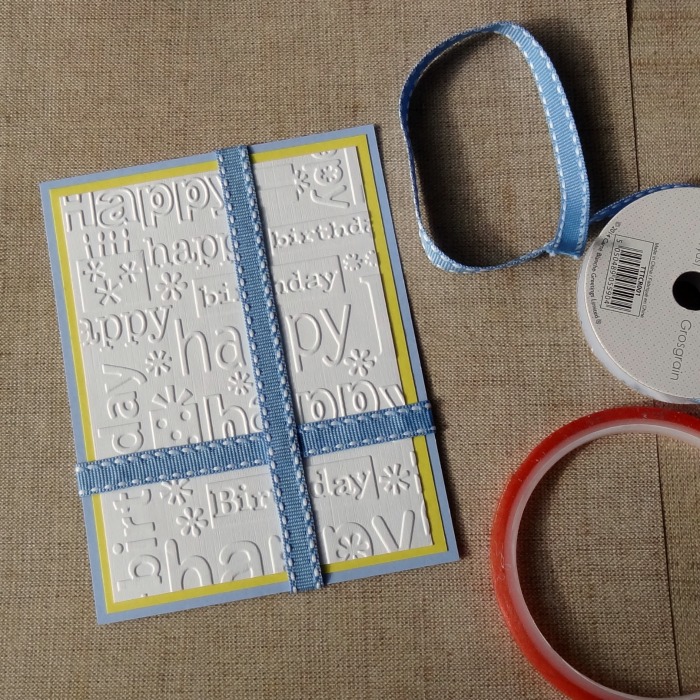
Use a Birthday themed embossing folder to emboss a piece of PMD White Linen Card and trim down to measure approx. 3 3/4" x 5".

Mat embossed panel onto a slightly larger panel of PMD Daffodil Yellow card using double sided tape, and mat again onto a panel of PMD Marine Blue cardstock approx. 4 1/4" x 5 1/2".

 Add blue grosgrain ribbon across matted panel as shown adhereing with permafix tape and securing ends at back of panel.  Cut 2 small pieces of ribbon, fishtail ends and add where ribbons cross.
Score & fold Papermilldirect Plain White card and trim down to create a 4 1/2" x 5 3/4" card base.  Add embossed panel to card front using 3D foam pads.  Add layered image towards bottom of card on top of where the ribbons meet, again using 3D foam pads.


To finish, add glitter glue to icing on the cake and decorate card front using pale blue adhesive gems.

Materials Used:
White Linen Card - Papermilldirect
Marine Blue Card - Papermilldirect
Daffodil Yellow Card - Papermilldirect
Plain White Card - Papermilldirect
Free digi download image - http://www.papercraftmagazines.com/downloads/item/652-simply-cards-papercraft-150-downloads
Dies - Nesting Circle Dies - Sizzix
Embossing Folder - Happy Birthday - Cuttlebug / Provocraft
First Edition Craft Markers - First Edition
Blue Grosgrain Ribbon, Blue Adhesive Gems, Glitter glue
Adhesives: Double Sided Tape, Perma-Fix Tape, 3D Foam Pads.


Wednesday, 25 May 2016

Heartfelt Thanks Card - Step By Step Tutorial


Hello, I'm back again to share another Step by Step card tutorial.  This week the +Papermilldirect Design Team are working on the theme of ‘Pinterest Inspired’ and I’m using this card pinned here as my inspiration.  From this design I decided to choose the trio of embossed shapes on bright backgrounds and bird as elements for my own card.

Step-by-Step:
Using nesting circle dies, cut 3 from Papermilldirect White Linen card and 3 larger ones from papermilldirect coloured cardstocks (Mandarin Orange, Dark Violet and Marine Blue).  Emboss the white linen circles using 3 different effect embossing folders.


Cut a panel of PMD White Linen approx. 4 5/8” x 6 5/8” and stamp sentiment of ‘Heartfelt Thanks’ in bottom Right corner using black Archival ink, mat onto slighter larger panel of PMD Black card.  Glue embossed white circles onto coloured card circles and then arrange onto card front as shown.  When happy with layout, glue top circle to card base and then add the other circles using 3D foam pads, allowing each circle to overlap the previous one.
Take a woodgrain embossing folder and add memento rich cocoa ink to one side of the inside, use to emboss a small piece of PMD Buff cardstock.  Trim into a small branch shape approx. 3” long.  Die cut some small individual leaves from PMD Apple green cardstock.

Die cut a bird shape from PMD Teal and buff card and add to card front using 3D foam pads, positioning across the overlapping circles.  Add 3D foam  pads to back of branch.

Adhere branch onto card front, positioning it so the bird looks to be perching on it.  Add small pieces of 3D foam to the back of each leaf and add to branch in pairs.  A small dab of clear drying glue on the stalks to adhere them under the branch.  Score & Fold and A4 sheet of Papermilldirect plain White cardstock, trim down to create a standard 5” x 7” card base and attach completed panel using a combination of double sided tape and glue.

This is a great way to make use of those scraps of gorgeous bright papermilldrect cardstocks and the embossing adds lots of extra interest, the use of white linen gives a lovely texture and plenty of white space which adds impact to those bright colours.  I felt my design needed a 'sentiment' to finish it off, but you could make this card for all occasions simply by changing the sentiment and / or centre element.

Materials Used:
White Linen Card, Plain White Card – Papermilldirect
Black, Mandarin Orange, Dark Violet, Marine Blue, Teal, Buff, Apple Green coloured card – Papermilldirect
Swiss Dots, Divine Swirls, & Tiny Mosaic Embossing Folders – Cuttlebug
Woodgrain Textures Embossing Folder – Crafters Companion
Circles #65755 Die set – Sizzix
Wildlife Dies set #FEDIE053 – First Edition
Foliage Die Set #FEDIE019 – First Edition
Sentiment Stamp – Clearly Besotted
Inks: Jet Black Archival Inkpad, Rich Cocoa Memento Inkpad
Adhesives: D/S Tape, 3D Foam Pads, Cosmic Shimmer glue


Friday, 13 May 2016

Fathers Day Card - Step By Step Tutorial


Hello, sorry I'm running a little late with another blog update for you.  This week the Papermilldirect Design Team are working on ideas for Father’s Day cards and I have been playing with ink and dies again for this cog themed make.


Step by Step:
Take Papermilldirect Plain White cardstock and apply Vintage Sepia & Juicy Orange Colour Chemistry inks.  I used a foam make up sponge and also a water brush to randomly apply the inks to give a mottled effect.  Leave to dry or use a heat gun
Die cut a variety of cog shapes from the inked card.  Using a spray bottle to spray the cogs with Glorious Gold Colour Chemistry Ink or use a brush if you don’t have a spray.

Ink up another piece of Papermilldirect Plain White card as before, but this time applying Jubilee Blue & Tempting Teal Colour Chemistry Inks.  Dry fully before die-cutting 2 geometric trims and letters to spell out ‘DAD’.  Also cut the ‘DAD’ letters from Papermilldirect Navy Blue card.
Cut a piece of PMD Plain white card approx. 4 ¾” square and mat onto a piece of PMD Navy Blue card approx. 5” square, using double sided tape to adhere.  Glue the 2 blue inked geometric trims to card front using cosmic shimmer clear drying glue.
Work out your desired positioning of the cogs, with the DAD sentiment running across the centre.  When you’re happy with position, glue in place with clear drying glue.  Create a card base by scoring and folding an A4 sheet of PMD Plain White card in half, then trim down to just under 6” square.  With card fold across the top, add the completed panel using 3D foam pads to give height.

I really liked the fresh look of the Papermilldirect Plain White card against the inked elements and thought the cogs and geometric die cuts would be great for a masculine make. The gold spray added a subtle metallic element to the cogs and I really like the mix of blues and oranges together for a modern look.  I haven’t used ‘Father’s Day wording on the front as I wanted this card to be suitable for other occasions such as birthdays too and an extra sentiment could be added inside if required.


Materials Used:
Plain White Card – Papermilldirect
Navy Blue Card – Papermilldirect
Vintage Sepia, Juicy Orange, Jubilee Blue, Tempting Teal, & Glorious Gold – Colour Chemistry Inks – Oak House Studio
Cog Dies #FEDIE009 – First Edition
Alphabet Dies #FEDIE007 – First Edition
Tuck In Geometric Dies #ETL172 – Tattered Lace
Adhesives Used: Cosmic Shimmer glue, D/S Tape, 3D Foam Pads